Diabetic Cotton Cake Recipe

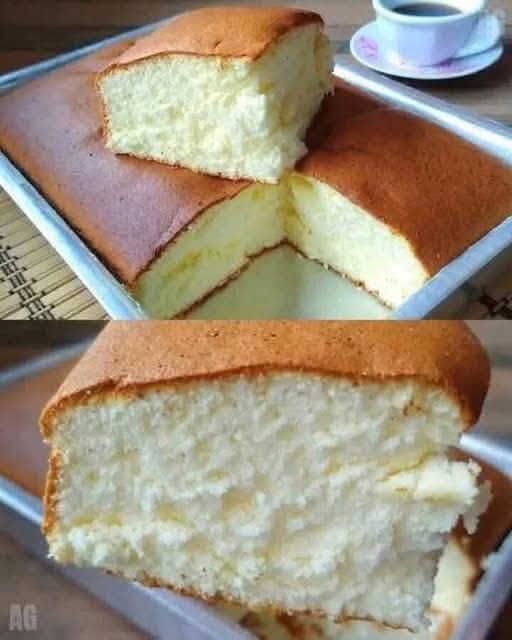
Cotton cake, also known as Japanese cotton cheesecake or cotton sponge cake, is loved for its cloud-like texture and delicate flavor. The good news? You don’t have to give it up just because you’re diabetic. With a few smart ingredient swaps, you can enjoy a soft, fluffy cotton cake that’s low in sugar, lower in carbs, and gentle on blood glucose levels.

This diabetic cotton cake recipe avoids refined sugar and white flour, focuses on balanced ingredients, and keeps the cake light, moist, and satisfying—without guilt.

Why This Cotton Cake Is Diabetic-Friendly

Traditional cotton cakes are loaded with sugar and refined flour, which can spike blood sugar. This version is different:

  • ✔ Uses natural, diabetic-safe sweeteners

  • ✔ Made with low-glycemic flour

  • ✔ High in protein from eggs

  • ✔ No butter overload

  • ✔ Light texture, not dense or heavy

When enjoyed in moderation, this cake can fit into a diabetic-friendly lifestyle.

Ingredients (Serves 8–10)

Dry Ingredients

  • ½ cup almond flour (low-carb, high-fiber)

  • ¼ cup oat flour (use finely ground oats)

  • 1 tablespoon cornstarch (for softness)

  • 1 teaspoon baking powder

  • Pinch of salt

Wet Ingredients

  • 4 large eggs, separated (room temperature)

  • 3 tablespoons erythritol or monk fruit sweetener (powdered)

  • ¼ cup unsweetened almond milk

  • 2 tablespoons olive oil or avocado oil

  • 1 teaspoon vanilla extract

  • ½ teaspoon lemon juice or cream of tartar (for egg whites)

Step-by-Step Instructions

Step 1: Prepare the Pan

Preheat your oven to 160°C (320°F). Line a 7-inch round cake pan with parchment paper. Wrap the outside of the pan with foil to prevent water from seeping in during baking.

Place the cake pan inside a larger baking tray (for the water bath).

Step 2: Mix Dry Ingredients

In a bowl, whisk together:

  • Almond flour

  • Oat flour

  • Cornstarch

  • Baking powder

  • Salt

Sift if possible to ensure an extra-light texture.

Step 3: Prepare Egg Yolk Batter

In another bowl, whisk the egg yolks with:

  • Almond milk

  • Oil

  • Vanilla extract

Add the dry ingredients gradually and mix until smooth. The batter should be silky and lump-free.

Step 4: Whip the Egg Whites

In a clean, dry bowl, beat the egg whites on medium speed until foamy. Add lemon juice or cream of tartar.

Slowly add the powdered sweetener in small amounts. Continue beating until soft peaks form—not stiff. Overbeating will make the cake crack.

Step 5: Fold Gently

Add one-third of the egg whites into the yolk batter and gently mix to lighten it.

Then carefully fold in the remaining egg whites using a spatula. Use slow, sweeping motions to keep the air inside the batter.

This step is key to achieving the cotton-soft texture.

Step 6: Bake in a Water Bath

Pour the batter into the prepared pan and tap gently to remove air bubbles.

Place the pan into the larger tray and pour hot water halfway up the sides.

Bake at 160°C (320°F) for 50–60 minutes.
Turn off the oven and leave the cake inside with the door slightly open for 10–15 minutes to prevent collapse.

Step 7: Cool & Serve

Remove the cake, let it cool completely, then gently remove from the pan.

The cake should be:

  • Light

  • Jiggly

  • Moist

  • Soft like cotton

Nutritional Benefits for Diabetics

  • Low glycemic load compared to regular cake

  • High protein from eggs helps stabilize blood sugar

  • Healthy fats reduce glucose spikes

  • No refined sugar or white flour

One slice (depending on portion size) is much safer than traditional desserts.

Serving Tips (Diabetic-Friendly)

  • Serve with fresh berries (strawberries or blueberries)

  • Add a spoon of unsweetened Greek yogurt

  • Light dusting of powdered erythritol

  • Enjoy as a mid-morning or afternoon snack, not late at night

Storage Tips

  • Store in the refrigerator for up to 3 days

  • Bring to room temperature before eating

  • Do not freeze (texture may change)

Important Note for Diabetics

Even diabetic-friendly desserts should be eaten in moderation. Always monitor your blood sugar response, especially when trying new recipes.

If you have visible veins it means you are

If You Have Visible Veins, It Means You Are… Here’s the Truth Behind What Your Veins Are Telling You

Noticing visible veins on your hands, arms, legs, or even your chest can be surprising—and sometimes worrying. Social media and viral posts often claim that visible veins mean you are unhealthy, aging rapidly, or suffering from a hidden disease. On the flip side, others say visible veins are a sign of strength, fitness, or good circulation. So which is true?

The reality is more balanced and far less alarming. Visible veins can mean many different things depending on your body type, lifestyle, and overall health. Let’s separate myths from facts and explain what visible veins really say about you.

1. You May Have Low Body Fat

One of the most common reasons veins become visible is low subcutaneous fat—the fat that sits just under your skin. Fat acts like insulation, covering veins and making them less noticeable. When body fat levels are lower, veins are closer to the surface and easier to see.

This is why athletes, runners, gym-goers, and physically active people often have prominent veins. In these cases, visible veins are not a problem at all. They simply reflect body composition.

What it means:
✔ Normal
✔ Often linked to fitness
✔ Not dangerous on its own

2. Your Skin May Be Thin or Aging

As we age, our skin naturally becomes thinner and loses collagen and elasticity. This makes veins more noticeable, especially on the hands, arms, and feet. Sun exposure can speed up this process by breaking down collagen in the skin.

Older adults often notice visible veins even without weight loss or major health changes.

What it means:
✔ A normal part of aging
✔ Not usually a medical concern
✔ Sun protection and skincare can help

3. You Could Have Good Blood Circulation

Contrary to popular belief, visible veins are not a sign of poor circulation. In many cases, they indicate that blood is flowing efficiently back to the heart. During exercise or warm weather, veins expand to help regulate body temperature, making them stand out more.

This is why veins often appear more prominent after physical activity or on hot days.

What it means:
✔ Often a sign of healthy circulation
✔ Temporary and normal
✔ More noticeable during heat or exercise

4. Genetics Play a Big Role

Some people are simply born with veins that are closer to the skin’s surface. If your parents or grandparents had visible veins, chances are you will too—regardless of your weight or health habits.

Genetics determine skin thickness, vein size, and how fat is distributed in your body.

What it means:
✔ Inherited trait
✔ Completely normal
✔ Nothing to “fix”

5. Dehydration Can Make Veins Look More Prominent

When you’re dehydrated, your blood volume decreases slightly, which can cause veins to appear more defined. This effect is usually temporary and resolves once you drink enough fluids.

What it means:
✔ Mild dehydration
✔ Easily corrected
✔ Drink more water

6. Hormonal Changes Can Affect Vein Visibility

Hormonal shifts—such as during pregnancy, menopause, or thyroid imbalance—can cause veins to become more noticeable. Estrogen affects blood vessel walls, and changes in hormone levels may lead to vein dilation.

Pregnant women often notice visible veins due to increased blood volume and pressure.

What it means:
✔ Often temporary
✔ Hormone-related
✔ Usually harmless

7. In Some Cases, It Can Signal a Vein Condition

While most visible veins are harmless, bulging, twisted, painful, or swollen veins—especially in the legs—may indicate varicose veins or chronic venous insufficiency. These conditions occur when vein valves weaken and blood pools instead of flowing upward efficiently.

Warning signs to watch for:

  • Pain or aching

  • Swelling

  • Skin discoloration

  • Heaviness in legs

  • Veins that worsen over time

What it means:
⚠ Possible vein issue
⚠ Medical advice recommended
⚠ Treatable with lifestyle changes or medical care

Myths About Visible Veins

Let’s clear up a few common myths:

❌ “Visible veins mean you’re sick”
✔ False. Most of the time, they are completely normal.

❌ “Only men get visible veins”
✔ False. Women get them too—especially with age or fitness.

❌ “Visible veins mean weak blood vessels”
✔ False. Many visible veins are strong and healthy.

When Should You See a Doctor?

You should consult a healthcare professional if visible veins are accompanied by:

  • Pain or burning

  • Sudden swelling

  • Skin ulcers

  • Redness or warmth

  • Rapid changes in appearance

Otherwise, visible veins alone are usually nothing to worry about.

The Bottom Line

If you have visible veins, it doesn’t automatically mean something is wrong with you. In most cases, it means you have low body fat, thin skin, good circulation, genetics at play, or normal age-related changes. Only when veins are painful, swollen, or rapidly changing do they signal a potential health issue.

Your body speaks in many ways—but visible veins are usually just one of its normal, harmless features.

Yellow Crust When Waking Up What Does It Mean

Waking up and noticing a yellow crust on your eyes, lips, nose, or even skin can be surprising—and sometimes worrying. While this symptom is often harmless, it can also be your body’s way of signaling an underlying issue. Understanding what yellow crust is, why it forms overnight, and when to seek medical advice can help you respond appropriately and protect your health.


What Is Yellow Crust?

Yellow crust usually refers to dried secretions that collect on the skin or around body openings while you sleep. These secretions may be made up of mucus, pus, oil, dead skin cells, or tears. During sleep, blinking, swallowing, and wiping stop, allowing fluids to build up and dry into a crust by morning.

The yellow color often suggests the presence of white blood cells, bacteria, or thicker mucus—but this doesn’t always mean something serious is wrong.


Common Areas Where Yellow Crust Appears

  • Eyes (eyelashes or corners)

  • Nose (nostrils)

  • Lips or mouth corners

  • Ears

  • Skin wounds or rashes

Each location can point to different causes.


Yellow Crust Around the Eyes

This is one of the most common complaints.

Possible causes include:

  1. Eye Discharge (Sleep or “Eye Boogers”)
    Mild yellow crust in the morning can be normal. Your eyes naturally produce mucus and tears that dry overnight.

  2. Conjunctivitis (Pink Eye)
    Thick yellow or green crust that seals the eyes shut may indicate bacterial conjunctivitis. It’s often accompanied by redness, itching, swelling, or sensitivity to light.

  3. Blepharitis
    Inflammation of the eyelids can cause yellow crusting at the lash line, especially in the morning.

  4. Dry Eye Syndrome
    Ironically, dry eyes can lead to excess mucus production, forming crust overnight.

When to worry:
If the crust is persistent, painful, causes blurred vision, or is accompanied by redness and swelling, medical evaluation is recommended.


Yellow Crust in the Nose

Yellow crust inside or around the nostrils often relates to nasal mucus.

Common reasons include:

  • Colds or Sinus Infections
    Thick yellow mucus can dry around the nostrils while sleeping.

  • Dry Air
    Heated or air-conditioned rooms dry nasal passages, causing mucus to thicken and crust.

  • Nasal Irritation or Picking
    Small wounds inside the nose may ooze fluid that dries into a yellow crust.

  • Allergies
    Chronic irritation can increase mucus production.

Usually, this is harmless unless accompanied by pain, fever, or facial pressure.


Yellow Crust on Lips or Mouth Corners

This can be uncomfortable and sometimes embarrassing.

Possible causes:

  • Angular Cheilitis
    A common condition where saliva collects in mouth corners, leading to infection and yellow crusting.

  • Dehydration
    Dry lips can crack and ooze fluid overnight.

  • Cold Sores (Herpes Simplex Virus)
    These may ooze clear or yellow fluid before crusting over.

  • Poor Oral Hygiene or Denture Issues

If cracking and crusting persist, antifungal or antibacterial treatment may be needed.


Yellow Crust on the Skin or Wounds

When yellow crust forms on a cut, rash, or sore, it deserves attention.

Potential causes include:

  • Normal Healing
    Clear or slightly yellow fluid (serous fluid) can dry as a crust during healing.

  • Bacterial Infection
    Thick yellow crust, redness, warmth, swelling, or pain may suggest infection (such as impetigo).

  • Eczema or Dermatitis
    Scratching inflamed skin can lead to weeping and crust formation.

Crust that smells bad, spreads, or worsens should be checked by a healthcare provider.


Is Yellow Crust a Sign of Infection?

Not always. Yellow crust alone does not automatically mean infection. However, infection becomes more likely when crusting is accompanied by:

  • Pain or tenderness

  • Swelling or redness

  • Fever

  • Foul odor

  • Thick pus-like discharge

  • Symptoms that worsen instead of improve


What You Can Do at Home

For mild or occasional yellow crust:

  • Gently clean the area with warm water

  • Use a clean, soft cloth—never scrub harshly

  • Practice good hygiene (handwashing, clean bedding)

  • Stay hydrated

  • Use a humidifier if the air is dry

  • Avoid touching or picking at crusted areas

For eye crusting, warm compresses can help loosen debris safely.


When to See a Doctor

Seek medical advice if:

  • Yellow crust persists for more than a few days

  • It keeps returning frequently

  • You experience pain, vision changes, or fever

  • The crust spreads or becomes thick and foul-smelling

  • A wound shows signs of infection

Early evaluation can prevent complications and ensure proper treatment.


Final Thoughts

Yellow crust when waking up is often a normal result of your body’s overnight processes. In many cases, it’s harmless and temporary. However, persistent or worsening crust—especially when paired with other symptoms—can signal infection or inflammation that needs attention.

Listening to your body, maintaining good hygiene, and knowing when to seek help are the keys to staying healthy. If in doubt, it’s always wise to consult a healthcare professional for peace of mind.

Doctors reveal that eating bananas before bed can lead to

Bananas are one of the most popular fruits in the world—affordable, filling, and naturally sweet. But recently, doctors and nutrition experts have been paying closer attention to when you eat bananas, especially before bed. While some people swear by a nighttime banana for better sleep, others report discomfort or unexpected side effects. So what really happens when you eat bananas before going to sleep? The answer depends on your body, your health, and how you eat them.

Let’s explore what doctors reveal about the benefits—and possible downsides—of eating bananas at night.

1. Improved Sleep Quality for Many People

One of the biggest reasons doctors recommend bananas before bed is their sleep-supporting nutrients. Bananas are rich in:

  • Magnesium, which relaxes muscles and calms the nervous system

  • Potassium, which helps prevent nighttime muscle cramps

  • Vitamin B6, which supports the production of melatonin

  • Tryptophan, an amino acid linked to serotonin and melatonin production

Together, these nutrients can help your body relax, lower stress, and prepare for deeper, more restful sleep. Many doctors say that for people who struggle with falling asleep or waking up tired, a small banana 30–60 minutes before bed may help improve sleep quality naturally.

2. Reduced Nighttime Leg Cramps

Doctors often point out that eating bananas before bed can help reduce leg cramps, especially in older adults or people who are low in potassium or magnesium. Nighttime cramps are commonly caused by electrolyte imbalances, dehydration, or muscle fatigue.

A banana provides a gentle dose of electrolytes that may help muscles relax during sleep. This is why some healthcare professionals recommend bananas for people who frequently wake up with calf or foot cramps.

3. Blood Sugar Spikes in Some Individuals

However, doctors also warn that bananas are relatively high in natural sugars. Eating one right before bed may cause a blood sugar spike, especially in people with:

  • Diabetes

  • Prediabetes

  • Insulin resistance

A sudden rise in blood sugar can interfere with sleep, increase nighttime urination, or cause early-morning hunger. Doctors often suggest pairing a banana with protein or healthy fat, such as peanut butter or yogurt, to slow sugar absorption and prevent blood sugar swings.

4. Possible Digestive Discomfort

For some people, eating bananas before bed can lead to bloating, gas, or stomach discomfort. Doctors explain that bananas contain fermentable carbohydrates that may cause digestive issues, particularly in those with sensitive stomachs or IBS.

If you notice heaviness, acid reflux, or discomfort after a nighttime banana, it may be best to eat it earlier in the evening or switch to half a banana instead of a full one.

5. Support for Heart Health During Sleep

Doctors also highlight bananas’ role in heart health, even while you sleep. The potassium in bananas helps regulate blood pressure by balancing sodium levels in the body. Stable blood pressure during sleep is important for heart recovery and overall cardiovascular health.

Eating bananas regularly—not excessively—may support heart rhythm and reduce nighttime blood pressure fluctuations, especially when part of a balanced diet.

6. Weight Gain Myths vs. Reality

Some people worry that eating bananas before bed leads to weight gain. Doctors clarify that bananas alone do not cause weight gain. What matters is total calorie intake and lifestyle.

However, eating large portions late at night—especially alongside sugary or processed foods—can contribute to unwanted weight gain over time. A single medium banana contains about 100 calories, which is generally safe for most people if it fits within daily calorie needs.

7. Better Mood and Reduced Stress

Doctors note that bananas can positively affect mood due to their role in serotonin production. Lower stress levels before bed can mean less anxiety, fewer racing thoughts, and improved sleep onset.

For people who experience nighttime stress or emotional eating, a banana can be a healthier alternative to processed snacks, offering comfort without artificial additives.

8. Who Should Avoid Bananas Before Bed?

Doctors advise caution for certain individuals, including:

  • People with acid reflux (bananas may worsen symptoms for some)

  • Those with severe blood sugar issues

  • Individuals prone to mucus buildup or nighttime congestion

In these cases, eating bananas earlier in the day may be a better option.

Final Verdict from Doctors

Doctors reveal that eating bananas before bed can lead to better sleep, fewer muscle cramps, improved relaxation, and heart support—but only when eaten mindfully. For some people, it may also cause blood sugar spikes or digestive discomfort.

The key is moderation and timing.
If you tolerate bananas well, a small banana or half a banana before bed—ideally paired with protein—can be a healthy nighttime choice. As with all foods, listening to your body is the most important guide.

In short, bananas before bed are neither a miracle cure nor a guaranteed problem—but for many people, they can be a simple, natural way to support a better night’s sleep. 🍌😴

How to clean dirty bed pillows to leave them white and smelling sweet

Bed pillows quietly collect sweat, body oils, dust mites, saliva, and even makeup residue over time. While pillowcases are washed regularly, the pillows themselves are often forgotten. This leads to yellow stains, dullness, and unpleasant odors. The good news? You don’t need expensive products or professional cleaning to restore your pillows. With the right techniques, you can make dirty pillows bright white, fresh, and sweet-smelling again.

Why Pillows Turn Yellow and Smell Bad

Pillows discolor mainly because of sweat and natural body oils. Even if you shower before bed, your body releases moisture at night. Over months or years, this moisture seeps through pillowcases and protectors. Dust mites and bacteria also thrive in warm, damp pillows, contributing to odors and allergies.

Cleaning pillows regularly (every 3–6 months) not only improves appearance but also promotes better sleep and hygiene.

Step 1: Check the Pillow Label First

Before cleaning, always read the care label. Most pillows fall into these categories:

  • Machine-washable: Cotton, polyester, down, and feather pillows

  • Hand-wash only: Memory foam and latex pillows

Never machine-wash memory foam or latex, as water can destroy their structure.

Step 2: The Best Whitening Wash for Machine-Washable Pillows

This method works exceptionally well for yellowed or gray pillows.

What You’ll Need:

  • 1 cup baking soda

  • 1 cup white vinegar

  • ½ cup laundry detergent

  • Hot water (if allowed by the label)

Instructions:

  1. Remove pillowcases and protectors.

  2. Place two pillows in the washing machine to keep it balanced.

  3. Add detergent directly to the drum.

  4. Pour baking soda into the drum.

  5. Start the wash cycle using hot water.

  6. During the rinse cycle, add white vinegar.

Why it works:
Baking soda lifts stains and neutralizes odors, while vinegar kills bacteria and dissolves body oils—leaving pillows white and odor-free.

Step 3: Extra Whitening for Deep Stains

If pillows are heavily stained, add one of the following boosters:

  • Oxygen bleach (safe for most fabrics)

  • ½ cup hydrogen peroxide (natural whitening power)

Avoid chlorine bleach for down or feather pillows—it can damage the filling and cause yellowing over time.

Step 4: Proper Drying Is Essential

Incorrect drying can ruin all your hard work.

Best Drying Tips:

  • Use a dryer on low or medium heat

  • Add 2–3 clean tennis balls or dryer balls to fluff the filling

  • Dry thoroughly—any moisture can cause mildew and bad smells

To test dryness, press the pillow firmly. If it feels cool or damp inside, dry longer.

For sun lovers: letting pillows dry in direct sunlight naturally whitens fabric and kills bacteria while adding a fresh outdoor scent.

Step 5: How to Clean Memory Foam and Latex Pillows

These pillows require gentle care.

What You’ll Need:

  • Mild detergent

  • Baking soda

Instructions:

  1. Remove the pillow cover and wash it separately.

  2. Spot-clean stains using a cloth with diluted detergent.

  3. Sprinkle baking soda over the pillow surface.

  4. Let it sit for 8–12 hours.

  5. Vacuum thoroughly using an upholstery attachment.

  6. Air-dry completely in a well-ventilated area.

This method removes odors without damaging the foam.

Step 6: Make Pillows Smell Sweet Naturally

For a clean, pleasant scent without harsh chemicals:

Natural Freshening Options:

  • Add 10–15 drops of essential oil (lavender, eucalyptus, lemon) to the rinse water

  • Place a scented dryer sachet in the dryer

  • Lightly mist pillows with a mixture of water and essential oil after drying

Avoid heavy perfumes—they can trap moisture and attract dirt.

Step 7: Keep Pillows White Longer

Prevention is the secret to long-lasting freshness.

Smart Pillow Care Tips:

  • Always use pillow protectors

  • Wash pillowcases weekly

  • Shower before bed to reduce oil buildup

  • Replace pillows every 1–2 years

  • Air pillows outside once a month

These habits dramatically reduce staining and odors.

Final Thoughts

Cleaning your pillows is one of the most overlooked yet powerful ways to improve sleep quality. With simple household ingredients like baking soda, vinegar, and sunlight, you can transform dirty, yellow pillows into bright white, fresh-smelling bedding that feels brand new.

Not only will your bed look cleaner, but you’ll also breathe easier, sleep deeper, and enjoy the comforting scent of truly clean pillows—night after night.

Taking a Nap Stimulates Your Mind How It Improves Learning Memory and Perception

In a fast-paced world that often glorifies constant productivity, taking a nap can feel like an indulgence or even a weakness. Yet science increasingly shows the opposite: a well-timed nap is one of the most powerful tools for stimulating the mind. Far from being wasted time, short periods of sleep during the day can significantly improve learning ability, strengthen memory, and sharpen perception of the environment. In essence, napping is not about doing less—it’s about enabling the brain to do more.

The Brain Needs Rest to Learn

Learning is not just about exposure to information; it’s about how well the brain processes and organizes what it receives. Throughout the day, our brains are bombarded with stimuli—conversations, screens, tasks, sounds, and decisions. As this information accumulates, mental fatigue sets in, making it harder to absorb new material. A nap acts as a reset button.

During sleep, especially in the lighter stages of non-REM sleep, the brain clears out irrelevant neural activity and prepares itself for new input. This creates “space” for learning. Studies have shown that people who take short naps after learning something new perform better when tested later than those who stay awake. In practical terms, a nap before studying can make learning more efficient, while a nap after studying can help lock information in.

Memory Consolidation Happens While You Sleep

One of the most powerful cognitive benefits of napping is improved memory. Memory is not formed instantly; it develops in stages. First, information is encoded while you are awake. Then, it must be consolidated—strengthened and stored—before it can be reliably recalled. Sleep plays a critical role in this process.

During naps, the brain replays recent experiences and transfers them from short-term storage in the hippocampus to long-term storage in the cortex. This is why a nap after learning can dramatically improve recall. Whether it’s memorizing vocabulary, learning a new skill, or remembering details from a meeting, a nap helps stabilize those memories and protect them from interference.

Even brief naps of 10 to 30 minutes can enhance memory performance. Longer naps that include deeper sleep stages may provide even greater benefits, especially for complex information and emotional memories. This makes napping particularly useful for students, professionals, and anyone engaged in mentally demanding work.

Enhanced Perception and Environmental Awareness

Perception—the ability to interpret and respond to your surroundings—also improves after a nap. Mental fatigue dulls the senses, slowing reaction time and reducing accuracy. This is especially noticeable in tasks that require attention to detail, quick decision-making, or spatial awareness.

After a nap, people often experience sharper focus and heightened alertness. Visual perception becomes clearer, auditory processing improves, and reaction times shorten. This is because sleep restores the brain’s attentional networks, allowing them to function more efficiently. In real-world terms, this can translate to safer driving, better performance at work, and improved coordination in physical activities.

Napping also reduces the “noise” in the brain—the unnecessary neural chatter that builds up during prolonged wakefulness. With this noise reduced, the brain can more accurately interpret sensory information, making you more aware of subtle changes in your environment.

Creativity and Problem-Solving Get a Boost

Beyond memory and perception, naps are known to enhance creativity and problem-solving. When you sleep, the brain makes new connections between ideas that may not seem related while you’re awake. This associative thinking is essential for insight and innovation.

Many people report waking from a nap with fresh ideas or sudden clarity about a problem they were struggling with earlier. This isn’t coincidence. Sleep allows the brain to step back from rigid thought patterns and explore alternative solutions. Even short naps can improve performance on tasks that require flexible thinking and pattern recognition.

The Ideal Nap: Timing and Duration Matter

Not all naps are created equal. To get the cognitive benefits without grogginess, timing and duration are important. The best time to nap is usually in the early afternoon, when the body naturally experiences a dip in alertness. Napping too late in the day can interfere with nighttime sleep.

As for duration, short naps of 10 to 20 minutes are ideal for a quick mental boost. These “power naps” improve alertness and focus without entering deep sleep. Longer naps of 60 to 90 minutes can include deeper sleep stages and may enhance memory and creativity, but they also carry a higher risk of sleep inertia—the groggy feeling after waking.

Napping Is a Sign of Brain Wisdom, Not Laziness

Culturally, napping is often misunderstood. In many societies, it’s seen as unproductive. Yet from a biological perspective, napping is a natural and intelligent response to mental overload. Children nap instinctively because their brains are developing rapidly. Adults, too, benefit from respecting the brain’s need for rest.

Rather than pushing through fatigue with caffeine or stress, a short nap offers a healthier and more effective solution. It supports brain health, improves emotional regulation, and enhances overall cognitive performance.

Conclusion

Taking a nap is one of the simplest yet most powerful ways to stimulate your mind. By improving learning ability, strengthening memory, and sharpening perception of the environment, naps help the brain function at its best. In a world that demands constant mental output, giving your brain permission to rest may be the smartest productivity strategy of all. Instead of fighting fatigue, embrace the nap—and wake up mentally refreshed, focused, and ready to perform.

Easy Ice Cream Recipe 4 Ingredients

simple, foolproof, and creamy Easy Ice Cream Recipe using just 4 ingredients—no eggs, no cooking, and no ice cream machine required. Perfect for beginners and busy days, yet rich enough to feel like a treat from a premium ice cream shop.

Easy 4-Ingredient Homemade Ice Cream Recipe

Homemade ice cream doesn’t have to be complicated. Many people believe you need special equipment, eggs, or a long list of ingredients to get that smooth, creamy texture. The truth is, with just four basic ingredients, you can make delicious ice cream right in your kitchen. This recipe is flexible, customizable, and nearly impossible to mess up.

Why This Recipe Works

The secret behind this recipe is whipped cream. When heavy cream is whipped, it traps air, giving the ice cream a light and creamy texture similar to churned ice cream. Sweetened condensed milk adds sweetness and richness, while vanilla provides classic flavor. That’s it—no cooking, no churning, no stress.

Ingredients (Only 4!)

  1. 2 cups heavy whipping cream
    (Very cold for best results)

  2. 1 can (14 oz / 397 g) sweetened condensed milk

  3. 1 teaspoon vanilla extract

  4. A pinch of salt
    (Optional, but highly recommended—it enhances the flavor)

That’s all you need to make a smooth, creamy vanilla ice cream base.

Step-by-Step Instructions

Step 1: Chill Everything

Before you start, place your mixing bowl and beaters in the refrigerator or freezer for about 10–15 minutes. Cold tools help the cream whip faster and hold its structure better.

Step 2: Whip the Cream

Pour the cold heavy whipping cream into the chilled bowl. Using an electric mixer or hand whisk, whip the cream on medium-high speed until stiff peaks form. This means when you lift the beaters, the cream stands up without collapsing.

Tip: Do not overwhip. If the cream starts to look grainy, you’ve gone too far.

Step 3: Mix the Condensed Milk

In a separate bowl, combine the sweetened condensed milk, vanilla extract, and a pinch of salt. Stir gently until well mixed.

Step 4: Fold, Don’t Stir

Add the condensed milk mixture to the whipped cream. Using a spatula, gently fold the mixture together. Use slow, sweeping motions from the bottom of the bowl to the top. This keeps the air in the whipped cream, which is essential for a creamy texture.

Step 5: Freeze

Transfer the mixture into a freezer-safe container. Smooth the top with a spatula and cover tightly with a lid or plastic wrap.

Freeze for at least 6 hours, or overnight for best results.

Serving Tips

Remove the ice cream from the freezer about 5 minutes before serving. This allows it to soften slightly, making it easier to scoop and giving it that perfect creamy texture.

Flavor Variations (Optional Add-Ins)

Once you master the base recipe, you can easily create new flavors. Add these during the folding stage:

Chocolate Ice Cream

  • Add ¼ cup cocoa powder to the condensed milk mixture
    OR

  • Fold in ½ cup melted and cooled chocolate

Strawberry Ice Cream

  • Swirl in ½ cup strawberry puree or strawberry jam

Mango Ice Cream

  • Add ½ cup thick mango pulp for a tropical flavor

Cookies & Cream

  • Fold in ½ cup crushed chocolate sandwich cookies

Nutty Ice Cream

  • Add ¼–½ cup chopped almonds, pistachios, or walnuts

Common Mistakes to Avoid

  • Using warm cream: Always use cold heavy cream or it won’t whip properly.

  • Overmixing: Stirring too hard will deflate the cream and make the ice cream dense.

  • Not sealing the container: Air exposure can cause ice crystals to form.

Storage

Store homemade ice cream in an airtight container for up to 2 weeks. Place a piece of plastic wrap directly on the surface before closing the lid to prevent freezer burn.

Final Thoughts

This 4-ingredient ice cream recipe proves that simplicity can still deliver amazing results. Whether you’re making dessert for family, guests, or just yourself, this recipe is quick, affordable, and endlessly customizable. Once you try it, you’ll never look at store-bought ice cream the same way again.

If you’d like, I can also share a no-sugar version, dairy-free option, or kid-friendly flavor ideas—just tell me! 🍨

Canning Meatloaf

Canning meatloaf may sound unusual at first, but for home preservers who value convenience, food security, and homemade flavor, it can be a practical option. Properly canned meatloaf allows you to enjoy a hearty, ready-to-eat meal straight from the pantry—perfect for busy nights, emergencies, or off-grid living. However, because meatloaf is a low-acid, high-protein food, it must be canned correctly to ensure safety. This guide explains everything you need to know about canning meatloaf safely, deliciously, and with confidence.


Why Can Meatloaf?

The main appeal of canning meatloaf is convenience. Once canned, meatloaf is fully cooked and shelf-stable for up to a year when stored properly. You don’t need refrigeration or freezing space, and reheating takes only minutes. It’s also a great way to control ingredients—no preservatives, fillers, or excess sodium like many store-bought canned meats.

For homesteaders, preppers, and busy families alike, canned meatloaf offers:

  • Long shelf life

  • Quick, protein-rich meals

  • Reduced food waste

  • Customizable flavors


Safety First: Pressure Canning Is Essential

This is the most important rule: meatloaf can only be canned using a pressure canner. Never attempt to water-bath can meatloaf. Low-acid foods such as meat can harbor Clostridium botulinum, the bacteria that causes botulism, which can only be destroyed at the higher temperatures achieved in pressure canning.

Always follow tested, science-based guidelines from trusted sources like the USDA or university extension services.


Ingredients: Keep It Simple

When canning meatloaf, simplicity equals safety. Complex ingredients can interfere with heat penetration.

Recommended ingredients:

  • Ground beef, turkey, or a mix (leaner meats work best)

  • Eggs (as a binder)

  • Finely crushed crackers or breadcrumbs

  • Salt, pepper, and dry herbs (onion powder, garlic powder)

Avoid or limit:

  • Milk or cream

  • Cheese

  • Fresh vegetables (especially onions and peppers)

  • Thick sauces like ketchup or BBQ sauce

You can always add sauces and extras when reheating.


Preparing the Meatloaf for Canning

  1. Mix the meatloaf
    Combine ingredients gently. Do not overmix, as dense packing can affect heat flow.

  2. Shape carefully
    Instead of a large loaf, form individual mini loaves or pack the raw mixture loosely into wide-mouth jars. Leave about 1 inch of headspace.

  3. No added liquid
    The meat will release its own juices during processing.

  4. Clean jar rims
    Wipe rims thoroughly to ensure a proper seal.


Pressure Canning Process

  • Jar size: Pints or quarts

  • Processing time:

    • Pints: 75 minutes

    • Quarts: 90 minutes

  • Pressure:

    • 10–11 pounds (dial-gauge canner, adjusted for altitude)

    • 15 pounds (weighted-gauge canner)

Follow your pressure canner’s manufacturer instructions exactly. Allow the canner to cool naturally before opening.


Cooling and Storage

Once jars are removed:

  • Let them cool undisturbed for 12–24 hours

  • Check seals (lids should not flex)

  • Label jars with date and contents

  • Store in a cool, dark place

Properly sealed jars can last up to 12 months, though quality is best within the first year.


How to Use Canned Meatloaf

Using canned meatloaf is easy and versatile:

  • Slice and heat with gravy

  • Crumble into pasta or casseroles

  • Pan-fry slices for a crispy exterior

  • Serve with mashed potatoes or rice

Always inspect the jar before use. If you notice an off smell, bubbling, or a broken seal, discard the contents without tasting.


Common Mistakes to Avoid

  • ❌ Water-bath canning meatloaf

  • ❌ Adding thickeners or dairy

  • ❌ Over-packing jars

  • ❌ Guessing processing times

When in doubt, stick to tested methods.


Final Thoughts

Canning meatloaf is not a beginner project, but with proper equipment and careful attention to safety, it can be a rewarding way to preserve a beloved comfort food. The result is a nutritious, homemade meal ready whenever you need it—no freezer required. By following pressure-canning guidelines and keeping recipes simple, you can enjoy the convenience of shelf-stable meatloaf with peace of mind and great flavor.

Waking Up Between 3 and 5 AM May Be a Sign of Spiritual Awakening

Have you ever found yourself waking up between 3 and 5 AM again and again, without an alarm, feeling oddly alert or reflective? For many people, this experience feels too consistent to be random. Across spiritual traditions, this early-morning awakening is often seen as more than a sleep disturbance—it’s believed to be a sign of spiritual awakening, heightened awareness, or an inner call to transformation.

While science explains early waking through sleep cycles and stress, spirituality offers a deeper, symbolic meaning. Let’s explore why this time window is considered powerful and what it may be trying to tell you.

The Spiritual Significance of 3–5 AM

In many spiritual systems, the hours between 3 and 5 AM are known as the “sacred hours” or “divine window.” The world is quiet, distractions are minimal, and the mind naturally becomes more receptive. Ancient mystics believed this was the best time to connect with higher consciousness, intuition, and divine guidance.

In some traditions, 3 AM is called the veil hour, when the boundary between the physical and spiritual realms is thinnest. Others refer to it as Brahma Muhurta, an auspicious time for meditation, prayer, and self-realization. Waking during this period is said to mean your soul is ready to listen.

A Call From Your Inner Self

Repeatedly waking up during these hours may indicate that your inner self is trying to communicate with you. Spiritual awakening often begins subtly—through restlessness, vivid dreams, or sudden awareness during the night.

You may notice:

  • A strong urge to reflect on your life

  • Deep thoughts about purpose or meaning

  • A desire to change old habits or beliefs

  • Heightened emotions or sensitivity

These are common signs that you’re outgrowing an old version of yourself. Your soul may be nudging you to slow down, listen, and realign with your true path.

Heightened Intuition and Energy Shifts

Many people experiencing spiritual awakening report increased intuition. During the early morning hours, the ego mind is quiet, making it easier for intuitive insights to surface. You may suddenly receive ideas, solutions to problems, or a strong sense of clarity.

Some spiritual teachings suggest that waking at this time is linked to energy activation, especially around the heart or crown chakras. You might feel a gentle vibration, warmth, or a sense of peace rather than anxiety. This can be a sign that your energy is shifting to a higher frequency.

Emotional Release and Healing

Spiritual awakening is not always blissful. It often brings emotional healing, which can be uncomfortable. Waking between 3 and 5 AM may happen when suppressed emotions are ready to surface.

You might experience:

  • Sudden sadness or tears without a clear reason

  • Memories from the past resurfacing

  • A need to forgive yourself or others

This isn’t a setback—it’s a release. Healing often happens when the mind is quiet and defenses are down. These early hours provide the perfect space for deep emotional cleansing.

Feeling Called to Pray or Meditate

One of the most telling signs of spiritual awakening is a spontaneous desire to pray, meditate, or simply sit in silence after waking. Even people who were never spiritual before may feel drawn to these practices.

Instead of forcing yourself back to sleep, many spiritual teachers suggest gently embracing the moment. Sitting quietly, focusing on your breath, or expressing gratitude can bring profound peace and insight. Over time, these moments may become the most meaningful part of your day.

Not Fear, but Awareness

It’s important to understand that waking up at this time is not a bad omen. While some cultures attach fear-based meanings to early waking, spiritual perspectives emphasize awareness and growth, not danger.

However, balance matters. If waking up comes with anxiety, exhaustion, or physical discomfort, lifestyle factors like stress, diet, or sleep habits may also be involved. Spiritual awakening doesn’t replace practical self-care—it complements it.

What Should You Do If This Keeps Happening?

If you frequently wake between 3 and 5 AM and feel calm, curious, or reflective, try this:

  • Avoid checking your phone immediately

  • Take slow, deep breaths

  • Ask yourself gentle questions like, “What is my soul trying to show me?”

  • Write down thoughts or dreams in a journal

These small practices can help you understand the deeper message behind the awakening.

A Gentle Reminder From the Universe

Waking up between 3 and 5 AM may be a quiet invitation—a reminder to reconnect with yourself, reassess your direction, and awaken to a deeper truth. Spiritual awakening doesn’t always arrive dramatically. Sometimes, it begins softly, in the stillness of the early morning, when the world sleeps and your soul speaks.

If this experience resonates with you, don’t ignore it. Listen gently. You may be standing at the doorway of a powerful inner transformation.

10 Genius Aspirin Hacks You Need to Try

Aspirin has been a household staple for over a century, best known for easing headaches, reducing fever, and supporting heart health when prescribed by a doctor. But beyond the medicine cabinet, aspirin has several surprising and practical uses that many people have never heard of. From household fixes to beauty and gardening tricks, this humble tablet can do far more than you think—when used correctly.

Before we dive in, an important note: aspirin should never replace medical advice, and it should not be used internally unless recommended by a healthcare professional. The hacks below focus on external, household, and lifestyle uses that are generally considered safe.

Let’s explore ten genius aspirin hacks you’ll be glad you know.

1. Relieve Insect Bite Itch Naturally

If a mosquito or ant bite is driving you crazy, aspirin can help soothe the irritation. Crush one uncoated aspirin tablet and mix it with a few drops of water to form a paste. Apply it directly to the bite for a few minutes.

Why it works: Aspirin contains salicylic acid, which helps reduce inflammation and itching.

⚠️ Avoid this if you have sensitive skin or broken skin.

2. Remove Sweat Stains from Clothes

Yellow sweat stains on white shirts can be stubborn. Aspirin offers a surprisingly effective solution.

How to use it:

Crush two aspirin tablets

Dissolve them in half a cup of warm water

Soak the stained area for 2–3 hours before washing

This trick helps break down sweat proteins and brighten fabric naturally.

3. Help Plants Recover from Stress

Aspirin isn’t just for humans—plants can benefit too.

How it helps:
A diluted aspirin solution may support plant immunity and help them recover from stress caused by transplanting or disease.

How to use:
Dissolve one aspirin tablet in one gallon of water and spray lightly on leaves or water the soil once every few weeks.

🌱 Do not overuse—less is more.

4. Reduce Dandruff Buildup

If you struggle with flaky dandruff, aspirin can help enhance your shampoo.

Try this:
Crush two aspirin tablets and mix them into your regular shampoo. Massage into the scalp, let sit for 2–3 minutes, then rinse thoroughly.

Aspirin’s salicylic acid helps loosen dead skin cells and reduce flakes.

5. Clean Soap Scum and Grime

Bathroom surfaces covered in soap residue? Aspirin can help cut through grime.

Method:
Mix crushed aspirin with water to form a paste. Apply to stained areas like sinks or tiles, let sit for 10 minutes, then scrub and rinse.

It’s an affordable and chemical-light cleaning option.

6. Soothe Mild Sunburn (External Use Only)

Aspirin’s anti-inflammatory properties may help calm mild sunburn discomfort.

How:
Dissolve aspirin in cool water and gently dab onto the affected area using a clean cloth.

☀️ This is for mild sunburn only—not severe burns or blistered skin.

7. Extend the Life of Cut Flowers

Want your bouquet to last longer? Add aspirin to the vase.

How it works:
Aspirin helps inhibit bacterial growth in water, keeping stems clearer.

Instructions:
Crush one aspirin tablet and dissolve it in the vase water before adding flowers.

8. Remove Nicotine or Grease Stains from Hands

If soap alone won’t remove stubborn stains, aspirin can help.

Use:
Make a paste with crushed aspirin and lemon juice. Rub gently on hands, then rinse well.

This is especially useful for mechanics, gardeners, or smokers.

9. Clear Minor Skin Buildup (Occasional Use)

Aspirin is sometimes used in DIY skincare due to its exfoliating properties.

Safe approach:
Mix a small amount of crushed aspirin with honey and apply briefly as a mask (1–2 minutes only), then rinse thoroughly.

⚠️ Not suitable for sensitive skin or daily use. Always patch test first.

10. Emergency Callus Softener

Rough heels or calluses? Aspirin may help soften them.

How:
Crush several tablets, mix with lemon juice, apply to the area, wrap with a warm cloth for 10 minutes, then gently exfoliate.

Follow with moisturizer for best results.

Important Safety Reminders

Never ingest aspirin unless advised by a doctor

Avoid use if you are allergic to aspirin or salicylates

Keep aspirin away from children

External use should be occasional, not daily

Final Thoughts

Aspirin is far more versatile than most people realize. From cleaning hacks to plant care and personal grooming, these clever uses can save time and money when done responsibly. The key is using aspirin wisely and safely, respecting its strength even outside medical use.

Sometimes, the most powerful solutions are already sitting in your cabinet—you just need to know how to use them.