Ginger Is 100 Times More Powerful Than Botox Heres the Truth About Wrinkles Freckles and Dark Spots

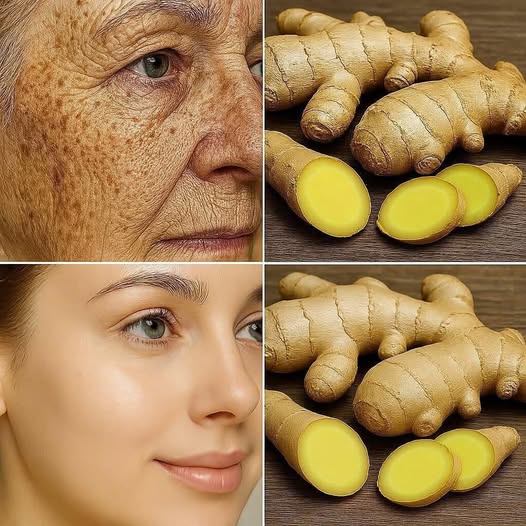
Headlines claiming that ginger is 100 times more powerful than Botox are everywhere—and while they sound exciting, the real story is more nuanced and far more useful for your skin. Ginger is not a replacement for Botox, and it doesn’t paralyze muscles or erase deep wrinkles overnight. However, what ginger does offer is a powerful mix of antioxidants, anti-inflammatory compounds, and circulation-boosting properties that can support healthier, brighter, more youthful-looking skin when used correctly and consistently.

Let’s separate myth from science and explore what ginger can realistically do for wrinkles, freckles, and dark spots.

Why Ginger Has a Reputation as a “Natural Botox”

Ginger (Zingiber officinale) has been used in traditional medicine and beauty rituals for centuries. Its reputation in skincare comes from several bioactive compounds, especially gingerol, shogaol, and zingerone.

These compounds are known for:

  • Strong antioxidant activity

  • Anti-inflammatory effects

  • Improved blood circulation

  • Protection against oxidative stress

Aging skin is largely driven by free radical damage, collagen breakdown, and chronic inflammation. Ginger targets these processes—not by freezing facial muscles like Botox, but by supporting the skin’s natural repair systems.

So while the phrase “100 times more powerful than Botox” is not scientifically accurate, ginger can help skin age more gracefully over time.

Ginger and Wrinkles: What It Really Does

Wrinkles form when collagen and elastin fibers weaken due to age, sun exposure, and oxidative stress. Ginger doesn’t instantly erase deep wrinkles, but it helps in three important ways:

  1. Boosts circulation
    Ginger increases blood flow to the skin, delivering more oxygen and nutrients to skin cells. This can make the skin appear firmer and more energized.

  2. Fights collagen breakdown
    Antioxidants in ginger help neutralize free radicals that damage collagen. Less damage means collagen lasts longer.

  3. Reduces inflammation
    Chronic inflammation accelerates aging. Ginger’s anti-inflammatory properties help calm the skin, which may soften the appearance of fine lines over time.

With regular use, many people notice smoother texture and improved skin tone, not frozen expressions.

Ginger for Dark Spots and Hyperpigmentation

Dark spots and freckles are often caused by excess melanin production, triggered by sun exposure, hormonal changes, or skin inflammation.

Ginger helps by:

  • Inhibiting oxidative stress that triggers melanin overproduction

  • Improving skin cell turnover through better circulation

  • Supporting a more even skin tone

Some natural skincare formulations use ginger extract to help brighten dull skin and reduce the appearance of dark patches. Results are gradual and depend on consistency, sun protection, and overall skincare habits.

Ginger vs. Botox: A Fair Comparison

Botox Ginger
Medical injectable Natural root
Temporarily paralyzes muscles Supports skin health
Immediate wrinkle smoothing Gradual improvement
Requires professional treatment Can be used at home
Effects last 3–6 months Benefits build over time

Botox treats expression wrinkles by stopping muscle movement. Ginger works at the cellular level, supporting healthier skin from the inside out. They are fundamentally different tools.

How to Use Ginger Safely for Skin

If you want to include ginger in your skincare routine, here are evidence-based and safer options:

1. Ginger-Infused Face Mask (1–2 times per week)

  • 1 teaspoon ginger powder

  • 1 tablespoon honey

  • A few drops of lemon juice (optional, avoid sun exposure afterward)

Apply for 10–15 minutes, then rinse. Always patch-test first.

2. Ginger Tea for Skin Health

Drinking ginger tea supports skin from within by reducing inflammation and improving circulation.

3. Skincare Products with Ginger Extract

Look for professionally formulated serums or creams containing ginger extract. These are safer than raw ginger on sensitive skin.

Important Safety Notes

  • Never apply raw ginger directly to your face—it can cause burns and irritation

  • Always do a patch test

  • Ginger will not replace medical treatments for deep wrinkles

  • Results vary based on age, skin type, sun exposure, and lifestyle

The Bottom Line

Ginger is not 100 times more powerful than Botox, and it doesn’t erase deep wrinkles instantly. However, it is a scientifically supported natural ingredient that can:

  • Improve skin circulation

  • Reduce inflammation

  • Protect collagen

  • Brighten skin tone

  • Support a healthier aging process

Think of ginger as a long-term skin ally, not a miracle injection. When combined with sun protection, hydration, a balanced diet, and proper skincare, ginger can play a meaningful role in maintaining youthful, radiant skin—naturally.

Pour italian dressing and these 3 ingredients over chicken breasts in slow cooker

If you’re craving a comforting, flavorful dinner that practically cooks itself, this slow cooker Italian chicken recipe is about to become your new favorite. With just four simple ingredients—including bottled Italian dressing—you can turn plain chicken breasts into a tender, creamy, crave-worthy meal that tastes like you spent hours in the kitchen. The best part? The slow cooker does all the work while you go about your day.

This recipe is perfect for busy weeknights, meal prep, or when you want something warm and satisfying without a long ingredient list or complicated steps.

The Magic Ingredients

Here’s what you’ll need:

  1. Chicken Breasts
    Boneless, skinless chicken breasts are lean, affordable, and perfect for slow cooking. They soak up flavor beautifully and become fork-tender after hours of gentle heat.

  2. Italian Dressing
    This is the flavor powerhouse of the recipe. Italian dressing contains oil, vinegar, herbs, garlic, and spices—all the things you’d normally add separately. It seasons the chicken deeply while keeping it moist.

  3. Cream Cheese
    Cream cheese melts into the cooking liquid, creating a rich, creamy sauce. It balances the tanginess of the Italian dressing and gives the dish a luxurious texture.

  4. Grated Parmesan Cheese
    Parmesan adds a salty, nutty depth that ties everything together. As it melts, it thickens the sauce slightly and boosts the savory flavor.

That’s it—just four ingredients, many of which you probably already have.

How to Make It (Step by Step)

  1. Prep the Slow Cooker
    Lightly grease the inside of your slow cooker with a bit of oil or nonstick spray to prevent sticking.

  2. Add the Chicken
    Place the chicken breasts in a single layer at the bottom of the slow cooker. If they overlap slightly, that’s fine.

  3. Pour the Italian Dressing
    Evenly pour the Italian dressing over the chicken, making sure each piece is coated. This ensures maximum flavor as it cooks.

  4. Add the Cream Cheese
    Cut the cream cheese into cubes and scatter them over the top. Don’t worry about mixing—it will melt on its own during cooking.

  5. Sprinkle the Parmesan
    Finish by sprinkling grated Parmesan cheese evenly over everything.

  6. Cook Low and Slow
    Cover and cook on LOW for 6–7 hours or on HIGH for 3–4 hours, until the chicken is fully cooked and very tender.

  7. Stir and Serve
    About 15 minutes before serving, gently stir to combine the melted cream cheese and Parmesan into a smooth sauce. You can leave the chicken whole or shred it with two forks.

Why This Recipe Works So Well

  • Minimal effort, maximum flavor: Italian dressing replaces multiple seasonings.

  • Creamy without being heavy: The cream cheese creates richness without needing cream or butter.

  • Perfect texture: Slow cooking keeps chicken breasts moist instead of dry.

  • Beginner-friendly: No special skills required—just dump, cook, and enjoy.

Serving Ideas

This creamy Italian chicken is incredibly versatile. Here are some delicious ways to serve it:

  • Over rice (white, brown, or jasmine) to soak up the sauce

  • With mashed potatoes for ultimate comfort food

  • Tossed with pasta like penne or fettuccine

  • Alongside steamed vegetables such as broccoli, green beans, or carrots

  • In sandwiches or wraps using shredded chicken

It also makes excellent leftovers—the flavors deepen overnight.

Easy Variations

Want to change things up? Try these simple twists:

  • Add vegetables: Toss in mushrooms, sliced onions, or spinach during the last hour of cooking.

  • Use chicken thighs: They’re even juicier and harder to overcook.

  • Make it lighter: Use reduced-fat cream cheese and light Italian dressing.

  • Add a kick: Sprinkle in red pepper flakes or a dash of hot sauce.

Storage and Reheating Tips

  • Refrigerator: Store leftovers in an airtight container for up to 3–4 days.

  • Freezer: Freeze for up to 2 months. Thaw overnight in the fridge before reheating.

  • Reheat gently: Warm on the stove or in the microwave at low power, stirring to keep the sauce smooth.

Final Thoughts

Sometimes the simplest recipes are the ones that stick with us—and this slow cooker Italian chicken is proof. By pouring Italian dressing and just three other ingredients over chicken breasts, you get a meal that’s creamy, savory, and deeply comforting with almost no effort at all.

Once you try it, this recipe is likely to earn a permanent spot in your dinner rotation—because great food doesn’t have to be complicated to be delicious. 🍗✨

If you eat cucumbers everyday, this is what happens to your body

Cucumbers may look simple—mostly water, light green, and refreshingly crisp—but eating them every day can quietly influence your body in several meaningful ways. Often overlooked as just a salad filler, cucumbers actually deliver hydration, nutrients, and gentle detox support that add up over time. Here’s what really happens to your body when cucumbers become a daily habit.

1. Your Body Stays Better Hydrated

Cucumbers are made up of about 95–96% water, which means every bite contributes to your daily fluid intake. If you struggle to drink enough water, eating cucumbers daily can help prevent mild dehydration. Proper hydration supports circulation, digestion, temperature regulation, and even brain function. Many people notice fewer headaches, less fatigue, and better concentration when hydration improves—even from water-rich foods like cucumbers.

2. Your Digestion Becomes Smoother

Cucumbers contain fiber, especially in the peel, which helps keep digestion regular. Eating them daily can help prevent constipation and support healthy bowel movements. The water content also softens stool, making digestion gentler on your system. For people who experience bloating or sluggish digestion, cucumbers can feel soothing and light, especially when eaten raw.

3. You May Notice Clearer, Healthier Skin

Cucumbers are well known for skin health—and not just when placed on your eyes. They contain antioxidants like vitamin C and beta-carotene, which help fight oxidative stress that contributes to aging skin. Daily consumption may support a more hydrated complexion, reduced puffiness, and improved skin elasticity. Hydration from the inside out plays a major role in skin glow, and cucumbers contribute quietly but effectively.

4. Your Body Benefits from Gentle Detox Support

While your liver and kidneys do the real detox work, cucumbers can support these organs by promoting urine production and flushing excess sodium from the body. This mild diuretic effect can help reduce water retention and bloating. People who eat cucumbers regularly often report feeling “lighter” and less swollen, especially during hot weather or after salty meals.

5. You May Support Heart Health

Cucumbers contain potassium, a mineral that helps balance sodium levels in the body. This balance is important for maintaining healthy blood pressure. Eating cucumbers daily—especially as a replacement for salty snacks—can support cardiovascular health over time. Some studies also suggest that cucumber antioxidants may help reduce inflammation, another factor linked to heart disease.

6. Weight Management Becomes Easier

If you eat cucumbers every day, you’re adding volume to your meals without adding many calories. One cup of sliced cucumber contains only about 15–20 calories. This makes cucumbers ideal for weight management, as they help you feel full while keeping calorie intake low. Crunchy and refreshing, they can replace chips, crackers, or sugary snacks with ease.

7. Your Blood Sugar Stays More Stable

Cucumbers have a very low glycemic index, meaning they don’t cause rapid spikes in blood sugar. Eating them daily can be especially helpful for people trying to manage blood sugar levels or reduce sugar cravings. When paired with protein or healthy fats, cucumbers can help slow digestion and support more stable energy throughout the day.

8. Your Joints and Bones Get Subtle Support

Cucumbers contain vitamin K, a nutrient essential for bone health and proper blood clotting. Regular intake helps the body use calcium more effectively, supporting stronger bones over time. While cucumbers alone won’t prevent bone loss, they can be a helpful addition to a balanced diet focused on skeletal health.

9. You May Feel Cooler and More Refreshed

In traditional wellness systems, cucumbers are considered a “cooling” food. Their high water content and refreshing nature may help regulate body temperature, especially in warm climates or during summer months. Many people notice they feel less overheated or fatigued when cucumbers are part of their daily meals.

10. Possible Downsides to Keep in Mind

While cucumbers are generally safe and healthy, eating them in excessive amounts may cause bloating or gas in some people, especially if eaten on an empty stomach. Pesticide residue on conventionally grown cucumbers can also be a concern, so washing thoroughly or choosing organic when possible is wise. Balance is key—cucumbers should complement, not replace, other nutrient-dense foods.

The Bottom Line

Eating cucumbers every day may seem like a small habit, but over time it can support hydration, digestion, skin health, heart function, and weight management. Light, refreshing, and versatile, cucumbers are an easy addition to salads, sandwiches, smoothies, or even enjoyed on their own with a pinch of salt and lemon.

Your body often responds best to simple, consistent choices—and adding cucumbers to your daily routine is one of those quietly powerful habits that can make a noticeable difference. 🥒

Japanese cotton cheesecake

Japanese cotton cheesecake—also known as Japanese soufflé cheesecake—is a delicate fusion of classic cheesecake and airy sponge cake. Unlike dense New York–style cheesecake, this version is incredibly light, fluffy, and gently sweet, with a soft jiggle that feels almost magical. Each bite melts on your tongue like cotton, which is exactly how it earned its name.

This dessert may look intimidating, but with the right technique and patience, you can create bakery-quality results at home.

Why You’ll Love This Cheesecake

  • Ultra-light and airy texture

  • Not overly sweet

  • Low flour and gentle richness

  • Perfect for tea, coffee, or special occasions

  • Beautiful rise with a soft jiggle

Ingredients (Serves 6–8)

Cream Cheese Mixture

  • 250 g (9 oz) cream cheese, softened

  • 50 g (¼ cup) unsalted butter

  • 100 ml (⅓ cup + 1 tbsp) whole milk

Egg Yolks

  • 6 large eggs, separated

  • 60 g (½ cup) cake flour (or all-purpose flour, sifted)

  • 20 g (2 tbsp) cornstarch

  • 1 tsp vanilla extract

  • 1 tbsp lemon juice

Meringue

  • 6 egg whites

  • 120 g (½ cup + 2 tbsp) granulated sugar

  • ¼ tsp cream of tartar (optional, but recommended)

Equipment You’ll Need

  • 8-inch (20 cm) round cake pan

  • Parchment paper

  • Mixing bowls

  • Hand or stand mixer

  • Baking tray for water bath

Step-by-Step Instructions

1. Prepare the Pan and Oven

Line the bottom and sides of your cake pan with parchment paper. Wrap the outside of the pan tightly with aluminum foil to prevent water from seeping in.

Preheat your oven to 160°C (320°F). Boil water for the water bath.

2. Melt the Cream Cheese Base

In a heatproof bowl, combine cream cheese, butter, and milk. Place the bowl over a pot of gently simmering water (double boiler method). Stir continuously until smooth and creamy.

Remove from heat and let cool slightly.

3. Add Egg Yolks and Flavoring

Whisk in the egg yolks one at a time, mixing gently to avoid incorporating air. Add vanilla extract and lemon juice.

Sift in the cake flour and cornstarch. Fold gently until smooth and lump-free. Set aside.

4. Make the Meringue

In a clean bowl, beat egg whites on medium speed until foamy. Add cream of tartar.

Gradually add sugar in three additions, beating until soft to medium peaks form. The meringue should be glossy and hold its shape but still bend slightly at the tip.

5. Fold Gently (Very Important)

Add one-third of the meringue to the cream cheese batter and fold gently to loosen the mixture.

Add the remaining meringue in two additions, folding carefully with a spatula using a bottom-to-top motion. Do not overmix—this step determines the cake’s airy texture.

6. Bake in a Water Bath

Pour the batter into the prepared pan and tap gently to release air bubbles.

Place the pan into a larger baking tray. Pour hot water into the tray until it reaches halfway up the sides of the cake pan.

Bake at 160°C (320°F) for 25 minutes, then reduce temperature to 150°C (300°F) and bake for another 55 minutes.

7. Cooling Process (Prevents Cracks)

Turn off the oven and leave the door slightly open. Let the cake cool inside the oven for 30 minutes.

Remove from oven and allow to cool completely at room temperature before unmolding.

Serving Suggestions

  • Dust lightly with powdered sugar

  • Serve with fresh berries

  • Pair with green tea or black coffee

  • Add a dollop of whipped cream for elegance

Pro Tips for Perfect Results

  • Always use room-temperature ingredients

  • Do not overbeat the meringue

  • Fold slowly and gently

  • Never skip the water bath

  • Cool gradually to prevent shrinking

Storage

  • Store in the refrigerator for up to 3 days

  • Best enjoyed the same day for maximum fluffiness

  • Bring to room temperature before serving

Final Thoughts

Japanese cotton cheesecake is a celebration of simplicity and technique. Its delicate texture, gentle sweetness, and cloud-like softness make it a dessert that feels luxurious without being heavy. Once you master this recipe, it’s guaranteed to become a favorite—both for special occasions and quiet moments with tea.

3 Ingredient Homemade Crunch Bars

If you love simple recipes that deliver big flavor, 3-ingredient homemade crunch bars are about to become your new favorite dessert. These no-bake treats are fast, affordable, and incredibly satisfying, making them perfect for busy weekdays, last-minute guests, or when a chocolate craving strikes. Best of all, they require no oven, no special equipment, and no complicated steps—just three everyday ingredients and a few minutes of your time.

Crunch bars have a nostalgic charm. Many of us remember enjoying store-bought chocolate crunch bars as kids, with their irresistible combination of smooth chocolate and crispy texture. The homemade version takes that classic treat and makes it even better: fresher, customizable, and free from unnecessary additives.

Let’s explore why these bars are so popular, how to make them perfectly every time, and a few clever variations to suit your taste.

Why 3-Ingredient Recipes Are So Popular

In today’s fast-paced world, recipes with fewer ingredients are more appealing than ever. They save time, reduce grocery costs, and minimize cleanup. With just three ingredients, this crunch bar recipe proves that simplicity doesn’t mean sacrificing flavor.

Homemade crunch bars are also ideal for:

  • Beginners who are new to cooking

  • Kids who want to help in the kitchen

  • Anyone avoiding overly processed snacks

  • Busy families needing quick dessert options

The Only 3 Ingredients You Need

You’ll be surprised by how basic these ingredients are:

  1. Chocolate (milk, dark, or semi-sweet)
    Chocolate is the star of this recipe. Choose high-quality chocolate bars or chocolate chips for the best flavor and smooth texture.

  2. Crispy Rice Cereal
    This provides the signature crunch. Plain puffed rice cereal works perfectly and keeps the bars light and crispy.

  3. Peanut Butter (or any nut butter)
    Peanut butter adds richness, depth, and helps bind everything together. You can substitute almond butter, cashew butter, or sunflower seed butter if preferred.

How to Make 3-Ingredient Homemade Crunch Bars

Step 1: Melt the Chocolate and Peanut Butter

Break the chocolate into small pieces and place it in a heat-safe bowl with the peanut butter. Melt gently using a microwave in short intervals or over a double boiler. Stir until smooth and glossy.

Step 2: Add the Crunch

Remove the melted mixture from heat and fold in the crispy rice cereal. Stir gently until every piece is coated evenly with chocolate.

Step 3: Shape and Set

Pour the mixture into a lined baking dish and press it down evenly. Refrigerate for about 30–45 minutes, or until firm. Once set, cut into bars and enjoy.

That’s it—three ingredients, three steps, and zero stress.

Tips for Perfect Crunch Bars Every Time

  • Don’t overheat the chocolate: Slow melting prevents burning and keeps the texture smooth.

  • Use fresh cereal: Stale cereal won’t give you that satisfying crunch.

  • Line your pan: Parchment paper makes removal and slicing much easier.

  • Let them set fully: Cutting too early can cause the bars to crumble.

Delicious Variations to Try

Once you master the basic recipe, you can easily customize it:

  • Dark Chocolate Crunch Bars – Use 70% dark chocolate for a richer, less sweet flavor.

  • Vegan Crunch Bars – Choose dairy-free chocolate and plant-based nut butter.

  • Nut-Free Version – Replace peanut butter with coconut butter or tahini.

  • Extra Crunch – Add crushed pretzels or toasted coconut flakes.

  • Healthier Twist – Use sugar-free chocolate and natural peanut butter with no added sugar.

Why Homemade Crunch Bars Are Better Than Store-Bought

Store-bought crunch bars often contain preservatives, artificial flavors, and excess sugar. When you make them at home, you’re in full control of the ingredients. This means:

  • Fewer additives

  • Better quality chocolate

  • Customizable sweetness

  • Fresher taste

Plus, homemade crunch bars are budget-friendly and perfect for meal prep. Store them in an airtight container in the fridge for up to one week.

Perfect for Any Occasion

These 3-ingredient homemade crunch bars are incredibly versatile. Serve them:

  • As a quick dessert after dinner

  • As a lunchbox treat

  • At parties or family gatherings

  • As a homemade edible gift

They look impressive, taste indulgent, and yet require minimal effort—an unbeatable combination.

Final Thoughts

When it comes to easy desserts, 3-ingredient homemade crunch bars truly shine. They prove that you don’t need a long list of ingredients or advanced baking skills to create something delicious. With creamy chocolate, crispy texture, and endless customization options, this recipe is one you’ll come back to again and again.

If you’re craving something sweet, crunchy, and comforting, give these homemade crunch bars a try—you might never go back to store-bought again.

What Happens to Your Body When You Start Eating Beets Every Day

Beets may look simple, but they are one of the most powerful natural foods you can add to your daily diet. Whether eaten raw, boiled, roasted, juiced, or pickled, beets are packed with nutrients that can cause noticeable changes in your body—often within just a few weeks. From improving blood flow to supporting digestion and brain health, eating beets every day can quietly transform your overall well-being. Here’s what really happens to your body when beets become a daily habit.

1. Your Blood Pressure May Drop Naturally

One of the most well-known benefits of beets is their ability to help lower blood pressure. Beets are rich in natural nitrates, which your body converts into nitric oxide. This compound relaxes and widens blood vessels, allowing blood to flow more easily.

As a result, regular beet consumption may:

  • Reduce systolic and diastolic blood pressure

  • Improve circulation

  • Lower strain on the heart

Many people notice improved blood pressure readings after just a few days to a couple of weeks of daily beet intake.

2. Your Energy and Stamina Can Increase

If you start eating beets every day, you may feel more energetic—especially during physical activity. Nitric oxide not only improves blood flow but also helps muscles use oxygen more efficiently.

This can lead to:

  • Better endurance

  • Less fatigue during exercise

  • Improved athletic performance

That’s why beet juice is popular among athletes and fitness enthusiasts. Even if you’re not exercising intensely, improved oxygen delivery can help you feel less tired throughout the day.

3. Your Digestion Becomes Healthier

Beets are high in dietary fiber, which plays a vital role in digestive health. Eating them daily helps keep your intestines moving smoothly and supports healthy gut bacteria.

Digestive benefits include:

  • Reduced constipation

  • Better bowel regularity

  • Improved gut health

Additionally, beets support bile production in the liver, which aids fat digestion and overall digestive efficiency.

4. Your Liver Gets Extra Support

Your liver works nonstop to filter toxins from your body, and beets can help lighten its load. Beets contain betalains—powerful antioxidants that support liver detoxification and reduce inflammation.

With regular beet consumption:

  • The liver may process toxins more efficiently

  • Fat buildup in the liver may decrease

  • Overall liver function can improve

This makes beets especially beneficial for people exposed to processed foods, pollution, or high stress.

5. Your Brain Function May Improve

As you age, blood flow to the brain naturally decreases. Beets can help counteract this process. The nitrates in beets improve circulation not only to the heart but also to the brain.

Eating beets daily may:

  • Enhance focus and mental clarity

  • Support memory

  • Reduce the risk of age-related cognitive decline

Better blood flow means more oxygen and nutrients reach brain cells, helping them function more efficiently.

6. Inflammation in Your Body May Decrease

Chronic inflammation is linked to many health problems, including arthritis, heart disease, and autoimmune conditions. Beets are rich in anti-inflammatory compounds that help calm inflammation at the cellular level.

With daily beet intake, you may notice:

  • Reduced joint stiffness

  • Less muscle soreness

  • Improved recovery after physical activity

This anti-inflammatory effect is gentle but cumulative, becoming more noticeable over time.

7. Your Blood Sugar Control May Improve

Despite their natural sweetness, beets have a low to moderate glycemic load when eaten whole. Their fiber content slows sugar absorption into the bloodstream.

Benefits include:

  • More stable blood sugar levels

  • Reduced sugar cravings

  • Better insulin sensitivity

This makes beets a smart choice when eaten in moderation, even for people monitoring their blood sugar.

8. Your Skin May Start to Glow

Beets are loaded with vitamin C, iron, and antioxidants—nutrients essential for healthy skin. By improving blood circulation and supporting detoxification, beets help nourish your skin from the inside out.

Over time, you may notice:

  • Brighter, more even skin tone

  • Fewer breakouts

  • Reduced dullness

Many people describe beet-related skin improvements as a natural “inner glow.”

9. Your Urine or Stool May Change Color (Don’t Panic)

One surprising effect of eating beets every day is reddish or pink urine and stool—a harmless condition called beeturia. It’s more noticeable in people with lower stomach acid or iron deficiency.

This color change:

  • Is completely safe

  • Usually disappears within 24–48 hours

  • Is simply your body eliminating beet pigments

How to Eat Beets Daily (Safely)

To enjoy the benefits without overdoing it:

  • Eat ½ to 1 cup of cooked beets daily

  • Rotate between raw, cooked, or pickled forms

  • Drink beet juice in small portions

If you have kidney stones or low blood pressure, consult a healthcare professional before increasing beet intake.

Final Thoughts

Eating beets every day can bring powerful yet gentle changes to your body—better circulation, improved digestion, enhanced energy, and stronger brain and liver health. While they may not work miracles overnight, their benefits build steadily with consistency. Simple, affordable, and deeply nourishing, beets are one of nature’s most underrated superfoods.

boil LEMON PEEL with SALT and you won’t need to buy it at home anymore

Did you know that boiling lemon peel with salt can replace several expensive household products? This simple, natural remedy has been used for generations and is now making a comeback as people search for natural home remedies, eco-friendly cleaning solutions, and zero-waste hacks. Instead of throwing away lemon peels, you can turn them into a powerful, multipurpose solution that saves money and reduces chemical use at home.

Let’s explore why lemon peel and salt are so powerful, how to prepare them, and the many ways this natural mixture can replace store-bought products.

Why Lemon Peel and Salt Are So Powerful

Lemon Peel Benefits

Lemon peels are rich in:

  • Natural citric acid

  • Antibacterial properties

  • Fresh citrus oils

  • Natural deodorizing compounds

They are widely searched online for natural cleaning hacks, lemon peel uses, and DIY household cleaners.

Salt Benefits

Salt is one of the most versatile household ingredients. It:

  • Acts as a natural disinfectant

  • Absorbs moisture and odors

  • Enhances cleaning power

  • Helps preserve natural solutions

When combined, lemon peel and salt create a natural alternative to many chemical products you buy regularly.

How to Boil Lemon Peel with Salt (Simple Recipe)

Ingredients:

  • Peels from 2–3 fresh lemons

  • 1 tablespoon coarse salt (sea salt or rock salt works best)

  • 2 cups water

Instructions:

  1. Add lemon peels and salt to a pot.

  2. Pour in the water.

  3. Bring to a boil, then simmer for 10–15 minutes.

  4. Allow the mixture to cool.

  5. Strain and store the liquid in a glass bottle or spray container.

This solution can be kept in the refrigerator for up to one week.

You Won’t Need to Buy These Products Anymore

1. Natural All-Purpose Cleaner

One of the most searched uses of lemon peel is DIY natural cleaner. This solution:

  • Cleans kitchen counters

  • Removes grease from stovetops

  • Freshens sinks and tiles

  • Leaves a clean citrus scent

Simply spray and wipe—no harsh chemicals required.

2. Powerful Odor Remover

Boiled lemon peel with salt works as a natural deodorizer for:

  • Refrigerators

  • Trash cans

  • Bathrooms

  • Shoe cabinets

The citrus oils neutralize odors while salt absorbs lingering smells.

3. Glass and Mirror Cleaner

Forget expensive glass sprays. This solution:

  • Removes fingerprints

  • Leaves no streaks

  • Adds shine naturally

Spray lightly and wipe with a microfiber cloth.

4. Natural Ant Repellent

Lemons are a well-known natural insect deterrent. Spray this mixture:

  • Along windowsills

  • Near doors

  • Around sinks

Ants and small insects dislike the citrus aroma, helping keep them away naturally.

5. Grease-Cutting Dish Booster

Add a small amount of this lemon-salt liquid to greasy dishes before washing. It:

  • Breaks down oil

  • Reduces dish soap usage

  • Removes lingering food odors

6. Floor Freshener

Add one cup of the solution to a bucket of warm water to:

  • Clean tile and marble floors

  • Remove dull odors

  • Leave a fresh, clean scent

7. Natural Air Freshener

Boiling lemon peel with salt releases a refreshing aroma. Many people search for natural air freshener recipes to avoid artificial sprays. You can:

  • Reheat the mixture

  • Let the steam refresh your home

  • Pour into a spray bottle for quick use

Why This Hack Is Trending on Google

Search terms like:

  • “boil lemon peel with salt”

  • “lemon peel uses at home”

  • “natural cleaning solutions”

  • “DIY eco-friendly cleaner”

  • “stop buying cleaning products”

are trending as people look for cheap home remedies, sustainable living tips, and chemical-free cleaning methods.

Extra Tips for Best Results

  • Use organic lemons if possible

  • Avoid using on unfinished wood or delicate stone

  • Always do a spot test first

  • Store in glass for longer freshness

Final Thoughts

Boiling lemon peel with salt is one of the simplest and most effective home hacks you can try today. It’s affordable, eco-friendly, and incredibly versatile. Once you start using this natural solution, you’ll realize you no longer need to spend money on multiple cleaning products.

Sometimes the best solutions are already in your kitchen—just waiting to be rediscovered.

Put 4 drops in your ear and you will hear like new again

If you’ve seen headlines claiming “Put 4 drops in your ear and you will hear like new again,” you’re not alone. This eye-catching promise circulates widely online, especially among people experiencing muffled hearing, ear fullness, or ringing sounds. But does it really work, or is it just another health myth designed to grab attention?

Let’s separate fact from fiction and explore what ear drops can and cannot do for your hearing—based on science, safety, and common medical practice.

Why Hearing Suddenly Feels “Blocked”

Before understanding ear drops, it’s important to know why hearing problems happen in the first place. In many cases, reduced hearing is not caused by permanent damage but by temporary blockages, such as:

  • Excess earwax (cerumen buildup)

  • Trapped water after bathing or swimming

  • Mild ear canal inflammation

  • Dry, hardened earwax in older adults

  • Use of earbuds or hearing aids pushing wax deeper

In these situations, sound waves cannot travel efficiently through the ear canal, creating the sensation of dull or reduced hearing.

👉 This is where ear drops may help—but only in specific cases.

The Truth About “4 Drops” in the Ear

There is no magical liquid that instantly restores hearing for everyone. However, doctors do recommend certain ear drops to soften earwax, making it easier for the ear to clear naturally or for a professional to remove it safely.

Commonly used ear-safe solutions include:

  • Sterile saline

  • Mineral oil

  • Olive oil (medical grade)

  • Glycerin

  • Hydrogen peroxide solutions made specifically for ears

In many instructions, people are told to use 2–5 drops, once or twice daily, for a few days—not as a miracle cure, but as part of ear hygiene management.

⚠️ Important: The “4 drops” idea is a general guideline, not a guaranteed solution or universal rule.

When Ear Drops Can Help Improve Hearing

Ear drops may help restore clearer hearing only if the cause is earwax buildup or dryness. Benefits may include:

  • Softer wax that moves out naturally

  • Reduced pressure and fullness

  • Improved sound clarity

  • Less itching and irritation

Many people report noticeable improvement within a few days, not instantly.

When Ear Drops Will NOT Help

Ear drops will not fix hearing problems caused by:

  • Inner ear damage

  • Age-related hearing loss (presbycusis)

  • Nerve damage

  • Ear infections behind the eardrum

  • Ruptured eardrum

  • Chronic tinnitus

In these cases, using drops repeatedly may delay proper treatment and worsen symptoms.

Dangerous Mistakes to Avoid 🚫

Never put drops in your ear if you have:

  • Severe ear pain

  • Pus or fluid leaking from the ear

  • Sudden hearing loss

  • Dizziness or vertigo

  • A known or suspected perforated eardrum

Also avoid:

  • Garlic oil, vinegar, or alcohol mixtures

  • Undiluted hydrogen peroxide

  • Random “viral” remedies

  • Using cotton swabs to dig inside the ear

These practices can damage the ear canal and eardrum.

Safe Way to Use Ear Drops (If Appropriate)

If a healthcare professional confirms wax buildup, safe use usually looks like this:

  1. Lie on your side with the affected ear facing up

  2. Place the recommended number of drops gently

  3. Stay in position for 3–5 minutes

  4. Let excess fluid drain out naturally

  5. Repeat as advised (usually for 2–5 days)

If hearing does not improve, stop and seek medical care.

When to See a Doctor

You should consult a doctor or ENT specialist if:

  • Hearing loss lasts more than a few days

  • Symptoms worsen

  • You feel pain, ringing, or dizziness

  • Ear drops don’t help

  • You wear hearing aids and experience blockage

Professional ear cleaning is safe, quick, and far more effective than home experiments.

Final Verdict: Can “4 Drops” Make You Hear Like New?

✔️ Sometimes, if the issue is simple earwax buildup
Never, as a guaranteed or instant cure
⚠️ Potentially harmful if misused or used blindly

The phrase “Put 4 drops in your ear and you will hear like new again” is a marketing exaggeration, not medical truth. While ear drops have their place, hearing health deserves proper diagnosis and care.

Danger at home! 8 household items that could harm your health

Home is supposed to be the safest place to relax, recharge, and protect your well-being. Yet many everyday household items—things we use without a second thought—can quietly pose risks to our health. The danger isn’t always obvious, and long-term exposure can sometimes be more harmful than sudden accidents. Being aware of these hidden threats is the first step toward creating a safer living environment. Here are eight common household items that could harm your health, along with tips to reduce the risk.

1. Non-Stick Cookware (When Damaged or Overheated)

Non-stick pans are popular because they make cooking and cleaning easier. However, when these pans are scratched, worn, or overheated, they can release harmful fumes and chemicals. Some coatings may break down at high temperatures, potentially causing respiratory irritation and other health concerns.

How to reduce risk:
Avoid overheating non-stick cookware, replace pans that are scratched or peeling, and use wooden or silicone utensils instead of metal ones.

2. Air Fresheners and Scented Candles

That pleasant smell in your living room may come at a cost. Many air fresheners and scented candles contain synthetic fragrances and chemicals that can irritate the lungs, trigger headaches, or worsen asthma. Burning candles can also release soot and volatile compounds into the air.

How to reduce risk:
Ventilate rooms regularly, choose unscented or naturally scented products, or use alternatives like fresh flowers, essential oil diffusers (in moderation), or simply open windows.

3. Cleaning Products with Strong Chemicals

Household cleaners are designed to kill germs, but some contain harsh chemicals that can irritate the skin, eyes, and respiratory system. Mixing certain products—such as bleach and ammonia—can even create toxic fumes.

How to reduce risk:
Read labels carefully, never mix cleaning products, wear gloves when cleaning, and consider using milder or homemade alternatives like vinegar and baking soda for everyday tasks.

4. Plastic Food Containers

Many plastic containers are convenient for storing food, but some can release harmful substances when heated or used repeatedly. This is especially concerning when microwaving food or storing hot meals in plastic.

How to reduce risk:
Use glass or stainless-steel containers whenever possible, avoid microwaving food in plastic, and discard old or cracked plastic containers.

5. Old Mattresses and Pillows

You spend a significant portion of your life sleeping, yet old mattresses and pillows can harbor dust mites, mold, and allergens. Over time, they can contribute to allergies, breathing problems, and poor sleep quality.

How to reduce risk:
Replace pillows every 1–2 years and mattresses every 7–10 years. Use washable, allergen-resistant covers and clean bedding regularly.

6. Mold in Damp Areas

Bathrooms, kitchens, basements, and poorly ventilated rooms are common breeding grounds for mold. Mold exposure can cause coughing, sneezing, skin irritation, and may worsen asthma or other respiratory conditions.

How to reduce risk:
Fix leaks promptly, use exhaust fans, keep humidity levels low, and clean visible mold with appropriate solutions while wearing protective gloves.

7. Electronics in the Bedroom

Phones, tablets, and televisions are a normal part of modern life, but keeping them close while sleeping can affect your health. Blue light exposure may disrupt sleep patterns, and constant notifications can increase stress and anxiety.

How to reduce risk:
Keep electronics out of the bedroom when possible, turn off screens at least an hour before sleep, and use night-mode settings to reduce blue light.

8. Old Paint and Household Dust

In older homes, peeling paint and household dust may contain harmful substances. Even in newer homes, dust can carry allergens, chemicals, and pollutants that affect breathing and overall health.

How to reduce risk:
Clean floors and surfaces regularly with a damp cloth, vacuum with a HEPA filter, and avoid sanding or scraping old paint without proper safety measures.

Final Thoughts

Most household dangers don’t announce themselves loudly—they build up quietly over time. The good news is that awareness and small changes can significantly reduce the risks. You don’t need to replace everything at once or live in fear of your surroundings. Instead, focus on ventilation, cleanliness, safer materials, and mindful use of everyday products.

Your home should support your health, not compromise it. By paying attention to these common household items and making simple adjustments, you can create a safer, healthier space for yourself and your loved ones—starting today.

Honey Lemon Turmeric Gummies

Honey Lemon Turmeric Gummies are a delicious way to enjoy ingredients that have been treasured for generations. These soft, chewy gummies combine the warm earthiness of turmeric, the bright freshness of lemon, and the soothing sweetness of honey into one easy, enjoyable bite. Unlike store-bought supplements filled with artificial flavors and preservatives, homemade gummies allow you to control exactly what goes into your body—naturally.

Perfect for adults who dislike swallowing pills and for anyone looking to add a comforting daily ritual, these gummies are as enjoyable as they are practical.

Why Honey, Lemon, and Turmeric Work So Well Together

This trio has been used across cultures for centuries, especially in traditional home remedies and wellness drinks.

Turmeric
Turmeric contains curcumin, a compound known for its antioxidant properties. It has long been used in cooking and traditional wellness practices, particularly in South Asia. When paired with black pepper, turmeric’s absorption improves significantly.

Honey
Raw honey is naturally sweet and contains trace enzymes and antioxidants. It also helps balance turmeric’s bitterness, making these gummies pleasant to eat while acting as a natural binder and preservative.

Lemon
Fresh lemon juice adds vitamin C and a refreshing tang. Its acidity helps brighten the flavor and complements honey beautifully.

Together, these ingredients create gummies that taste more like a treat than a supplement.

Benefits of Honey Lemon Turmeric Gummies (Without Medical Claims)

While these gummies are not medicine, many people enjoy them as part of a balanced lifestyle because they:

  • Add natural antioxidants to the diet

  • Encourage consistent use of turmeric in a tasty form

  • Offer a comforting daily ritual

  • Replace sugary candies with a homemade alternative

  • Are easy to store and carry

They’re especially popular during seasonal changes, early mornings, or as a gentle after-meal treat.

Ingredients You’ll Need

To make about 25–30 gummies:

  • 1 cup fresh lemon juice (strained)

  • 2 tablespoons ground turmeric (or 3 tablespoons fresh grated turmeric)

  • 3 tablespoons raw honey (adjust to taste)

  • 1 tablespoon fresh ginger juice (optional but recommended)

  • 2 tablespoons grass-fed gelatin powder

  • 1/4 teaspoon ground black pepper

  • Silicone gummy molds

Step-by-Step Recipe Instructions

Step 1: Warm the Liquid Base

In a small saucepan over low heat, combine the lemon juice, honey, turmeric, ginger juice, and black pepper. Stir gently and warm the mixture without boiling. Heat just until everything is well combined.

Step 2: Bloom the Gelatin

Slowly sprinkle the gelatin over the warm mixture while whisking continuously. This prevents clumping and ensures smooth gummies.

Step 3: Fully Dissolve

Continue whisking over low heat for 2–3 minutes until the gelatin is completely dissolved. Do not let the mixture boil, as this can weaken the gelatin’s setting power.

Step 4: Pour into Molds

Carefully pour the mixture into silicone molds using a spoon or dropper. Work quickly, as the mixture thickens as it cools.

Step 5: Chill and Set

Place the molds in the refrigerator for at least 1–2 hours until fully set.

Step 6: Store Properly

Remove gummies from molds and store them in an airtight container in the refrigerator for up to 2 weeks.

Tips for Perfect Gummies Every Time

  • Use silicone molds for easy removal

  • Stir constantly when adding gelatin to avoid lumps

  • Adjust sweetness by increasing or reducing honey

  • Wear gloves when handling turmeric—it stains

  • Add orange juice for a sweeter citrus flavor

How to Enjoy These Gummies

  • Take 1–2 gummies daily as part of your routine

  • Enjoy in the morning with warm water or tea

  • Use as a healthy alternative to candy cravings

  • Pair with a balanced diet for best results

Consistency matters more than quantity.

Variations You Can Try

  • Vegan version: Use agar-agar instead of gelatin

  • Spiced version: Add cinnamon or clove

  • Immune blend: Add a splash of elderberry juice

  • Cooling twist: Mix in mint extract

Final Thoughts

Honey Lemon Turmeric Gummies are a simple, enjoyable way to bring traditional ingredients into modern life. They’re easy to make, naturally flavored, and customizable to your taste. Whether you’re looking for a daily wellness habit or a homemade treat with purpose, these gummies strike the perfect balance between flavor and function.

Once you try them, they’re likely to become a staple in your kitchen—one chewy bite at a time. 🍯🍋✨