No bake Chocolate Eclair Cake

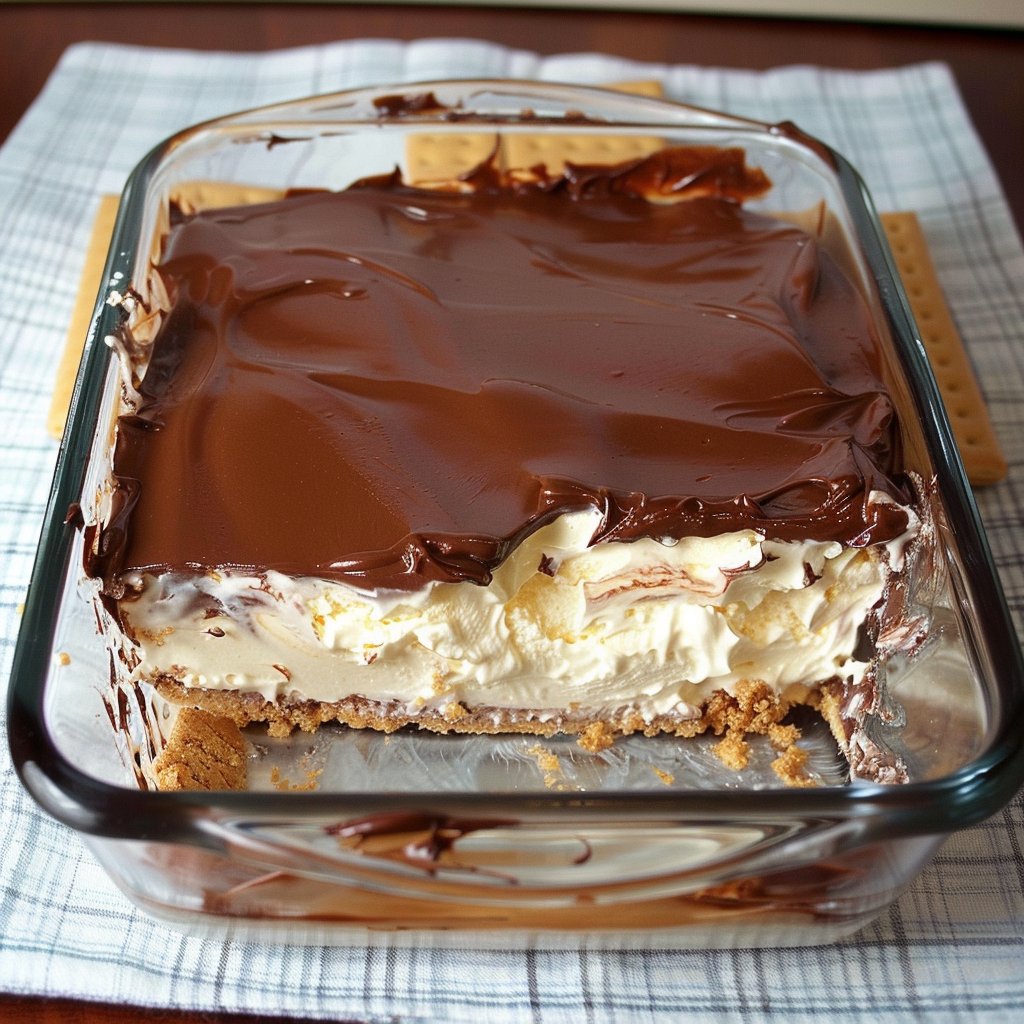
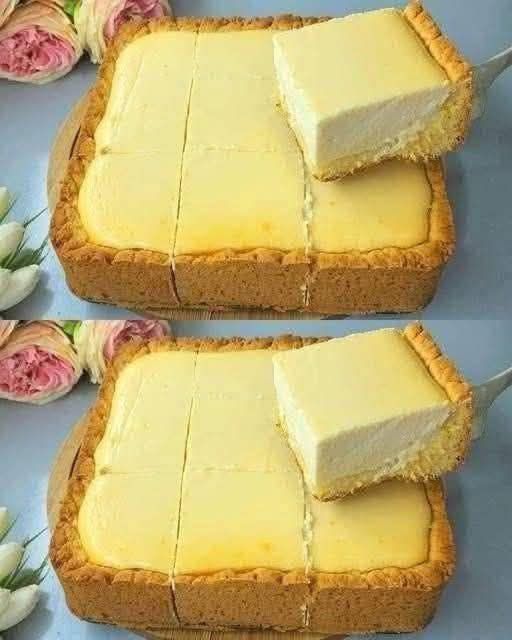
If you’re looking for a dessert that combines rich chocolate, creamy custard, and soft, pillowy layers—all without turning on your oven—look no further than the no-bake chocolate eclair cake. This dessert is a simplified version of the traditional French éclair, transforming it into a layered treat that’s perfect for gatherings, holidays, or even a simple family dessert. With minimal effort and maximum flavor, it’s no wonder that this no-bake delight has become a favorite in homes around the world.

What is a No-Bake Chocolate Eclair Cake?

Traditionally, eclairs are delicate pastries filled with custard or cream and topped with chocolate ganache. The no-bake chocolate eclair cake recreates those flavors using layers of store-bought graham crackers or ladyfingers, creamy vanilla custard, and a luscious chocolate topping. The magic lies in the simplicity: the crackers soak up the custard, creating a texture reminiscent of soft pastry, while the chocolate topping adds the perfect finish.

Unlike baked desserts, this cake doesn’t require complicated steps or precise oven temperatures. It’s assembled in a few easy layers and chilled until firm, making it accessible even to novice bakers or anyone short on time.

Ingredients You’ll Need

The beauty of this dessert is that the ingredients are simple and easy to find:

For the Custard Layer:

  • 1 package (3.4 oz) instant vanilla pudding mix

  • 2 cups cold milk

  • 8 oz cream cheese, softened

  • 1/2 cup granulated sugar

  • 1 teaspoon vanilla extract

  • 1 cup heavy whipping cream, whipped

For the Chocolate Topping:

  • 1 package (4 oz) semi-sweet chocolate, melted

  • 1/4 cup butter, melted

  • 1/4 cup powdered sugar (optional, for extra sweetness)

For the Layers:

  • 1–2 packages graham crackers (depending on pan size)

Optional: Whipped cream or chocolate shavings for garnish.

Step-by-Step Instructions

1. Prepare the Custard Layer:
In a large mixing bowl, combine the softened cream cheese and sugar. Beat until smooth and creamy. In another bowl, whisk together the instant vanilla pudding mix and cold milk until thickened. Slowly fold the pudding into the cream cheese mixture until fully combined. Finally, gently fold in the whipped cream for a light, airy texture. This mixture will form the indulgent, creamy base of your cake.

2. Layer the Graham Crackers:
In a 9×13-inch baking dish, lay down a single layer of graham crackers. Make sure the crackers cover the bottom completely, but don’t worry if there are small gaps—they will soften and meld together once the custard is added.

3. Add the Custard:
Spread half of your prepared custard mixture evenly over the graham crackers. Use a spatula to ensure the layer is smooth and reaches all edges.

4. Repeat Layers:
Add another layer of graham crackers on top of the custard, followed by the remaining custard mixture. Finish with a final layer of graham crackers. The layers don’t need to be perfect; the flavors and textures will merge beautifully as the cake chills.

5. Prepare the Chocolate Topping:
In a small bowl, melt the chocolate and butter together. You can do this in the microwave in 30-second intervals, stirring between each until smooth. If you like extra sweetness, mix in the powdered sugar. Pour the chocolate mixture over the top layer of graham crackers, spreading it evenly with a spatula. The chocolate will set as the cake chills, creating a glossy, decadent finish.

6. Chill the Cake:
Cover the cake with plastic wrap and refrigerate for at least 4 hours, or overnight if possible. During this time, the graham crackers will absorb the custard and soften, creating a texture similar to a baked pastry. The flavors meld together, resulting in a dessert that’s creamy, chocolatey, and irresistibly rich.

7. Serve and Garnish:
Once chilled, slice the cake into squares or rectangles. For a decorative touch, add whipped cream rosettes, chocolate shavings, or a drizzle of caramel on top. Each bite offers a perfect balance of creamy custard, soft graham crackers, and rich chocolate.

Tips for Success

  • Use full-fat ingredients for the richest flavor. Skim milk or low-fat cream cheese can affect the texture.

  • Layering matters: Ensure your graham crackers are completely covered with custard to avoid dryness.

  • Chilling is key: The cake tastes best when fully chilled, as this allows the layers to meld together and the chocolate topping to firm up.

  • Make ahead: This dessert can be made a day in advance, making it perfect for parties or family gatherings.

Variations and Add-Ons

  • Coffee flavor: Add 1–2 teaspoons of instant coffee or espresso powder to the chocolate topping for a mocha twist.

  • Fruit layer: Incorporate sliced bananas or strawberries between the custard layers for added freshness.

  • Nutty delight: Sprinkle chopped nuts, such as pecans or almonds, on top of the chocolate for crunch.

Why This Cake is a Crowd-Pleaser

No-bake chocolate eclair cake is a dessert that appeals to all ages. Its combination of chocolate and creamy custard satisfies any sweet tooth, while the soft graham crackers mimic a delicate pastry without the hassle of baking. It’s quick, easy, and forgiving, making it ideal for both experienced bakers and beginners.

The convenience of no-bake desserts is unmatched, especially during the hot summer months or when time is limited. This cake proves that you don’t need to spend hours in the kitchen to create something extraordinary.

Final Thoughts

Whether it’s a birthday celebration, a potluck, or a simple family treat, no-bake chocolate eclair cake is a dessert that promises indulgence with minimal effort. Its creamy layers, chocolatey topping, and soft texture make it irresistible, and its simplicity ensures anyone can create it successfully. Once you try this recipe, it’s bound to become a staple in your dessert rotation, delighting friends and family with every bite.

keto butter pecan pound cake

If you’ve ever dreamed of savoring a rich, buttery slice of pound cake without the carb overload, the Keto Butter Pecan Pound Cake is your answer. This luxurious dessert blends the nutty crunch of toasted pecans with the deep, indulgent flavor of real butter, creating a cake that tastes decadent while remaining low in carbs. Perfect for keto dieters, low-carb enthusiasts, or anyone who loves a sweet treat without guilt, this pound cake is a must-try.

Why Keto Pound Cake Works

Traditional pound cakes rely heavily on flour and sugar, which are high in carbs. A keto version replaces these with almond flour and a low-carb sweetener, keeping the texture soft and moist without spiking blood sugar. Butter and eggs form the backbone, providing structure and richness, while pecans add texture and flavor. The result is a cake that’s slightly denser than a conventional pound cake, but impossibly tender, buttery, and nutty—just as a classic should be.


Ingredients

To make a perfect Keto Butter Pecan Pound Cake, you’ll need the following:

  • 1 ½ cups almond flour – finely ground for a smooth texture

  • ½ cup coconut flour – adds structure and absorbs moisture

  • 1 cup unsalted butter, softened – real butter is essential for richness

  • 1 cup erythritol – or your preferred keto-friendly sweetener

  • 5 large eggs, room temperature – provides structure and moisture

  • ½ cup unsweetened almond milk – keeps the cake moist

  • 1 teaspoon vanilla extract – enhances flavor

  • ½ teaspoon almond extract – optional but adds a subtle nutty note

  • ½ teaspoon baking powder – helps the cake rise

  • ¼ teaspoon salt – balances sweetness

  • 1 cup pecans, chopped and lightly toasted – for flavor and crunch


Step-by-Step Instructions

1. Preheat and Prepare

Start by preheating your oven to 325°F (163°C). Grease a 9×5-inch loaf pan with butter or line it with parchment paper for easy removal. Toast the pecans in a dry skillet over medium heat for 5–7 minutes until fragrant, stirring frequently to prevent burning. Set aside to cool.

2. Cream the Butter and Sweetener

In a large mixing bowl, use an electric mixer to beat the softened butter with erythritol until light and fluffy, about 2–3 minutes. This step is crucial—it incorporates air, giving the pound cake a tender, airy crumb.

3. Add the Eggs

Add the eggs one at a time, beating well after each addition. Eggs provide structure and help the cake rise while keeping it moist. Mix in the vanilla and almond extracts for a burst of flavor.

4. Combine Dry Ingredients

In a separate bowl, whisk together almond flour, coconut flour, baking powder, and salt. Coconut flour absorbs a lot of moisture, so don’t skip it—it keeps the cake from being too dense. Gradually fold the dry ingredients into the butter mixture, alternating with almond milk. Begin and end with the dry ingredients, gently folding to maintain a light texture.

5. Fold in Pecans

Gently fold the toasted pecans into the batter. Save a few for topping if you want a decorative crunchy layer on top of your cake.

6. Bake

Pour the batter into your prepared loaf pan and smooth the top with a spatula. Bake for 55–65 minutes, or until the top is golden brown and a toothpick inserted into the center comes out clean. Keep in mind that almond flour cakes brown faster, so check at 50 minutes to prevent over-baking.

7. Cool and Serve

Allow the cake to cool in the pan for 15 minutes, then transfer to a wire rack to cool completely. This step is essential—keto pound cakes firm up as they cool, making them easier to slice without crumbling. Slice thick or thin, and serve as-is or with a pat of butter for extra indulgence.


Tips for Perfect Keto Pound Cake

  1. Room Temperature Ingredients: Butter and eggs at room temperature blend better and result in a smoother batter.

  2. Avoid Overmixing: Once you combine dry and wet ingredients, fold gently. Overmixing can make the cake dense.

  3. Sweetener Choice: Erythritol works well because it doesn’t affect blood sugar, but monk fruit sweetener or allulose are great alternatives.

  4. Storage: Wrap tightly in plastic wrap and store in the fridge for up to a week, or freeze slices for up to three months. Reheat slightly before serving for that just-baked taste.

  5. Add a Glaze: For extra indulgence, drizzle a sugar-free caramel or cream cheese glaze over the cooled cake.


Flavor Variations

  • Chocolate Pecan: Fold in ¼ cup unsweetened cocoa powder and ½ cup sugar-free chocolate chips.

  • Maple Pecan: Replace half the vanilla with sugar-free maple extract for a fall-inspired flavor.

  • Cinnamon Swirl: Mix 1 tablespoon cinnamon with 2 tablespoons erythritol and swirl into the batter before baking.


Final Thoughts

The Keto Butter Pecan Pound Cake proves that low-carb doesn’t mean low-flavor. Every bite is buttery, nutty, and satisfying, with a tender crumb that rivals any traditional pound cake. Perfect for afternoon tea, dessert after dinner, or a keto-friendly celebration cake, this recipe brings the indulgence you love without the carbs you don’t. With a few simple ingredients and a little care, you can enjoy a slice of pure bliss that’s guilt-free and irresistibly delicious.

Whether you’re new to keto baking or a seasoned low-carb chef, this pound cake is a versatile, fail-proof recipe to keep in your repertoire. Toasted pecans, real butter, and a touch of almond extract combine for a cake that’s rich, moist, and utterly unforgettable. Slice a piece, savor the flavor, and relish the fact that it’s low-carb, keto-approved, and absolutely delectable.

garlic kills 14 types of bacteria and 13 types of infections

Garlic, scientifically known as Allium sativum, has been revered for centuries not just as a culinary delight but also as a powerful medicinal herb. From ancient civilizations like the Egyptians and Greeks to modern scientific studies, garlic has been celebrated for its remarkable health benefits. One of its most impressive claims is its ability to combat bacteria and infections—some studies suggest it can target up to 14 types of bacteria and 13 different infections. But what makes garlic such a potent natural antibiotic? Let’s explore the science behind this tiny yet mighty bulb.

The Science Behind Garlic’s Power

The magic of garlic lies in its sulfur-containing compounds, most notably allicin. Allicin is formed when garlic is chopped, crushed, or chewed, activating an enzymatic reaction. This compound is not just responsible for garlic’s pungent aroma; it is also the main agent behind its antimicrobial effects.

Allicin works by disrupting the cellular functions of bacteria. It interferes with their ability to produce essential enzymes, damages their cell walls, and ultimately inhibits their growth. What’s remarkable is that garlic doesn’t just target one or two strains—it has a broad-spectrum effect against a variety of harmful bacteria and pathogens.

14 Types of Bacteria Garlic Can Combat

Scientific research has shown that garlic has antibacterial activity against a wide range of bacteria. Some of the most significant include:

  1. Escherichia coli (E. coli) – Often linked to food poisoning and urinary tract infections.

  2. Staphylococcus aureus – Known for causing skin infections, pneumonia, and sepsis.

  3. Salmonella – Responsible for foodborne illnesses and typhoid fever.

  4. Listeria monocytogenes – Can cause severe infections in pregnant women and immunocompromised individuals.

  5. Helicobacter pylori – Associated with stomach ulcers and chronic gastritis.

  6. Pseudomonas aeruginosa – A dangerous pathogen for hospital-acquired infections.

  7. Bacillus cereus – Causes food poisoning and gastrointestinal issues.

  8. Klebsiella pneumoniae – Responsible for pneumonia and urinary tract infections.

  9. Shigella – Causes dysentery and severe gastrointestinal issues.

  10. Vibrio cholerae – The bacterium behind cholera outbreaks.

  11. Clostridium perfringens – Leads to food poisoning and tissue infections.

  12. Streptococcus mutans – Contributes to tooth decay and oral infections.

  13. Enterococcus faecalis – Can cause infections in the urinary tract, bloodstream, and wounds.

  14. Mycobacterium tuberculosis – The pathogen that causes tuberculosis, although garlic may only support treatment rather than replace medication.

This broad range makes garlic an impressive natural alternative for preventing and managing bacterial infections.

13 Infections Garlic Can Help Fight

Beyond targeting bacteria, garlic is also effective against several infections:

  1. Common cold – Garlic’s antiviral properties may reduce the severity and duration.

  2. Influenza – Acts as an immune booster and may prevent viral replication.

  3. Ear infections – Topical garlic oil can help reduce bacterial growth in the ear canal.

  4. Fungal infections – Effective against candida and athlete’s foot.

  5. Urinary tract infections (UTIs) – Helps eliminate bacteria causing UTIs.

  6. Gastrointestinal infections – Reduces pathogens causing diarrhea and food poisoning.

  7. Respiratory infections – Including bronchitis and sinusitis.

  8. Skin infections – Such as boils, acne, and minor wounds.

  9. Yeast infections – Garlic can help restore microbial balance.

  10. Ear, nose, and throat infections – Antimicrobial effect soothes infection and inflammation.

  11. Parasitic infections – Helps combat intestinal parasites and worms.

  12. Heart-related infections – Supports the body in reducing bacterial impact on cardiovascular tissues.

  13. Tuberculosis adjunct therapy – Supports the immune system alongside conventional treatment.

These effects are why garlic has been called “nature’s antibiotic.” While it’s not a replacement for professional medical care, incorporating garlic into your diet can significantly strengthen your immune system.

How to Use Garlic Effectively

To maximize garlic’s antibacterial and antiviral properties, proper usage is important:

  • Raw consumption: Crushing or chopping garlic and letting it sit for 10 minutes before consumption boosts allicin formation.

  • Garlic water or tea: Steeping crushed garlic in warm water can aid digestion and immunity.

  • Topical applications: Garlic oil or paste can be applied to minor skin infections or fungal issues, but always patch test to avoid irritation.

  • Supplements: Garlic capsules and powders are available, though raw garlic is generally more potent.

Safety Considerations

While garlic is generally safe, excessive intake can cause digestive discomfort, heartburn, or garlic breath. People on blood-thinning medication or with allergies should consult a doctor before consuming high doses.

Conclusion

Garlic is more than just a flavorful addition to your meals—it’s a natural powerhouse with remarkable antibacterial and infection-fighting properties. With its ability to combat 14 types of bacteria and support the body against 13 different infections, garlic proves that sometimes nature provides the best medicine. Integrating garlic into your diet, whether raw, cooked, or in supplement form, can boost immunity, protect against illness, and enhance overall well-being.

In a world where antibiotic resistance is a growing concern, garlic offers a natural, safe, and effective way to support health—truly earning its title as a medicinal marvel.

Doctors reveal that eating beets causes

Beets, also known as beetroot, have long been valued as a humble root vegetable, but modern doctors and nutrition experts are now revealing just how powerful their effects on the body can be. With their deep red color and earthy flavor, beets are packed with nutrients that trigger a wide range of positive changes once you start eating them regularly. From improved circulation to better brain health, the effects of beets go far beyond what most people expect.

Below is a closer look at what doctors say eating beets causes in your body—and why adding them to your diet could be a smart move.


1. Improved Blood Circulation and Lower Blood Pressure

One of the most well-documented effects of eating beets is improved blood flow. Beets are rich in dietary nitrates, which the body converts into nitric oxide. Nitric oxide helps relax and widen blood vessels, allowing blood to flow more easily.

Doctors often point out that this process can:

  • Lower blood pressure naturally

  • Reduce strain on the heart

  • Improve oxygen delivery to muscles and organs

For people with mild hypertension or poor circulation, regularly eating beets may support cardiovascular health when combined with a balanced diet and healthy lifestyle.


2. Increased Energy and Physical Performance

Doctors and sports nutritionists frequently recommend beets to athletes—and for good reason. The nitric oxide produced from beet nitrates improves how efficiently the body uses oxygen.

This can cause:

  • Better stamina and endurance

  • Reduced fatigue during exercise

  • Improved physical performance

Even for non-athletes, eating beets may result in feeling more energized throughout the day, especially for those who often feel sluggish or tired.


3. Better Brain Health and Mental Sharpness

As we age, blood flow to the brain naturally declines, which can affect memory and cognitive function. Doctors reveal that eating beets may help slow this process.

Improved circulation from nitric oxide helps:

  • Increase blood flow to brain areas linked to thinking and decision-making

  • Support focus and mental clarity

  • Potentially reduce age-related cognitive decline

Some experts suggest that beets may be especially beneficial for older adults looking to maintain brain health.


4. Natural Detox Support for the Liver

Beets contain powerful antioxidants and plant compounds, including betalains, which are responsible for their red color. Doctors explain that these compounds support the liver’s natural detoxification processes.

Eating beets can:

  • Help the liver process toxins more efficiently

  • Reduce oxidative stress in liver cells

  • Support overall digestive health

While beets are not a “detox cure,” they can play a supportive role in keeping the liver healthy.


5. Reduced Inflammation in the Body

Chronic inflammation is linked to many health problems, including heart disease, arthritis, and metabolic disorders. Doctors note that beets contain anti-inflammatory compounds that help calm inflammation at the cellular level.

Regular consumption may:

  • Reduce joint discomfort

  • Support heart health

  • Promote overall wellness

This makes beets a valuable food for people dealing with inflammatory conditions or general aches and pains.


6. Improved Digestive Health

Doctors also reveal that eating beets causes positive changes in digestion. Beets are high in dietary fiber, which supports gut health.

Fiber from beets helps:

  • Prevent constipation

  • Support healthy gut bacteria

  • Improve nutrient absorption

A healthier digestive system can also lead to better immunity and more stable blood sugar levels.


7. Support for Healthy Blood Sugar Levels

Despite their natural sweetness, beets have a relatively low glycemic load. Doctors explain that the fiber and antioxidants in beets help slow the absorption of sugar into the bloodstream.

This may:

  • Prevent sharp blood sugar spikes

  • Improve insulin sensitivity

  • Support metabolic health

For people without medical restrictions, beets can be enjoyed in moderation as part of a balanced diet.


8. Enhanced Skin Health and Appearance

Doctors and dermatologists often highlight the skin benefits of nutrient-rich vegetables like beets. Their antioxidants, vitamin C, and iron content help nourish the skin from within.

Eating beets may cause:

  • Healthier-looking, more radiant skin

  • Reduced dullness and dryness

  • Improved oxygen delivery to skin cells

Over time, these effects can contribute to a more youthful appearance.


How to Eat Beets for Maximum Benefits

Doctors recommend simple, natural preparations such as:

  • Roasted or steamed beets

  • Fresh beet juice (in moderation)

  • Grated raw beets in salads

  • Blended into smoothies

Cooking beets lightly helps preserve nutrients while improving digestibility.


Final Thoughts

Doctors reveal that eating beets causes a wide range of beneficial effects in the body—from improved circulation and lower blood pressure to better brain function, digestion, and energy levels. This vibrant root vegetable is a powerful example of how simple foods can make a meaningful difference in overall health.

Adding beets to your diet a few times a week may be a small change, but for many people, it leads to noticeable improvements in how they feel—inside and out.

Homemade Cheddar Cheese Rolls

There’s something deeply comforting about the smell of freshly baked bread filling your kitchen, and when that bread happens to be packed with rich, melty cheddar cheese, it becomes irresistible. Homemade Cheddar Cheese Rolls are the perfect balance of soft, pillowy dough and bold, savory flavor. Whether served warm at the dinner table, enjoyed as a snack, or used as a base for mini sandwiches, these rolls are guaranteed to disappear fast.

This recipe is designed to be approachable, even if you’re new to baking with yeast. With simple ingredients and clear steps, you’ll be rewarded with bakery-style cheese rolls that taste far better than anything store-bought.


Why You’ll Love These Cheddar Cheese Rolls

  • Soft and fluffy texture thanks to enriched dough

  • Real cheddar cheese in every bite

  • Versatile: perfect for breakfast, dinner, or snacks

  • Freezer-friendly and great for make-ahead baking

  • Customizable with herbs, spices, or different cheeses

These rolls pair beautifully with soups, stews, salads, or even a simple pat of butter while still warm.


Ingredients You’ll Need

For the Dough:

  • 3 ½ cups all-purpose flour

  • 2 ¼ teaspoons (1 packet) active dry yeast

  • 1 cup warm milk (about 110°F / 43°C)

  • 2 tablespoons sugar

  • 1 teaspoon salt

  • 3 tablespoons unsalted butter, melted

  • 1 large egg

For the Cheese Filling:

  • 1 ½ cups sharp cheddar cheese, freshly grated

  • ½ teaspoon garlic powder (optional)

  • ½ teaspoon paprika or black pepper (optional)

For Topping (Optional):

  • 1 tablespoon melted butter

  • 1–2 tablespoons grated cheddar

  • Pinch of dried parsley or chives


Step-by-Step Instructions

1. Activate the Yeast

In a large bowl, combine warm milk and sugar. Sprinkle the yeast over the top and let it sit for 5–10 minutes until foamy. This step ensures your yeast is alive and ready to work.

2. Make the Dough

Add melted butter, egg, and salt to the yeast mixture. Gradually mix in the flour, one cup at a time, until a soft dough forms. Turn the dough out onto a lightly floured surface and knead for 8–10 minutes until smooth and elastic.

If the dough feels sticky, add a little flour; if it feels too dry, add a teaspoon of milk at a time.

3. First Rise

Place the dough in a greased bowl, turning once to coat. Cover with a clean kitchen towel and let it rise in a warm place for about 1 hour, or until doubled in size.


Shaping the Cheddar Cheese Rolls

Once risen, gently punch down the dough to release excess air. Divide it into 12–15 equal pieces, depending on your preferred roll size.

Flatten each piece slightly and place about 1–2 tablespoons of grated cheddar cheese in the center. Pinch the edges together to seal, then roll gently into a smooth ball.

Arrange the rolls seam-side down in a greased baking dish, leaving a little space between each for expansion.


Second Rise and Baking

Cover the shaped rolls and let them rise again for 30–40 minutes until puffy. Meanwhile, preheat your oven to 375°F (190°C).

Brush the tops with melted butter and sprinkle with a little extra cheddar if desired. Bake for 18–22 minutes, or until the rolls are golden brown and the cheese is bubbling slightly.

Remove from the oven and brush with more melted butter for extra softness and shine.


Serving Suggestions

Homemade Cheddar Cheese Rolls are best enjoyed warm, straight from the oven. Serve them with:

  • Creamy tomato soup

  • Hearty beef or chicken stew

  • Fresh green salads

  • Scrambled eggs for breakfast

  • As sliders with ham or roast beef

They’re also fantastic sliced open and toasted the next day.


Tips for Perfect Cheese Rolls

  • Use sharp cheddar for maximum flavor

  • Grate your own cheese—pre-shredded cheese doesn’t melt as well

  • Don’t overfill the rolls, or the cheese may leak out

  • For extra flavor, add chopped jalapeños, caramelized onions, or fresh herbs


Storage and Freezing

  • Room temperature: Store in an airtight container for up to 2 days

  • Refrigerator: Up to 5 days (reheat before serving)

  • Freezer: Freeze baked rolls for up to 2 months

To reheat, warm in the oven at 300°F (150°C) for 8–10 minutes.


Final Thoughts

Homemade Cheddar Cheese Rolls are the kind of recipe that quickly becomes a household favorite. They’re comforting, satisfying, and versatile enough for everyday meals or special occasions. Once you’ve tasted the soft crumb and gooey cheddar center, you’ll find yourself making them again and again.

The Legendary Cornish Beef Pasty Recipe

The Cornish beef pasty is more than just a savory pastry—it’s a symbol of Cornwall’s rich culinary heritage. With its golden, hand-crimped crust and hearty filling of beef, potatoes, swede, and onion, this iconic dish was once the perfect meal for tin miners: filling, portable, and satisfying. Today, the Cornish pasty remains a beloved classic, protected by tradition and cherished for its honest, rustic flavors.

Below is an authentic, time-honored recipe that stays true to the spirit of the original Cornish beef pasty, along with tips to ensure perfect results every time.


What Makes a Cornish Pasty Authentic?

A traditional Cornish pasty is defined by a few key elements:

  • Uncooked filling placed inside the pastry before baking

  • Simple ingredients: beef skirt, potatoes, swede (rutabaga), onion, salt, and pepper

  • Shortcrust pastry, sturdy yet flaky

  • Side crimping, not top crimping

These rules helped the pasty survive long days in the mines—and they still make it delicious today.


Ingredients (Makes 4 Large Pasties)

For the Pastry

  • 3½ cups (450 g) all-purpose flour

  • 1 teaspoon salt

  • 1 cup (225 g) cold unsalted butter or beef suet, diced

  • 6–8 tablespoons cold water

For the Filling

  • 12 oz (350 g) beef skirt or chuck steak, finely diced

  • 1 large potato (about 10 oz / 300 g), peeled and diced

  • 1 cup (150 g) swede (rutabaga), peeled and diced

  • 1 medium onion, finely chopped

  • Salt and freshly ground black pepper, to taste

  • 1 tablespoon butter, divided into small pieces

To Finish

  • 1 egg, beaten (for egg wash)


Step-by-Step Instructions

1. Make the Pastry

In a large bowl, mix the flour and salt. Rub in the cold butter (or suet) with your fingertips until the mixture resembles coarse breadcrumbs. Add cold water gradually, mixing until a firm dough forms.

Turn the dough onto a lightly floured surface and knead briefly until smooth. Wrap in plastic and chill for at least 30 minutes. Resting the dough allows the gluten to relax and makes rolling easier.


2. Prepare the Filling

While the dough chills, prepare the filling. Dice the beef and vegetables into small, even pieces—this ensures they cook evenly inside the pastry.

In a bowl, combine the beef, potato, swede, and onion. Season generously with salt and freshly ground black pepper. Do not pre-cook the filling; traditional Cornish pasties rely on steam inside the pastry to cook everything perfectly.


3. Assemble the Pasties

Preheat your oven to 400°F (200°C).

Divide the chilled dough into four equal portions. Roll each portion into a circle about 8–9 inches (20–23 cm) in diameter.

Place a generous mound of filling slightly off-center on each circle. Dot the filling with small pieces of butter for added richness.

Brush the edges of the pastry lightly with water. Fold the dough over the filling to form a half-moon shape, pressing gently to seal.


4. Crimp Like a Cornish Baker

Starting at one end, crimp the edges by folding and pinching the dough along the side to create the signature rope-like seal. This not only looks beautiful but also locks in juices during baking.

Transfer the pasties to a lined baking tray. Brush each one with beaten egg for a glossy, golden finish.


5. Bake to Golden Perfection

Bake in the preheated oven for 15 minutes, then reduce the temperature to 350°F (180°C) and bake for another 35–40 minutes, until the pasties are deep golden brown.

If they begin to brown too quickly, loosely cover with foil.


Serving Suggestions

Cornish pasties are best enjoyed hot, straight from the oven, but they’re equally delicious warm or at room temperature. Traditionally, they’re served on their own, though a side of pickles, mustard, or a simple green salad works beautifully.


Tips for the Perfect Cornish Pasty

  • Use cold ingredients for the pastry to achieve maximum flakiness

  • Don’t overfill—too much filling can cause leaks

  • Cut ingredients evenly so everything cooks at the same rate

  • Season well—the filling relies on simple seasoning for flavor


A Bite of History

Legend has it that miners held the thick crimped edge with dirty hands and discarded it after eating the filling—almost like a built-in handle. Whether or not the story is true, one thing is certain: the Cornish beef pasty has stood the test of time.

With its humble ingredients and bold, comforting flavor, this legendary dish proves that simple food, made well, can become unforgettable.

Biscuit Bites

Biscuit Bites are one of those simple treats that disappear almost as soon as they come out of the oven. Golden on the outside, soft and fluffy on the inside, and bursting with buttery flavor, these bite-sized biscuits are perfect for breakfast, snacks, or even as a side dish for soups and stews. Their small size makes them fun to eat, easy to serve, and ideal for sharing.

What makes Biscuit Bites truly special is their versatility. You can keep them classic and buttery, make them sweet with cinnamon sugar, or turn them savory with cheese and herbs. Whether you’re cooking for a family gathering, a tea party, or just want a quick homemade treat, Biscuit Bites are a reliable and crowd-pleasing option.

Why You’ll Love Biscuit Bites

Biscuit Bites are quick to prepare and require basic pantry ingredients, making them perfect for both beginner and experienced bakers. Unlike large biscuits that need careful shaping, these bite-sized versions are forgiving and fun. They bake evenly, cook faster, and are easier to portion.

Another reason they’re so popular is their texture. When made correctly, Biscuit Bites are tender and fluffy, with delicate layers that pull apart beautifully. The outside becomes lightly crisp while the inside stays soft and moist. Add a brush of melted butter after baking, and you’ll have an irresistible finish that elevates them from simple to spectacular.

Ingredients for Biscuit Bites

To make classic buttery Biscuit Bites, you’ll need:

  • 2 cups all-purpose flour

  • 1 tablespoon baking powder

  • 1 tablespoon sugar

  • ½ teaspoon salt

  • ½ cup cold unsalted butter, cut into small cubes

  • ¾ cup milk (whole milk works best)

  • 1 teaspoon vanilla extract (optional, for a subtle aroma)

  • 2 tablespoons melted butter, for brushing

Optional additions:

  • ½ cup shredded cheddar cheese (for savory bites)

  • 1 teaspoon garlic powder or dried herbs

  • Cinnamon sugar for a sweet topping

Step-by-Step Instructions

1. Preheat the Oven

Start by preheating your oven to 200°C (400°F). Line a baking sheet with parchment paper or lightly grease it to prevent sticking.

2. Mix the Dry Ingredients

In a large bowl, combine the flour, baking powder, sugar, and salt. Whisk them together to ensure everything is evenly distributed. This step is important for achieving uniform rise and texture.

3. Cut in the Butter

Add the cold butter cubes to the flour mixture. Using a pastry cutter, fork, or your fingertips, gently work the butter into the flour until the mixture resembles coarse crumbs. Small chunks of butter are essential—they melt during baking and create tender, flaky layers.

4. Add the Milk

Pour in the milk and vanilla extract, if using. Stir gently until a soft dough forms. Be careful not to overmix, as this can make the biscuits dense rather than fluffy.

5. Shape the Biscuit Bites

Turn the dough out onto a lightly floured surface. Gently pat it into a rectangle about 1 inch thick. Using a knife or small cutter, cut the dough into bite-sized squares or circles.

6. Bake

Place the Biscuit Bites on the prepared baking sheet, leaving a little space between each piece. Bake for 12–15 minutes, or until the tops are lightly golden.

7. Finish with Butter

Remove the Biscuit Bites from the oven and immediately brush them with melted butter. This adds flavor and gives them a beautiful glossy finish.

Sweet and Savory Variations

Sweet Cinnamon Biscuit Bites
After brushing with butter, toss the warm Biscuit Bites in a mixture of cinnamon and sugar. Serve with honey or vanilla glaze for a dessert-style treat.

Cheesy Garlic Biscuit Bites
Mix shredded cheese and garlic powder into the dough before shaping. Sprinkle extra cheese on top before baking for a rich, savory version.

Herb Biscuit Bites
Add dried rosemary, thyme, or parsley to the dough for a fragrant and flavorful side dish.

Serving Suggestions

Biscuit Bites are incredibly versatile. Serve them warm with butter and jam for breakfast, alongside soup or stew for lunch, or as a snack with dipping sauces like honey butter or garlic butter. They’re also perfect for party platters, as guests can grab them easily without utensils.

Storage and Reheating Tips

Store leftover Biscuit Bites in an airtight container at room temperature for up to two days, or refrigerate for up to five days. To reheat, place them in a warm oven for a few minutes or microwave briefly to restore softness.

Final Thoughts

Biscuit Bites prove that great things often come in small packages. With their soft texture, rich buttery flavor, and endless customization options, they’re a recipe you’ll return to again and again. Whether you keep them simple or dress them up with sweet or savory flavors, Biscuit Bites are guaranteed to bring comfort and joy to your table.

Homemade Baileys for Christmas

There’s something undeniably festive about a glass of creamy Irish-style liqueur during the Christmas season. Smooth, indulgent, and gently warming, Baileys has become a holiday classic—sipped by the fire, poured into coffee, or used to elevate desserts. The good news is that you can easily make a homemade Baileys-style liqueur at home, and many people find it even better than the store-bought version. It’s fresher, customizable, and makes a wonderful homemade Christmas gift.

This recipe delivers a velvety, perfectly balanced drink with notes of chocolate, vanilla, and coffee, all wrapped in a smooth whiskey finish. Best of all, it comes together in just minutes and requires no cooking.


Why Make Homemade Baileys at Christmas?

Christmas is the season of warmth, generosity, and indulgence. Homemade Baileys fits beautifully into that spirit. It’s economical, free from unnecessary preservatives, and can be tailored to your personal taste—sweeter, stronger, or more chocolatey. Presented in a glass bottle with a festive ribbon, it becomes a thoughtful and impressive gift that feels far more personal than anything store-bought.


Ingredients (Makes About 1 Liter)

  • 1 cup heavy cream

  • 1 can (395 g) sweetened condensed milk

  • 1½ cups Irish whiskey (Jameson-style works best)

  • 2 tablespoons chocolate syrup

  • 1 tablespoon instant coffee granules

  • 1 teaspoon pure vanilla extract

  • ½ teaspoon almond extract (optional but highly recommended)

  • 1 pinch of salt


Step-by-Step Instructions

1. Dissolve the coffee
In a small bowl, mix the instant coffee granules with 1 tablespoon of hot water. Stir until completely dissolved. This step ensures a smooth texture without gritty bits.

2. Blend the base
Pour the heavy cream and sweetened condensed milk into a blender. Blend on low speed for about 15–20 seconds until fully combined and silky.

3. Add flavorings
Add the chocolate syrup, dissolved coffee, vanilla extract, almond extract (if using), and the pinch of salt. Blend again briefly to incorporate the flavors evenly.

4. Add the whiskey
With the blender on low speed, slowly pour in the Irish whiskey. Blend just until combined. Avoid over-blending, as too much air can thin the texture.

5. Taste and adjust
Taste your homemade Baileys. If you want it sweeter, add a little more condensed milk. For a stronger kick, add a splash more whiskey. If you love chocolate, an extra teaspoon of chocolate syrup works beautifully.

6. Chill before serving
Transfer the mixture to a clean glass bottle or jar with a tight-fitting lid. Refrigerate for at least 2 hours before serving. This resting time allows the flavors to meld and deepen.


Serving Ideas for the Holidays

Homemade Baileys is incredibly versatile during Christmas:

  • Classic: Serve chilled in a small glass, straight or over ice

  • Coffee Upgrade: Add a generous splash to hot coffee and top with whipped cream

  • Dessert Drizzle: Pour over vanilla ice cream, brownies, or chocolate cake

  • Festive Cocktails: Mix with hot chocolate, espresso, or even eggnog

It also pairs beautifully with Christmas cookies, mince pies, and rich desserts.


Storage and Shelf Life

Because this recipe uses fresh cream, it should be stored in the refrigerator at all times. When kept in an airtight container, homemade Baileys lasts up to 2 weeks. Shake gently before each use, as natural separation may occur.

If you plan to give it as a gift, include a small label with the preparation date and storage instructions.


Custom Flavor Variations

One of the joys of homemade Baileys is how easy it is to customize:

  • Chocolate Orange: Add ½ teaspoon orange zest or a drop of orange extract

  • Mint Chocolate: Add a few drops of peppermint extract

  • Spiced Christmas Baileys: Blend in a pinch of cinnamon or nutmeg

  • Caramel: Replace chocolate syrup with caramel sauce for a buttery twist

Each variation brings a new festive personality to the drink.


A Perfect Homemade Christmas Gift

Pour your Baileys into decorative glass bottles, add a handwritten tag, and tie with twine or a red ribbon. It’s a gift that feels luxurious, thoughtful, and handmade—perfect for Christmas gatherings, host gifts, or cozy nights in.


Final Thoughts

Homemade Baileys is more than just a drink—it’s a celebration of the season. Creamy, comforting, and deeply indulgent, it captures the essence of Christmas in every sip. Whether you’re sharing it with loved ones, gifting it to friends, or enjoying a quiet moment by the fire, this recipe is sure to become a cherished holiday tradition.

Once you try making it yourself, you may never go back to the store-bought version again. Cheers to a warm, joyful, and delicious Christmas! 🎄🥛🥃

Banana Pudding Trifle with Chocolate Chips

Few desserts strike the perfect balance between comfort and celebration quite like a banana pudding trifle. Creamy, sweet, and layered with nostalgic flavors, this dessert takes the classic Southern banana pudding and elevates it into a show-stopping centerpiece. The addition of chocolate chips adds a delightful twist—tiny bursts of rich chocolate that contrast beautifully with the smooth vanilla pudding, ripe bananas, and soft cake or cookies. Whether you’re hosting a family gathering, preparing a holiday dessert, or simply craving something indulgent yet familiar, this banana pudding trifle with chocolate chips is guaranteed to please.

Why This Trifle Works So Well

A trifle is all about layers, textures, and visual appeal. In this recipe, each spoonful delivers something special: fluffy whipped cream, velvety pudding, tender bananas, soft cake or wafers, and the gentle crunch of chocolate chips. The flavors are simple and comforting, but when combined, they create a dessert that feels both nostalgic and modern.

Chocolate chips might seem like a small addition, but they make a big difference. They cut through the sweetness of the pudding and bananas, adding depth and a slightly bittersweet note that keeps the dessert from feeling too heavy.

Ingredients You’ll Need

This recipe is designed to be approachable, using ingredients that are easy to find and simple to work with.

  • Bananas: Choose ripe but firm bananas. They should be sweet and fragrant without being mushy.

  • Vanilla pudding: You can use homemade vanilla pudding for a richer flavor or instant pudding for convenience.

  • Milk: Cold milk works best for pudding, especially if using instant.

  • Heavy cream: For homemade whipped cream that’s light and airy.

  • Powdered sugar: Adds sweetness to the whipped cream without graininess.

  • Vanilla extract: Enhances the overall flavor.

  • Vanilla wafers or sponge cake: Traditional banana pudding uses vanilla wafers, but pound cake or sponge cake also works beautifully.

  • Chocolate chips: Mini chocolate chips are ideal, as they distribute more evenly through the layers.

  • Optional extras: Chocolate shavings, caramel drizzle, or crushed cookies for garnish.

Step-by-Step Preparation

1. Prepare the pudding
If you’re making homemade pudding, allow it to cool completely before assembling the trifle. If using instant pudding, whisk it with cold milk until thick and smooth, then refrigerate for a few minutes to fully set. The pudding should be creamy but firm enough to hold its shape in layers.

2. Whip the cream
In a chilled bowl, beat the heavy cream with powdered sugar and vanilla extract until soft peaks form. Be careful not to overwhip—you want the cream to be fluffy and smooth, not stiff or grainy.

3. Slice the bananas
Just before assembling the trifle, slice the bananas into even rounds. Cutting them at the last minute helps prevent browning and keeps them looking fresh.

4. Prepare the base layer
At the bottom of a large glass trifle dish (or individual serving glasses), add a layer of vanilla wafers or cake pieces. This layer absorbs moisture from the pudding and bananas, becoming soft and cake-like.

5. Start layering
Spread a layer of vanilla pudding over the base, followed by a layer of banana slices. Sprinkle a generous handful of chocolate chips over the bananas. Then add a layer of whipped cream, spreading it gently to keep the layers distinct.

6. Repeat the layers
Continue layering wafers or cake, pudding, bananas, chocolate chips, and whipped cream until the dish is full. Aim for at least two to three complete sets of layers for the best visual and textural impact.

7. Finish with flair
Top the trifle with a final layer of whipped cream. Sprinkle chocolate chips, chocolate shavings, or crushed vanilla wafers on top. A few banana slices or a light drizzle of caramel can add an elegant finishing touch.

Chilling and Serving

For best results, refrigerate the trifle for at least 2–4 hours before serving. This resting time allows the flavors to meld and the layers to set properly. The wafers soften, the pudding thickens slightly, and the dessert becomes easier to scoop.

When ready to serve, use a large spoon to dig deep into the trifle, ensuring each portion includes every layer. The contrast of creamy pudding, soft fruit, and chocolate makes every bite satisfying.

Tips for the Perfect Banana Pudding Trifle

  • Use mini chocolate chips: They distribute more evenly and don’t overpower the dessert.

  • Prevent banana browning: If preparing slightly ahead, lightly brush banana slices with lemon juice, though this is usually unnecessary if assembling close to serving time.

  • Balance sweetness: If your chocolate chips are very sweet, consider using dark or semi-sweet chocolate.

  • Make it your own: Add peanut butter chips, white chocolate chips, or a layer of chocolate pudding for variation.

A Dessert for Any Occasion

This banana pudding trifle with chocolate chips is the kind of dessert that brings people back for seconds. It’s comforting enough for a casual family dinner yet impressive enough for parties and celebrations. With its beautiful layers, familiar flavors, and irresistible chocolate twist, it’s a dessert that feels both timeless and exciting—proof that even classic recipes can shine with a small, thoughtful upgrade.

A Timeless Italian Classic Torta della Nonna

Few desserts capture the warmth and nostalgia of Italian home baking quite like Torta della Nonna, which translates simply to “Grandmother’s Cake.” This beloved Tuscan dessert is a celebration of simplicity and balance: a tender shortcrust pastry filled with silky vanilla custard, topped with pine nuts and a gentle snowfall of powdered sugar. It’s the kind of cake that doesn’t shout for attention, yet once tasted, it leaves a lasting impression—much like the grandmothers who inspired it.

Traditionally served after Sunday lunch or with an afternoon espresso, Torta della Nonna has endured for generations because it relies on honest ingredients and careful technique rather than extravagance. Below is a classic, authentic recipe that brings this timeless Italian favorite into your kitchen.

Ingredients

For the Italian Shortcrust Pastry (Pasta Frolla)

  • 2 ½ cups (315 g) all-purpose flour

  • ½ cup (100 g) granulated sugar

  • ¾ cup (170 g) unsalted butter, cold and cubed

  • 2 large egg yolks

  • 1 whole egg

  • Zest of 1 lemon

  • 1 teaspoon vanilla extract

  • Pinch of salt

For the Pastry Cream (Crema Pasticcera)

  • 2 cups (500 ml) whole milk

  • 4 large egg yolks

  • ½ cup (100 g) granulated sugar

  • ¼ cup (30 g) cornstarch

  • Zest of 1 lemon

  • 1 teaspoon vanilla extract

For Topping

  • 3 tablespoons pine nuts

  • Powdered sugar, for dusting

Step-by-Step Instructions

1. Prepare the Pastry Cream

Begin with the custard, as it needs time to cool. In a saucepan, gently heat the milk with the lemon zest until it is warm but not boiling. Remove from heat and let it infuse.

In a bowl, whisk together the egg yolks and sugar until pale and creamy. Add the cornstarch and whisk until smooth. Slowly pour the warm milk into the egg mixture, whisking constantly to avoid curdling. Return everything to the saucepan and cook over medium-low heat, stirring continuously, until the custard thickens to a smooth, pudding-like consistency.

Remove from heat, stir in the vanilla extract, and discard the lemon zest. Transfer the custard to a bowl, cover with plastic wrap pressed directly onto the surface, and let it cool completely.

2. Make the Pasta Frolla

In a large bowl, combine the flour, sugar, salt, and lemon zest. Add the cold butter cubes and rub them into the flour using your fingertips until the mixture resembles coarse crumbs.

Add the egg yolks, whole egg, and vanilla extract. Gently mix until the dough comes together. Avoid overworking it; the dough should be soft but not sticky. Shape into a disk, wrap in plastic, and refrigerate for at least 30 minutes.

3. Assemble the Cake

Preheat your oven to 350°F (175°C). Butter and lightly flour a 9-inch (23 cm) tart pan.

Divide the chilled dough into two portions, one slightly larger than the other. Roll out the larger portion on a lightly floured surface and use it to line the bottom and sides of the tart pan. Trim any excess.

Spread the cooled pastry cream evenly over the dough base. Roll out the remaining dough and gently place it over the custard filling. Seal the edges by pressing lightly.

4. Add the Classic Topping

Sprinkle the pine nuts evenly over the top of the cake. They will toast beautifully in the oven, adding a subtle nutty aroma and traditional finish.

5. Bake

Bake the Torta della Nonna for 40–45 minutes, or until the pastry is golden and firm to the touch. Allow the cake to cool completely in the pan before removing it.

Once cooled, dust generously with powdered sugar.

Serving and Storage

Torta della Nonna is best served at room temperature, when the custard is fully set and the flavors are well balanced. Slice it cleanly with a sharp knife and serve with espresso, cappuccino, or a light dessert wine.

The cake keeps well in the refrigerator for up to 3 days. Simply bring it to room temperature before serving for the best texture and flavor.

Tips for Authentic Flavor

  • Use real vanilla and fresh lemon zest for a traditional Italian aroma.

  • Pine nuts are essential; substituting them changes the character of the cake.

  • Don’t rush the chilling time for the dough—it ensures a tender, flaky crust.

Final Thoughts

Torta della Nonna is more than just a dessert; it’s a slice of Italian tradition passed down through generations. With its buttery crust, creamy custard, and delicate pine nut topping, it embodies comfort, elegance, and timeless appeal. Whether you’re baking it for family, guests, or simply yourself, this classic recipe brings a touch of Italian grandmotherly love to every bite.