Decadent Chocolate Layer Cake with Vanilla Cream Filling

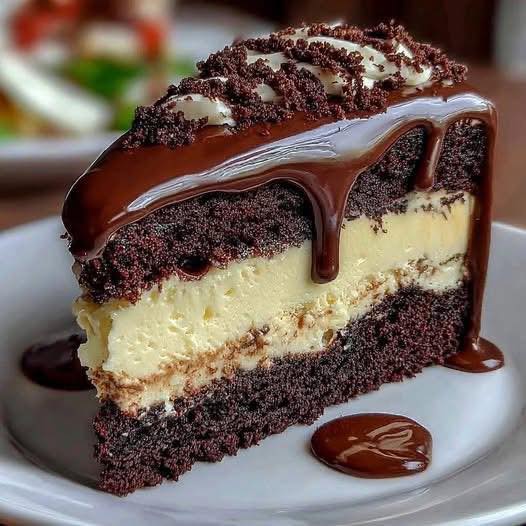
Few desserts command attention quite like a rich, towering chocolate layer cake. It’s the kind of dessert that turns an ordinary gathering into a celebration and makes birthdays, holidays, or simple family dinners feel extra special. This Decadent Chocolate Layer Cake with Vanilla Cream Filling is everything a chocolate lover dreams of: deeply moist chocolate cake layers, a silky smooth vanilla cream filling, and a luscious chocolate frosting that ties it all together. Each bite offers the perfect balance of intense cocoa flavor and light, creamy sweetness.

Why This Cake Is So Special

What sets this cake apart is its texture and contrast. The chocolate layers are tender and moist thanks to a combination of cocoa powder, oil, and hot liquid, which helps bloom the cocoa for maximum flavor. The vanilla cream filling adds a soft, cloud-like layer that cuts through the richness of the chocolate, preventing the cake from feeling too heavy. When frosted generously, the result is a bakery-quality dessert you can confidently make at home.

This cake is ideal for celebrations, but it’s also perfect when you simply want to impress guests or treat yourself to something truly indulgent.

Ingredients

For the Chocolate Cake Layers

  • 2 cups all-purpose flour

  • 2 cups granulated sugar

  • ¾ cup unsweetened cocoa powder

  • 2 teaspoons baking soda

  • 1 teaspoon baking powder

  • 1 teaspoon salt

  • 2 large eggs

  • 1 cup buttermilk (or milk with 1 tablespoon vinegar)

  • ½ cup vegetable oil

  • 2 teaspoons vanilla extract

  • 1 cup hot coffee or hot water

For the Vanilla Cream Filling

  • 1½ cups heavy whipping cream

  • ⅓ cup powdered sugar

  • 1 teaspoon vanilla extract

  • 8 oz cream cheese, softened

For the Chocolate Frosting

  • 1 cup unsalted butter, softened

  • 3½ cups powdered sugar

  • ½ cup unsweetened cocoa powder

  • ½ cup heavy cream (more if needed)

  • 1 teaspoon vanilla extract

  • Pinch of salt

Instructions

Step 1: Prepare the Chocolate Cake

Preheat your oven to 350°F (175°C). Grease and line two 9-inch round cake pans with parchment paper.

In a large bowl, whisk together the flour, sugar, cocoa powder, baking soda, baking powder, and salt. In another bowl, combine the eggs, buttermilk, oil, and vanilla extract. Slowly mix the wet ingredients into the dry ingredients until smooth.

Gradually pour in the hot coffee or water, stirring gently. The batter will be thin—this is exactly what you want for a moist cake. Divide the batter evenly between the prepared pans.

Bake for 30–35 minutes, or until a toothpick inserted in the center comes out clean. Allow the cakes to cool in the pans for 10 minutes, then transfer to a wire rack to cool completely.

Step 2: Make the Vanilla Cream Filling

In a mixing bowl, beat the softened cream cheese until smooth and creamy. Add powdered sugar and vanilla extract, mixing until fully combined.

In a separate bowl, whip the heavy cream until stiff peaks form. Gently fold the whipped cream into the cream cheese mixture. The result should be light, fluffy, and smooth—perfect for layering between cake layers.

Step 3: Prepare the Chocolate Frosting

In a large bowl, beat the softened butter until creamy. Add the cocoa powder and powdered sugar gradually, mixing well after each addition. Pour in the heavy cream, vanilla extract, and a pinch of salt. Beat until the frosting is smooth, fluffy, and spreadable. Adjust the consistency with more cream if needed.

Step 4: Assemble the Cake

Place one chocolate cake layer on a serving plate or cake stand. Spread a generous layer of vanilla cream filling evenly across the top. Carefully place the second cake layer on top, pressing gently to secure.

Frost the top and sides of the cake with the chocolate frosting. Use a spatula or cake scraper to create smooth sides or decorative swirls, depending on your preference.

Tips for the Perfect Cake

  • Use room-temperature ingredients: This ensures a smoother batter and cream filling.

  • Chill before slicing: Refrigerating the cake for 30–45 minutes helps the layers set and makes slicing easier.

  • Enhance the flavor: Add a pinch of espresso powder to the cake batter for an even deeper chocolate taste.

  • Decorate creatively: Top with chocolate shavings, fresh berries, or a light dusting of cocoa powder.

Serving and Storage

Serve this cake slightly chilled or at room temperature for the best texture and flavor. Each slice reveals beautiful layers of dark chocolate cake and creamy vanilla filling that are sure to impress.

Store leftovers in an airtight container in the refrigerator for up to 4 days. The flavors often deepen by the second day, making it just as delicious—if not better—than when it was freshly made.

Final Thoughts

This Decadent Chocolate Layer Cake with Vanilla Cream Filling is more than just a dessert—it’s a statement. Rich, elegant, and irresistibly indulgent, it’s the kind of cake people remember long after the last crumb is gone. Whether you’re celebrating a milestone or simply satisfying a chocolate craving, this cake delivers pure dessert perfection in every slice. 🍫🎂

Dump cabbage and these ingredients in slow cooker for a meal guests will crave over and and over

If you’re looking for a comforting, low-effort meal that tastes like you spent all day in the kitchen, this slow cooker cabbage dish is about to become your secret weapon. It’s the kind of recipe people ask for before they’ve even finished their plate. Hearty, savory, and deeply satisfying, this “dump-and-go” meal transforms humble cabbage into something rich, flavorful, and completely crave-worthy.

The beauty of this dish lies in its simplicity. There’s no browning, no complicated prep, and no babysitting the stove. You simply add the ingredients to your slow cooker, turn it on, and let time do the hard work. As the hours pass, the cabbage softens, the flavors meld, and the broth becomes infused with smoky, savory goodness. The result is a meal that feels rustic and homemade in the best possible way.

Why Cabbage Shines in the Slow Cooker

Cabbage is often overlooked, but it’s one of the best vegetables for slow cooking. It holds its shape without turning mushy, absorbs flavors beautifully, and becomes slightly sweet as it cooks. When paired with protein, aromatics, and a well-seasoned broth, cabbage turns into the star of the meal rather than a side dish.

This recipe is especially perfect for feeding guests because it’s:

  • Budget-friendly without tasting cheap

  • Easy to scale up for a crowd

  • Comforting and familiar, yet interesting enough to feel special

  • Practically foolproof, even for beginner cooks

The Ingredients That Make the Magic Happen

Here’s what you’ll need to dump into your slow cooker:

  • 1 large head of green cabbage, chopped into large chunks

  • 1½ pounds smoked sausage or kielbasa, sliced into thick rounds

  • 1 large onion, thinly sliced

  • 3 cloves garlic, minced

  • 4 medium potatoes, peeled and cut into chunks

  • 2 cups chicken broth (or vegetable broth)

  • 1 can (14.5 oz) diced tomatoes, with juices

  • 2 tablespoons tomato paste

  • 1 teaspoon smoked paprika

  • ½ teaspoon black pepper

  • ½ teaspoon salt (adjust to taste)

  • ½ teaspoon dried thyme or Italian seasoning

  • 1 tablespoon Worcestershire sauce

  • 1 tablespoon olive oil or butter (optional, but adds richness)

These ingredients come together to create layers of flavor: smoky from the sausage, savory from the broth, slightly tangy from the tomatoes, and gently sweet from the cabbage and onions.

How to Make It (No Fuss Required)

Start by lightly greasing the inside of your slow cooker. This helps prevent sticking and makes cleanup easier.

  1. Add the chopped cabbage to the bottom of the slow cooker. It may seem like a lot, but it will shrink significantly as it cooks.

  2. Layer in the potatoes, sliced onion, and garlic.

  3. Scatter the sliced sausage evenly over the top.

  4. In a bowl, stir together the broth, diced tomatoes, tomato paste, smoked paprika, black pepper, salt, thyme, and Worcestershire sauce.

  5. Pour this mixture over everything in the slow cooker.

  6. Drizzle with olive oil or dot with butter if using.

  7. Cover and cook on LOW for 7–8 hours or HIGH for 4–5 hours, until the potatoes are tender and the cabbage is silky and flavorful.

That’s it. No stirring required, no extra steps.

The Aroma Alone Will Win Them Over

As this dish cooks, your home will fill with a warm, savory aroma that immediately signals comfort. Guests will start asking what’s cooking the moment they walk in. The cabbage absorbs the smoky broth, the sausage releases its seasoning into the pot, and everything becomes infused with deep, slow-cooked flavor.

When it’s ready, give it a gentle stir and taste for seasoning. Adjust salt and pepper if needed.

How to Serve It for Maximum Praise

This slow cooker cabbage meal is incredibly versatile when it comes to serving. For a cozy, rustic presentation, serve it straight from the slow cooker with a ladle, making sure each bowl gets plenty of sausage, potatoes, and cabbage.

Pair it with:

  • Crusty bread or dinner rolls to soak up the broth

  • A dollop of sour cream or Greek yogurt for richness

  • Fresh chopped parsley for a pop of color

  • A simple green salad to balance the meal

For guests, this dish feels generous and abundant, which is exactly what makes it so memorable.

Why Guests Keep Asking for It Again

There’s something deeply comforting about this meal. It tastes like home cooking, like something passed down through generations, even if it’s the first time you’ve made it. The flavors are bold but not overwhelming, familiar but not boring. It satisfies without being heavy, and it somehow tastes even better the next day.

Leftovers reheat beautifully, making it perfect for meal prep or next-day lunches. In fact, many people swear it’s even more flavorful after sitting overnight.

If you want a no-stress, slow cooker meal that delivers big on taste and comfort, dumping cabbage and these ingredients into your slow cooker is the answer. Make it once, and don’t be surprised when your guests ask you to make it again—and again—and again.

The best mashed potatoes

Mashed potatoes may seem simple, but making the best mashed potatoes is an art. When done right, they are creamy without being gluey, rich without being heavy, and flavorful without overpowering the meal. This humble side dish has the power to steal the spotlight at any table—from everyday dinners to festive holiday feasts. The secret lies not in fancy ingredients, but in technique, balance, and a few professional tips that transform ordinary potatoes into something unforgettable.

Choosing the Right Potatoes

The foundation of great mashed potatoes starts with the right variety. Yukon Gold potatoes are widely considered the best choice. They have a naturally buttery flavor and a creamy texture that mashes beautifully. Russet potatoes are another excellent option, especially if you prefer lighter, fluffier mashed potatoes. They are starchier, which helps create a soft, airy texture. Avoid waxy potatoes like red or fingerling varieties, as they tend to become gummy when mashed.

Proper Preparation Makes the Difference

Always start by peeling your potatoes unless you prefer a rustic texture with skins included. Cut them into evenly sized chunks—this ensures they cook at the same rate. Place them in a pot of cold, well-salted water before heating. Starting in cold water allows the potatoes to cook evenly from the inside out, preventing a mushy exterior and undercooked center.

Bring the water to a gentle boil and cook until the potatoes are fork-tender. This usually takes about 15–20 minutes, depending on the size of the pieces. Be careful not to overcook them, as waterlogged potatoes lead to bland, watery mash.

Draining and Drying: A Crucial Step

Once cooked, drain the potatoes thoroughly and return them to the hot pot. Place the pot back over low heat for 30–60 seconds, gently shaking it. This step allows excess moisture to evaporate, which is essential for achieving rich, creamy mashed potatoes rather than soggy ones.

The Right Tools Matter

To achieve the best texture, use a potato masher, ricer, or food mill. These tools break down the potatoes gently, preserving their structure. Avoid using a blender or food processor, as they overwork the starches and turn the potatoes into glue. If you want ultra-smooth mashed potatoes, a ricer is the gold standard.

Warm Your Dairy

One of the most overlooked secrets to perfect mashed potatoes is warming your dairy. Cold butter or milk can cool the potatoes and prevent proper absorption. Heat your butter and cream (or milk) until warm—not boiling—before adding them. This allows the potatoes to absorb the fat evenly, resulting in a smoother, richer texture.

Butter First, Always

For the best flavor, add butter before milk or cream. Butter coats the starch molecules and prevents them from absorbing too much liquid, which helps maintain a creamy consistency. Use good-quality unsalted butter so you can control the salt level. Generous amounts are encouraged—this is not the dish to skimp on richness.

Seasoning Is Everything

Salt is essential, but timing matters. Salting the cooking water seasons the potatoes from the inside. After mashing, add more salt gradually and taste as you go. Freshly ground black pepper adds warmth, while optional additions like roasted garlic, chives, or sour cream can elevate the flavor without overwhelming it.

Texture: Customize to Your Taste

The “best” mashed potatoes are the ones that match your personal preference. For extra creamy mashed potatoes, add more warm cream and butter. For a fluffier texture, use russet potatoes and mash gently, incorporating air. If the potatoes seem too thick, add small splashes of warm milk until the desired consistency is reached.

Avoiding Common Mistakes

Several mistakes can ruin mashed potatoes. Overmixing is the most common—it releases excess starch and creates a gummy texture. Adding cold ingredients can make the mash stiff and uneven. Underseasoning leaves them bland, while too much liquid turns them soupy. Paying attention to these details ensures consistently excellent results.

Serving and Storing

Mashed potatoes are best served immediately while hot and fluffy. If you need to keep them warm, cover the pot and place it over very low heat or in a warm oven. For leftovers, store them in an airtight container in the refrigerator for up to three days. Reheat gently with a splash of milk or butter to restore creaminess.

Final Thoughts

The best mashed potatoes are more than just a side dish—they are comfort food at its finest. With the right potatoes, careful preparation, warm ingredients, and thoughtful seasoning, you can create mashed potatoes that are silky, rich, and deeply satisfying. Once you master these techniques, this classic dish will never be an afterthought again—it will be the reason people come back for seconds.

No-Bake Peanut Butter Oat Cookies

If you’re craving a sweet, satisfying treat but don’t want to spend hours in the kitchen or heat up your oven, no-bake peanut butter oat cookies are the perfect solution. These cookies combine the rich, creamy flavor of peanut butter with the wholesome goodness of oats, resulting in a snack that’s not only delicious but also quick and easy to make. Best of all, you can whip them up in less than 30 minutes, making them ideal for busy weekdays, a last-minute dessert, or even a healthy snack for kids.

Why No-Bake Cookies Are Great

No-bake cookies are a kitchen lifesaver for several reasons. First, they require minimal ingredients, most of which you probably already have in your pantry: oats, peanut butter, sugar, cocoa powder, butter, and a splash of vanilla. Second, since there’s no baking involved, they’re perfect for hot days when you don’t want to turn on the oven. Third, they are highly customizable. You can add chocolate chips, shredded coconut, dried fruits, or nuts to suit your taste. And finally, they offer a slightly healthier alternative to traditional baked cookies because they retain the natural texture and nutrients of the oats and nut butter.

Ingredients You’ll Need

Here’s a simple list of ingredients for making about 24 cookies:

  • 1/2 cup (115g) unsalted butter

  • 2 cups (400g) granulated sugar

  • 1/2 cup (120ml) milk

  • 1/4 cup (25g) unsweetened cocoa powder

  • 1/2 cup (130g) creamy peanut butter

  • 2 teaspoons vanilla extract

  • 3 cups (240g) rolled oats

  • Optional: 1/2 cup chocolate chips, 1/4 cup shredded coconut, 1/4 cup chopped nuts

Each ingredient plays an essential role. Butter, sugar, and milk create a sweet, syrupy base. Cocoa powder adds chocolatey richness. Peanut butter provides both flavor and a creamy texture that binds the oats. Vanilla enhances the overall aroma and taste, and oats give structure while contributing fiber and a hearty texture.

Step-by-Step Instructions

  1. Prepare your workspace: Line a baking sheet with parchment paper or a silicone mat. This is where you’ll place the cookies to set. Gather all your ingredients so you can work quickly once the syrup is ready.

  2. Make the chocolate-peanut butter mixture: In a medium saucepan over medium heat, combine butter, sugar, and milk. Stir constantly until the butter melts and the mixture begins to boil. Once it reaches a rolling boil, allow it to cook for 1-2 minutes while continuing to stir. This ensures the sugar is fully dissolved and the mixture will set properly when cooled.

  3. Add cocoa powder and peanut butter: Remove the saucepan from heat and stir in the cocoa powder until fully combined. Then, add the peanut butter and vanilla extract, stirring until smooth and glossy. If you want to include extras like chocolate chips, shredded coconut, or nuts, fold them in at this stage.

  4. Incorporate the oats: Gradually add the oats to the mixture, stirring until every oat is coated in the chocolate-peanut butter syrup. The mixture should be thick but still scoopable.

  5. Form the cookies: Using a spoon or cookie scoop, drop portions of the mixture onto the prepared baking sheet. Flatten them slightly if desired; no-bake cookies don’t spread like traditional baked cookies. For uniform shapes, you can use a small ice cream scoop.

  6. Let them set: Allow the cookies to cool at room temperature for about 20-30 minutes. If your kitchen is warm, you can place them in the refrigerator for 10-15 minutes to speed up the setting process. Once firm, they are ready to enjoy!

Tips for the Perfect No-Bake Cookie

  • Use fresh peanut butter: Natural peanut butter works, but make sure it’s well-stirred and creamy. Avoid peanut butter that’s too oily or overly dry, as it can affect the texture.

  • Measure oats properly: Too many oats can make the cookies dry, while too few can make them overly sticky. Rolled oats work best; quick oats can be used in a pinch but may result in softer cookies.

  • Don’t overcook the syrup: Boiling for too long can make the mixture too hard once cooled, while undercooking can prevent it from setting properly.

Variations to Try

No-bake peanut butter oat cookies are incredibly versatile. Here are a few variations to inspire you:

  1. Chocolate lover’s version: Add 1/2 cup of mini chocolate chips to the mixture for an extra chocolatey treat.

  2. Nutty delight: Stir in chopped almonds, walnuts, or pecans for added crunch.

  3. Coconut twist: Add shredded coconut to the oats mixture for a tropical flavor.

  4. Protein boost: Mix in a scoop of chocolate or vanilla protein powder to make them a post-workout snack.

Storage Tips

No-bake cookies are surprisingly resilient. You can store them in an airtight container at room temperature for up to a week. If you prefer a firmer texture, keep them in the refrigerator for up to two weeks. For longer storage, they freeze beautifully: place them in a freezer-safe container or bag and freeze for up to 3 months. To enjoy, simply thaw at room temperature for 10-15 minutes.

Conclusion

No-bake peanut butter oat cookies are the ultimate combination of simplicity, taste, and convenience. With just a handful of ingredients, you can create a treat that’s rich, chewy, and utterly irresistible. Whether you’re making them for yourself, your family, or a gathering with friends, these cookies are sure to satisfy any sweet tooth without requiring an oven or complicated baking skills.

The next time you need a quick snack or a dessert that everyone will love, reach for this no-bake recipe. It’s a classic example of how a few wholesome ingredients can come together to create something truly delicious. So grab your oats, peanut butter, and chocolate, and enjoy making – and eating – these delightful cookies. Your taste buds will thank you!

Sweet Pineapple Casserole

Sweet Pineapple Casserole: A Classic Comfort Dish for Every Occasion

Sweet Pineapple Casserole is a timeless side dish that brings a perfect balance of savory and sweet to the table. Often reserved for holiday feasts like Thanksgiving or Christmas, this golden, caramelized delight is a showstopper in its simplicity. Its combination of tender pineapple, buttery topping, and subtle seasonings makes it irresistible to both adults and children alike. Whether you are a seasoned cook or a kitchen novice, making this casserole is straightforward, yet the results are spectacular.

Origins and Popularity

Pineapple casseroles have roots in mid-20th-century American cuisine, particularly in the southern United States. During the post-war era, convenience foods such as canned pineapple, boxed cracker crumbs, and pre-made toppings became popular in home cooking. Housewives and chefs alike discovered that combining these simple ingredients created a rich, flavorful dish that could complement a wide array of main courses, from roasted turkey to glazed ham. Today, Sweet Pineapple Casserole remains a favorite at family gatherings, potlucks, and holiday dinners.

Ingredients: The Perfect Blend of Sweet and Savory

The beauty of this dish lies in its simplicity and the harmonious combination of ingredients. Here’s what you’ll need for a classic version:

  • Canned Pineapple: The star of the casserole, canned pineapple chunks or crushed pineapple bring natural sweetness and moisture. Using canned pineapple ensures a consistent texture and flavor, though fresh pineapple can be used for a brighter taste.

  • Sugar: Depending on the sweetness of your pineapple, a small amount of granulated sugar may be added to enhance the flavor without overpowering it.

  • Butter: Melted butter adds richness to the dish, helping bind the topping and infusing it with a creamy texture.

  • Eggs: Beaten eggs act as a binder, creating a soft, custard-like base that sets beautifully when baked.

  • Milk or Cream: A splash of milk or heavy cream adds silkiness to the mixture, making the casserole smooth and luscious.

  • Topping: The topping often consists of crushed crackers, bread crumbs, or even cornflakes, combined with brown sugar and melted butter. This creates a golden, crunchy contrast to the soft pineapple filling.

  • Optional Spices: Cinnamon, nutmeg, or allspice can be added to give a subtle warmth and aromatic depth.

Step-by-Step Preparation

  1. Preheat the Oven: Begin by preheating your oven to 350°F (175°C). A moderate temperature ensures even cooking without burning the topping.

  2. Prepare the Pineapple Mixture: Drain the pineapple if using chunks or crushed canned pineapple. In a mixing bowl, combine the pineapple with sugar, melted butter, eggs, and milk. Stir well until all ingredients are fully incorporated. The mixture should be smooth but still slightly chunky due to the pineapple.

  3. Transfer to Baking Dish: Lightly grease a 9×13-inch baking dish to prevent sticking. Pour the pineapple mixture into the dish, spreading it evenly.

  4. Make the Topping: In a separate bowl, mix crushed crackers or bread crumbs with brown sugar and melted butter. If you like extra crunch, add chopped pecans or walnuts. Sprinkle the topping evenly over the pineapple mixture.

  5. Bake: Place the casserole in the oven and bake for 30–40 minutes, or until the topping is golden brown and the filling is bubbling gently around the edges. The aroma of caramelized pineapple and butter will fill your kitchen—a clear sign your dish is ready.

  6. Cool and Serve: Let the casserole cool for a few minutes before serving. This allows it to set slightly, making it easier to slice and serve. Sweet Pineapple Casserole can be served warm or at room temperature, depending on your preference.

Tips for a Perfect Casserole

  • Balance Sweetness: Since pineapple is naturally sweet, taste your mixture before baking. Adjust sugar levels to avoid an overly sugary dish.

  • Texture Matters: If you prefer a smoother casserole, opt for crushed pineapple. For more texture and a fruity bite, use chunks.

  • Nutty Topping: Toasted pecans or almonds elevate the dish, adding a nutty flavor that complements the sweetness.

  • Make Ahead: You can assemble the casserole a day in advance, keeping it covered in the refrigerator. Bake just before serving for a fresh, hot dish.

  • Variations: Some versions include shredded coconut, which adds a tropical flair. Others incorporate a touch of cream cheese in the filling for extra creaminess.

Serving Suggestions

Sweet Pineapple Casserole is versatile enough to pair with a variety of dishes. Traditionally, it accompanies roasted meats like turkey, ham, or chicken. Its sweetness contrasts beautifully with savory flavors, balancing the meal. For a modern twist, it can also be served alongside grilled pork chops or a lightly spiced vegetable medley. Leftovers can be enjoyed cold, much like a dessert, or gently reheated in the oven or microwave.

Health Considerations

While delicious, Sweet Pineapple Casserole is a rich dish that contains sugar, butter, and eggs, making it calorie-dense. Using fresh pineapple and reducing added sugar can make it slightly healthier without compromising taste. For a lighter version, consider substituting part of the butter with Greek yogurt or using whole-grain crackers for the topping. Despite its indulgent nature, pineapple provides vitamin C, manganese, and antioxidants, contributing small nutritional benefits to the dish.

Conclusion

Sweet Pineapple Casserole is more than just a side dish; it’s a comforting tradition that brings warmth and sweetness to any table. Its blend of tender pineapple, creamy base, and crunchy topping creates a delightful texture and flavor profile that appeals to all ages. Easy to make, versatile, and irresistibly delicious, this casserole has stood the test of time in American kitchens. Whether you’re preparing it for a holiday feast, a Sunday family dinner, or a casual gathering, Sweet Pineapple Casserole is sure to be a crowd-pleaser that will leave everyone asking for seconds.

This dish exemplifies how simple ingredients, when combined thoughtfully, can create culinary magic—a true testament to the art of comfort food.

The Incredible Benefits of Dates

Dates, the sweet, chewy fruits of the date palm tree, have been cherished for thousands of years. Originating in the Middle East, these small but nutrient-dense fruits are not only delicious but also packed with a wide array of health benefits. From supporting digestive health to providing instant energy, dates are considered a superfood in many cultures. Let’s explore the incredible benefits of dates in detail.

1. Rich Source of Energy

Dates are naturally high in sugars like glucose, fructose, and sucrose, making them a quick and effective source of energy. This is why they are often consumed to break fasts during Ramadan, as they provide an immediate energy boost. Eating just a handful of dates can help replenish energy levels, making them an ideal snack for athletes or anyone in need of a natural pick-me-up. Unlike refined sugar, the natural sugars in dates are accompanied by fiber, vitamins, and minerals, which slow down sugar absorption and prevent spikes in blood sugar.

2. Packed with Essential Nutrients

Dates are a nutritional powerhouse. They are rich in essential vitamins and minerals, including vitamin A, vitamin K, vitamin B6, niacin, folate, magnesium, potassium, calcium, and iron. These nutrients play vital roles in maintaining overall health. For instance, potassium is crucial for heart health and regulating blood pressure, while magnesium supports muscle and nerve function. The iron content in dates helps combat anemia, especially in women who are prone to iron deficiency.

3. High in Fiber for Digestive Health

One of the most celebrated benefits of dates is their high dietary fiber content. Fiber promotes healthy digestion by adding bulk to stool and preventing constipation. Regular consumption of dates can help maintain bowel regularity and prevent digestive disorders. The fiber in dates also supports gut health by feeding beneficial bacteria in the intestines, which in turn improves nutrient absorption and strengthens immunity.

4. Natural Heart Health Booster

Dates are excellent for heart health due to their potassium, magnesium, and fiber content. Potassium helps regulate blood pressure, while magnesium contributes to proper heart function. Fiber, on the other hand, reduces cholesterol levels by removing LDL cholesterol from the bloodstream. Additionally, dates contain antioxidants such as flavonoids, carotenoids, and phenolic acid, which reduce inflammation and oxidative stress, lowering the risk of heart disease. Including dates in your diet may therefore promote a healthier cardiovascular system.

5. Rich in Antioxidants

Dates are loaded with powerful antioxidants, which protect the body against harmful free radicals. Free radicals can damage cells, accelerate aging, and increase the risk of chronic diseases like cancer and diabetes. The antioxidants in dates—such as flavonoids, carotenoids, and phenolic acid—help reduce inflammation, improve brain function, and support overall cellular health. Regular consumption of dates can therefore contribute to long-term disease prevention.

6. Supports Bone Health

Dates are a good source of minerals like calcium, phosphorus, potassium, and magnesium—all of which are essential for strong and healthy bones. Regular intake of dates may help prevent bone-related conditions such as osteoporosis, especially in older adults. The mineral content also supports joint health, reduces the risk of fractures, and aids in maintaining bone density over time.

7. Improves Brain Function

Research suggests that dates may play a role in promoting brain health. The antioxidants in dates help reduce inflammation in the brain, which is associated with neurodegenerative diseases such as Alzheimer’s. Some studies indicate that eating dates regularly may enhance memory, learning ability, and overall cognitive function. Additionally, dates’ natural sugars provide an instant energy boost for the brain, improving alertness and concentration.

8. Natural Aid for Labor and Pregnancy

Dates have been traditionally recommended for pregnant women, particularly in the last few weeks of pregnancy. Studies suggest that consuming dates during late pregnancy may promote cervical dilation and reduce the need for induced labor. Dates provide essential nutrients that support both maternal health and fetal development. They also help prevent anemia and boost energy levels, which are critical during pregnancy.

9. Helps Manage Blood Sugar Levels

Although dates are sweet, their high fiber content helps regulate blood sugar levels. The fiber slows down sugar absorption, preventing sudden spikes in blood glucose. Furthermore, dates have a low to medium glycemic index, making them a suitable natural sweetener for people with diabetes when consumed in moderation. Their combination of natural sugars, fiber, and nutrients makes them a healthier alternative to processed sugar.

10. Versatile and Easy to Incorporate

Apart from their health benefits, dates are incredibly versatile. They can be eaten raw, stuffed with nuts, blended into smoothies, added to desserts, or used as a natural sweetener in baking. This makes it easy to include dates in your daily diet without feeling deprived. Their natural sweetness allows them to replace refined sugar in many recipes, offering both taste and nutrition.

Conclusion

Dates are much more than just a sweet treat. Packed with essential vitamins, minerals, fiber, and antioxidants, they support heart health, digestion, bone strength, brain function, and energy levels. Their natural sweetness, coupled with a rich nutrient profile, makes them an ideal food for maintaining overall health and well-being. Regularly incorporating dates into your diet can provide long-term health benefits, making this ancient fruit as relevant today as it was thousands of years ago.

In short, whether you are looking for a natural energy booster, a heart-friendly snack, or a nutrient-packed addition to your meals, dates are a simple yet powerful choice. Their unique combination of taste and health benefits earns them the title of a true superfood.

Brown Sugar Chops

Brown Sugar Beef Chops – A Sweet & Savory Comfort Classic

Brown Sugar Beef Chops are the perfect example of how simple pantry ingredients can transform an ordinary cut of beef into something rich, glossy, and deeply comforting. This dish balances the deep caramel sweetness of brown sugar with savory seasonings and tender beef, creating a flavor that feels both home-style and special. Whether served for a cozy family dinner or as a hearty weekend meal, brown sugar beef chops deliver warmth, aroma, and satisfaction in every bite.

This recipe is especially loved because it requires minimal effort while producing maximum flavor. As the beef cooks, the brown sugar melts and blends with spices and juices, forming a sticky, caramelized sauce that clings beautifully to the meat. The result is tender beef with a sweet-savory crust and a sauce that begs to be spooned over rice, mashed potatoes, or roasted vegetables.

Why Brown Sugar Works So Well with Beef

Brown sugar contains molasses, which gives it a deeper, more complex sweetness compared to white sugar. When paired with beef, it enhances the meat’s natural umami flavor rather than overpowering it. As it cooks, brown sugar caramelizes, creating a rich glaze that adds color, depth, and a slightly smoky sweetness.

When combined with salt, garlic, onion, and a touch of acidity, brown sugar becomes the backbone of a perfectly balanced sauce. This contrast between sweet and savory is what makes brown sugar beef chops so irresistible.

Ingredients You’ll Need

For this recipe, choose beef chops or thick beef steaks such as chuck steak, sirloin, or shoulder cuts. These cuts become tender and flavorful when cooked gently.

Ingredients:

  • 4 beef chops or beef steaks (about 1-inch thick)

  • 3 tablespoons brown sugar (light or dark)

  • 1 teaspoon salt

  • 1 teaspoon black pepper

  • 1 teaspoon garlic powder

  • 1 teaspoon onion powder

  • ½ teaspoon paprika (optional, for color and mild heat)

  • 2 tablespoons vegetable oil or butter

  • 1 tablespoon soy sauce or Worcestershire sauce

  • ½ cup beef broth or water

  • 1 small onion, sliced (optional)

  • 2 cloves garlic, minced

Step-by-Step Cooking Method

Step 1: Season the Beef
Pat the beef chops dry with paper towels. This helps them sear properly. In a small bowl, mix salt, black pepper, garlic powder, onion powder, and paprika. Rub this seasoning generously over both sides of the beef.

Step 2: Sear for Flavor
Heat oil or butter in a large skillet over medium-high heat. Once hot, add the beef chops and sear for about 3–4 minutes per side until nicely browned. This step locks in juices and builds flavor. Remove the beef from the pan and set aside.

Step 3: Build the Sauce
In the same pan, lower the heat to medium. Add sliced onions (if using) and sauté until soft and lightly golden. Add minced garlic and cook for 30 seconds until fragrant. Sprinkle in the brown sugar, stirring gently as it begins to melt.

Step 4: Deglaze and Simmer
Pour in the beef broth and soy sauce or Worcestershire sauce. Stir well, scraping up any browned bits from the bottom of the pan. These bits add incredible depth to the sauce.

Step 5: Cook the Beef Slowly
Return the beef chops to the pan, spooning the sauce over them. Cover the skillet, reduce heat to low, and let simmer for 25–35 minutes, turning the beef once or twice. This slow cooking allows the beef to become tender while the sauce thickens into a glossy glaze.

Step 6: Final Glaze
Uncover the pan during the last 5 minutes of cooking. Let the sauce reduce slightly until thick and sticky. Taste and adjust seasoning if needed.

Serving Suggestions

Brown Sugar Beef Chops are incredibly versatile and pair well with many sides. Serve them over fluffy white rice, buttery mashed potatoes, or creamy polenta to soak up the rich sauce. Steamed green beans, sautéed spinach, or roasted carrots add freshness and balance to the sweetness of the dish.

For a rustic meal, serve with crusty bread to mop up every drop of the caramelized gravy.

Tips for Perfect Results

  • Choose the right cut: Slightly tougher cuts become wonderfully tender with slow simmering.

  • Don’t rush the sauce: Letting the brown sugar melt slowly prevents burning and ensures a smooth glaze.

  • Balance sweetness: If you prefer less sweetness, reduce the brown sugar slightly or add a splash of vinegar or lemon juice.

  • Make it spicy: A pinch of chili flakes or cayenne adds a pleasant heat that contrasts beautifully with the sugar.

Why This Dish Is a Family Favorite

Brown Sugar Beef Chops combine comfort, simplicity, and bold flavor in one pan. The aroma alone—sweet caramel, savory beef, and garlic—fills the kitchen with anticipation. It’s a dish that feels nostalgic yet timeless, perfect for busy weeknights or relaxed Sunday dinners.

With minimal ingredients and maximum flavor, this recipe proves that you don’t need complicated techniques to create a meal everyone will remember. Once you try brown sugar beef chops, they’re sure to become a regular on your table.

Creamy Garlic Butter Chicken & Linguine in Alfredo Sauce

Few dishes strike the perfect balance between comfort and indulgence like Creamy Garlic Butter Chicken & Linguine in Alfredo Sauce. This classic-inspired meal brings together tender, pan-seared chicken, silky linguine, and a rich Alfredo sauce infused with garlic and butter. It’s the kind of recipe that feels restaurant-worthy yet is simple enough to prepare at home, making it ideal for family dinners, special occasions, or when you simply want to treat yourself to something luxurious and satisfying.

Why This Dish Is So Loved

The magic of this dish lies in its layers of flavor. Garlic butter forms the foundation, creating a warm, aromatic base. Cream and Parmesan cheese add depth and richness, while perfectly cooked linguine absorbs the sauce, ensuring every bite is smooth and flavorful. The chicken, seasoned and seared until golden, adds heartiness and protein, transforming the pasta into a complete, filling meal.

Unlike jarred sauces, homemade Alfredo has a freshness and texture that can’t be replicated. It’s creamy without being heavy, garlicky without overpowering, and indulgent without feeling excessive.

Ingredients You’ll Need

For the Chicken:

  • 2 large boneless, skinless chicken breasts

  • Salt and black pepper, to taste

  • 1 teaspoon Italian seasoning

  • ½ teaspoon paprika

  • 2 tablespoons butter

  • 1 tablespoon olive oil

For the Pasta & Sauce:

  • 300 g (10 oz) linguine

  • 4 tablespoons butter

  • 5–6 garlic cloves, finely minced

  • 1½ cups heavy cream

  • 1 cup freshly grated Parmesan cheese

  • ½ teaspoon black pepper

  • Salt, to taste

  • Optional: a pinch of nutmeg or red chili flakes

For Garnish:

  • Fresh parsley or basil, chopped

  • Extra Parmesan cheese

Step-by-Step Preparation

1. Cook the Linguine
Bring a large pot of well-salted water to a rolling boil. Add the linguine and cook until al dente, following the package instructions. Reserve about ½ cup of the pasta cooking water, then drain the pasta and set it aside. The reserved water can help loosen the sauce later if needed.

2. Prepare and Cook the Chicken
Slice the chicken breasts horizontally to create thinner cutlets for even cooking. Season both sides with salt, black pepper, Italian seasoning, and paprika.
Heat a large skillet over medium heat and add the butter and olive oil. Once the butter melts and begins to foam, add the chicken. Cook for about 4–5 minutes per side, or until golden brown and fully cooked through. Remove the chicken from the pan and let it rest before slicing into strips.

3. Make the Garlic Butter Base
In the same skillet (do not wipe it clean), add the butter. Lower the heat slightly and add the minced garlic. Sauté for 30–60 seconds, stirring constantly, until fragrant. Be careful not to brown the garlic, as it can turn bitter.

4. Create the Alfredo Sauce
Slowly pour in the heavy cream while stirring. Let it simmer gently for 3–4 minutes until it starts to thicken. Add black pepper, salt to taste, and a small pinch of nutmeg if using. Gradually stir in the grated Parmesan cheese, allowing it to melt smoothly into the sauce.

5. Combine Pasta and Chicken
Add the cooked linguine directly into the sauce, tossing gently to coat every strand. If the sauce feels too thick, add a little reserved pasta water until you reach your desired consistency. Return the sliced chicken to the pan and mix everything together, letting it warm through for 1–2 minutes.

Serving Suggestions

Serve the Creamy Garlic Butter Chicken & Linguine hot, topped with freshly chopped parsley or basil and an extra sprinkle of Parmesan cheese. Pair it with a crisp green salad, garlic bread, or roasted vegetables for a complete meal. A squeeze of lemon just before serving can add a subtle brightness that balances the richness of the sauce.

Tips for the Best Alfredo Pasta

  • Use fresh Parmesan: Pre-grated cheese often contains anti-caking agents that prevent smooth melting.

  • Don’t rush the sauce: Keep the heat moderate to avoid splitting the cream.

  • Season gradually: Parmesan is salty, so taste before adding extra salt.

  • Customize it: Add mushrooms, spinach, or sun-dried tomatoes for variety.

Final Thoughts

Creamy Garlic Butter Chicken & Linguine in Alfredo Sauce is more than just a pasta dish—it’s a comforting experience. Rich, velvety, and packed with flavor, it’s perfect for cozy nights at home or impressing guests with minimal effort. Once you try this homemade version, it’s likely to become a regular favorite in your kitchen, offering warmth and indulgence in every delicious bite.

Spicy Cabbage and Rice Fritters

Spicy Cabbage and Rice Fritters are a wonderful example of how simple pantry ingredients can be transformed into something deeply satisfying. Crispy on the outside, tender on the inside, and packed with warm spices, these fritters are perfect as a snack, appetizer, or even a light meal. They are especially popular in home kitchens where leftover rice needs a delicious second life, and cabbage adds both texture and nutrition without overpowering the dish.

Why This Recipe Works

The beauty of cabbage and rice fritters lies in balance. Rice provides structure and softness, cabbage adds crunch and moisture, and spices bring everything together with bold flavor. When pan-fried, the mixture forms golden patties with irresistible crisp edges. These fritters are budget-friendly, vegetarian, and easy to customize depending on your spice tolerance and available ingredients.

Ingredients You’ll Need

This recipe uses everyday ingredients that are easy to find:

  • 2 cups cooked rice (white or brown, cooled)

  • 2 cups finely shredded cabbage (green or purple)

  • 1 small onion, finely chopped

  • 2 green chilies, finely chopped (adjust to taste)

  • 2 cloves garlic, minced

  • 1 teaspoon red chili flakes

  • 1 teaspoon ground cumin

  • 1 teaspoon coriander powder

  • ½ teaspoon turmeric

  • Salt to taste

  • 2 tablespoons fresh coriander or parsley, chopped

  • 2–3 tablespoons all-purpose flour or chickpea flour

  • 1 egg (optional, for binding)

  • Oil for shallow frying

Preparing the Cabbage

Cabbage contains a lot of water, which can make fritters soggy if not handled correctly. After shredding the cabbage, place it in a bowl, sprinkle lightly with salt, and let it rest for 10 minutes. Gently squeeze out excess moisture using your hands. This step ensures crispier fritters and better texture.

Making the Fritter Mixture

In a large mixing bowl, combine the cooked rice and squeezed cabbage. Add the chopped onion, green chilies, garlic, and fresh herbs. Sprinkle in the chili flakes, cumin, coriander powder, turmeric, and salt. Mix well until everything is evenly distributed.

Add the flour to help bind the mixture. If you prefer a firmer texture, add an egg, though the fritters will still hold together without it. Mix until the mixture can be shaped into patties. If it feels too wet, add a little more flour; if too dry, sprinkle in a tablespoon of water.

Shaping the Fritters

Take a small portion of the mixture and shape it into a flat patty using your palms. Avoid making them too thick, as thinner fritters cook more evenly and become crispier. Place the shaped fritters on a plate while you heat the oil.

Cooking the Fritters

Heat a shallow layer of oil in a heavy-bottomed pan over medium heat. Once the oil is hot, carefully place the fritters into the pan, leaving space between them. Cook for 3–4 minutes on each side, or until golden brown and crisp. Flip gently to avoid breaking them.

Once cooked, transfer the fritters to a plate lined with paper towels to absorb excess oil. Continue until all the mixture is used.

Serving Suggestions

Spicy Cabbage and Rice Fritters are best served hot. Pair them with mint chutney, garlic yogurt sauce, or simple tomato ketchup. They also go wonderfully with a side salad for a light lunch or can be tucked into wraps with fresh vegetables and a drizzle of sauce.

For a complete meal, serve them alongside lentil soup or a warm bowl of spiced yogurt.

Variations and Tips

  • Extra crunch: Add finely chopped carrots or spring onions.

  • Healthier option: Shallow fry with minimal oil or cook them in an air fryer.

  • Vegan version: Skip the egg and use chickpea flour for binding.

  • Cheesy twist: Add a handful of grated cheese for richness.

  • Milder flavor: Reduce chilies and chili flakes for a gentler heat.

Storage and Reheating

These fritters can be stored in the refrigerator for up to two days. Reheat them in a pan or air fryer to restore crispness. Avoid microwaving, as it can make them soft.

Final Thoughts

Spicy Cabbage and Rice Fritters are comforting, flavorful, and incredibly versatile. They are proof that humble ingredients can create something special when treated with care and imagination. Whether you make them for a family snack, a tea-time treat, or a casual gathering, these fritters are sure to be enjoyed by everyone at the table.

Fried Potatoes and Onion

Fried potatoes and onions are one of those simple, timeless dishes that appear in kitchens all around the world. With just a few humble ingredients, this classic recipe delivers deep flavor, satisfying texture, and an aroma that instantly feels like home. Whether served as a hearty breakfast side, a quick lunch, or a comforting dinner accompaniment, fried potatoes and onions prove that great food doesn’t need to be complicated.

At its heart, this dish is about balance. The potatoes provide a soft, fluffy interior with a golden, crispy exterior, while the onions add sweetness, depth, and a slight caramelized bite. Together, they create a harmony of flavors that is both rustic and irresistible. It’s the kind of food that reminds us of family meals, roadside diners, and simple pleasures.

Choosing the Right Potatoes

The type of potato you use can make a noticeable difference. Starchy potatoes like russets are a popular choice because they crisp up beautifully when fried. Their fluffy interior contrasts perfectly with their crunchy outer layer. Yukon Gold potatoes are another excellent option, offering a slightly buttery flavor and a creamy texture that holds up well in the pan. Waxy potatoes, such as red potatoes, can also be used, though they tend to stay firmer and less crispy.

Before cooking, potatoes should be washed thoroughly and peeled if desired. Some people prefer to leave the skins on for added texture and nutrients. Slicing is important: thin, even slices cook more uniformly and develop better browning. Uneven cuts can lead to some pieces burning while others remain undercooked.

The Role of Onions

Onions are more than just a supporting ingredient in this dish—they are essential. Yellow onions are the most common choice because they strike a perfect balance between sweetness and sharpness. As they cook, their natural sugars caramelize, adding a rich, slightly sweet flavor that complements the savory potatoes. White onions offer a milder taste, while red onions bring a hint of sweetness and color.

Slicing onions into thin strips or half-moons allows them to cook evenly and mingle with the potatoes. Timing is crucial: adding onions too early can cause them to burn before the potatoes are fully cooked, while adding them too late may leave them raw and sharp.

Cooking Technique Matters

The secret to perfect fried potatoes and onions lies in patience and heat control. A heavy skillet, such as cast iron, is ideal because it retains heat evenly and promotes browning. Oil choice also matters. Vegetable oil, sunflower oil, or a mix of oil and butter works well. Butter adds flavor, while oil prevents it from burning too quickly.

The potatoes should be added to hot oil in a single layer if possible. Overcrowding the pan causes steaming rather than frying, which prevents crispiness. Let the potatoes sit undisturbed for a few minutes before stirring. This allows a golden crust to form. Once they begin to soften and brown, the onions can be added.

Seasoning should be simple but thoughtful. Salt is essential and helps draw out moisture, enhancing browning. Black pepper adds mild heat, while paprika or chili flakes can bring warmth and color. Some cooks like to add garlic, herbs, or even a pinch of cumin for extra depth, but the classic version shines with minimal seasoning.

Flavor Variations and Additions

One of the reasons fried potatoes and onions are so beloved is their versatility. This dish easily adapts to different tastes and cuisines. Adding bell peppers creates a colorful and slightly sweet variation. Smoked paprika or dried herbs like thyme and rosemary can elevate the flavor profile. For a heartier meal, fried potatoes and onions pair wonderfully with eggs, sausages, or grilled meats.

In many cultures, this dish is customized with local spices. In South Asian kitchens, a touch of turmeric, coriander, or green chilies can transform it into a spicy, aromatic side. In European-style cooking, bacon fat or olive oil may be used for richer flavor.

Serving and Enjoying

Fried potatoes and onions are best served hot, straight from the pan. They can stand alone as a comforting dish or complement a wide variety of meals. At breakfast, they’re perfect alongside eggs and toast. At lunch or dinner, they work well with roasted chicken, fish, or even as a filling for sandwiches and wraps.

Beyond their taste, fried potatoes and onions carry a sense of nostalgia. They remind us that food doesn’t need to be fancy to be meaningful. With just a skillet, a few ingredients, and a bit of care, you can create a dish that satisfies both the stomach and the soul.

In a world full of complex recipes and exotic ingredients, fried potatoes and onions remain a humble reminder of the beauty of simplicity. Crispy, golden, and full of flavor, this classic dish continues to earn its place on tables everywhere—proof that sometimes, the simplest foods are the most memorable.