Doctors are surprised TWO vegetables that increase collagen in the knees and relieve joint pain

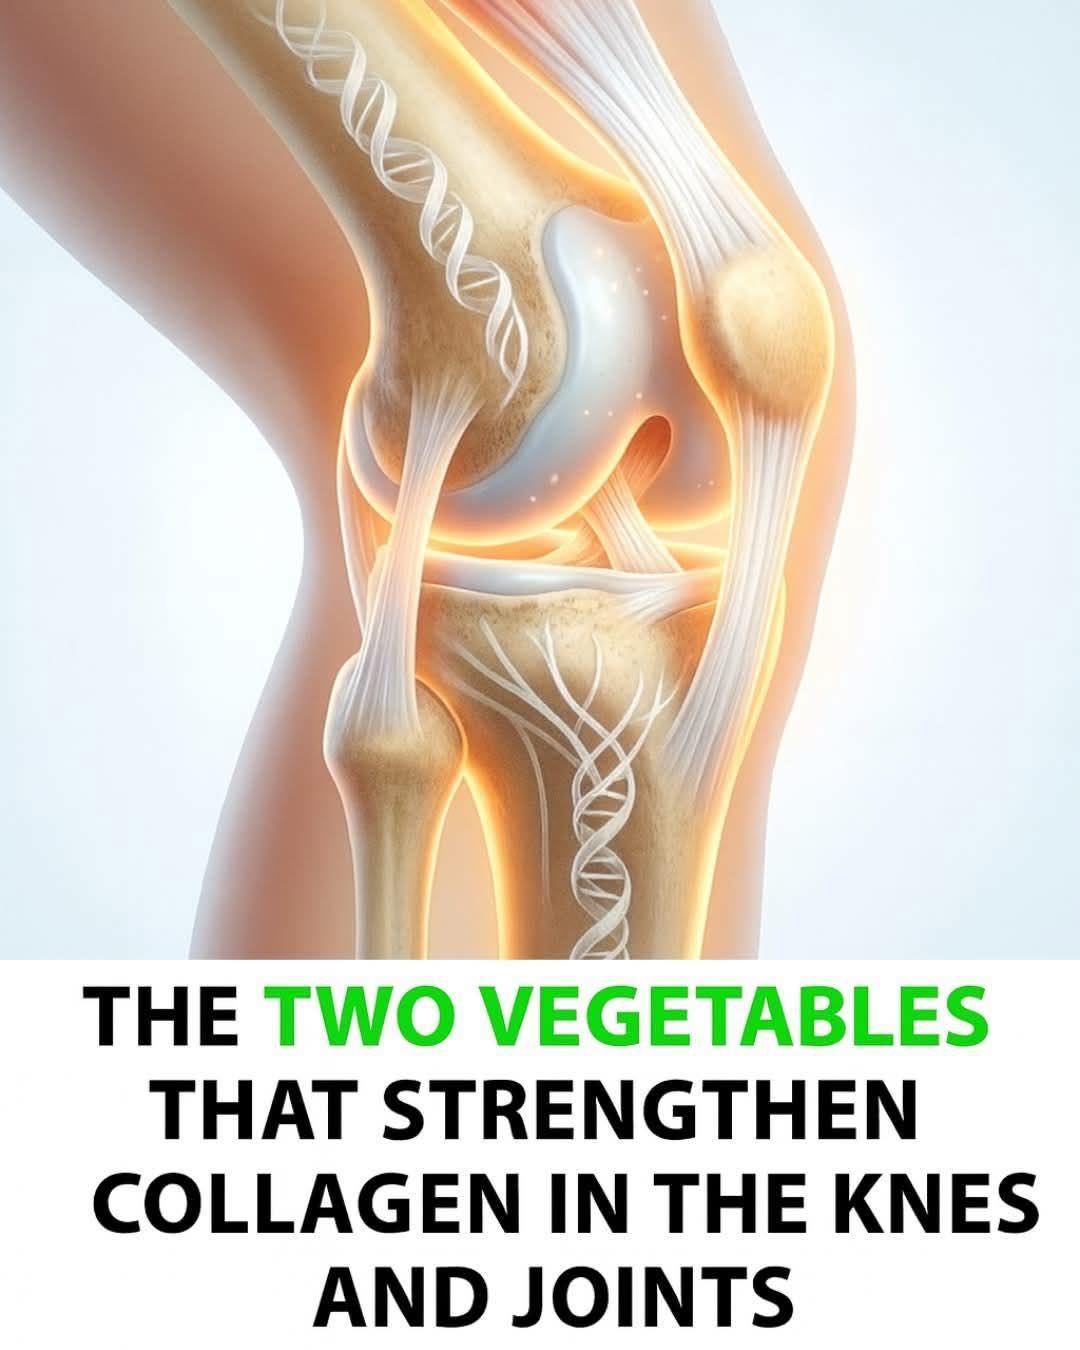
Joint pain, stiffness, and creaking knees are no longer problems limited to old age. Long hours of sitting, lack of movement, excess weight, and nutrient-poor diets have caused joint discomfort to appear earlier than ever. At the center of healthy joints lies collagen—the structural protein that cushions cartilage, supports tendons, and keeps knees moving smoothly.

While collagen supplements flood the market, many doctors are now pointing to a simpler, safer, and more natural solution: specific vegetables that help your body produce and protect collagen naturally. Among them, two stand out for their powerful effect on knee health.

Let’s take a closer look at the two vegetables doctors are increasingly recommending for stronger knees and reduced joint pain.

1. Spinach – The Green Collagen Protector

Spinach may look humble, but it is a nutritional powerhouse for joint health. Doctors are surprised not because spinach magically “creates” collagen, but because it provides everything your body needs to protect and maintain it.

Why Spinach Helps Your Knees

Spinach is rich in:

  • Vitamin C – essential for collagen synthesis

  • Magnesium – supports muscle relaxation and joint movement

  • Vitamin A (beta-carotene) – protects cartilage cells

  • Antioxidants (lutein and zeaxanthin) – reduce inflammation

Vitamin C plays a critical role in converting amino acids into collagen fibers. Without it, your body simply cannot build or repair collagen effectively. Spinach also helps fight oxidative stress, which breaks down collagen in aging joints.

How It Relieves Joint Pain

Chronic knee pain is often caused by inflammation and cartilage wear. Spinach’s antioxidants help neutralize free radicals that damage joint tissue. Magnesium further relaxes surrounding muscles, reducing pressure on knee joints and improving flexibility.

Doctors often note that patients who regularly consume leafy greens report:

  • Less morning stiffness

  • Improved knee mobility

  • Reduced swelling after walking or exercise

Best Ways to Eat Spinach

  • Lightly sautéed with olive oil (helps absorb nutrients)

  • Added to soups or lentil dishes

  • Blended into smoothies with lemon or orange for extra vitamin C

Avoid overcooking, as excessive heat can destroy key nutrients.

2. Red Bell Peppers – The Collagen Booster Vegetable

Red bell peppers are often overlooked, but doctors now call them one of the strongest collagen-supporting vegetables available.

Why Red Bell Peppers Are Special

Red bell peppers contain:

  • More vitamin C than oranges

  • Vitamin B6 – supports tissue repair

  • Capsaicin-like compounds – help reduce pain perception

  • Powerful antioxidants – slow cartilage breakdown

Vitamin C is the star here. Studies show that people with higher vitamin C intake tend to have less cartilage loss in the knees over time. This makes red bell peppers a true ally against joint degeneration.

How They Help Knee Collagen

Collagen fibers in the knee are constantly breaking down and rebuilding. Red bell peppers dramatically improve your body’s ability to rebuild those fibers. At the same time, their antioxidants reduce inflammation in the synovial fluid—the liquid that lubricates your joints.

Doctors have observed that patients who increase vitamin C-rich vegetables often experience:

  • Reduced knee pain during movement

  • Less joint cracking and popping

  • Better recovery after physical activity

Best Ways to Eat Red Bell Peppers

  • Raw in salads (highest vitamin C content)

  • Lightly roasted

  • Stir-fried quickly with other vegetables

Pairing them with healthy fats like olive oil improves nutrient absorption.

Why Vegetables Matter More Than Supplements

Many people rely on collagen powders, but doctors emphasize that collagen alone is not enough. Without vitamin C, magnesium, antioxidants, and supportive nutrients, collagen supplements may pass through your body with minimal benefit.

Vegetables work differently:

  • They stimulate your body’s own collagen production

  • They protect existing cartilage

  • They reduce inflammation naturally

This makes them especially effective for long-term joint health.

How Long Before You Feel Results?

Doctors suggest that with consistent daily intake:

  • 2–3 weeks: reduced stiffness and inflammation

  • 4–6 weeks: improved knee comfort and flexibility

  • 8–12 weeks: noticeable support for cartilage health

Results vary depending on age, activity level, and overall diet.

Extra Tips to Protect Knee Collagen

To maximize the benefits of spinach and red bell peppers:

  • Stay hydrated (cartilage needs water)

  • Avoid excessive sugar (destroys collagen)

  • Include gentle movement like walking or stretching

  • Get enough protein to provide collagen-building amino acids

Final Thoughts

Doctors are surprised not because these vegetables are exotic or new—but because they work so well when used consistently. Spinach protects and preserves collagen, while red bell peppers fuel its production. Together, they form a powerful, natural strategy to support knee health and relieve joint pain.

Instead of chasing quick fixes, adding these two vegetables to your daily meals may be one of the simplest ways to keep your knees strong, flexible, and pain-free for years to come. 🌱🦵

THIS JAPANESE WATER IS THE KEY TO BURNING ALL THE FAT FROM YOUR WAIST, BACK AND THIGHS IN RECORD TIME

THIS JAPANESE WATER IS THE KEY TO BURNING FAT FROM YOUR WAIST, BACK, AND THIGHS — FACT OR FICTION?

In recent years, “Japanese water” has taken social media by storm, praised as a simple yet powerful drink that can help melt stubborn fat from the waist, back, and thighs. Supporters claim it works quickly, naturally, and without extreme dieting. But what exactly is this Japanese water, where did it come from, and can it truly help with fat loss? Let’s separate hype from healthy reality and explore why this drink has become so popular.


What Is “Japanese Water”?

The term “Japanese water” usually refers to warm water consumed first thing in the morning, sometimes enhanced with ingredients like lemon, ginger, or apple cider vinegar. In Japan, drinking warm water upon waking is a long-standing wellness habit believed to support digestion, metabolism, and overall balance in the body.

Unlike sugary detox drinks or extreme weight-loss teas, Japanese water is refreshingly simple. At its core, it’s about hydration, timing, and temperature, not magic ingredients.


Why Warm Water Instead of Cold?

Traditional Japanese health practices emphasize harmony within the body. Warm water is thought to be gentler on the digestive system than cold water, which may temporarily slow digestion.

Drinking warm water in the morning may help to:

  • Wake up the digestive system

  • Improve circulation

  • Support bowel regularity

  • Reduce bloating and water retention

While these effects don’t “burn fat” directly, they can make the body function more efficiently—an important foundation for healthy weight management.


How Japanese Water May Support Fat Loss

It’s important to be honest: no drink can instantly burn fat from specific areas like the waist or thighs. Spot reduction is a myth. However, Japanese water may support fat loss in indirect but meaningful ways.

1. Boosts Metabolism Gently

Drinking water, especially in the morning, has been shown to slightly increase calorie burning. Warm water may enhance this effect by relaxing the digestive tract and improving nutrient absorption.

2. Reduces Overeating

Starting the day hydrated can help control appetite. Many people confuse thirst with hunger, leading to unnecessary snacking. Japanese water helps you feel fuller and more in control of portion sizes.

3. Improves Digestion and Reduces Bloating

A flatter-looking stomach often comes from reduced bloating rather than fat loss. Warm water supports smoother digestion, which can noticeably reduce belly puffiness.

4. Supports Fat Metabolism When Paired with Healthy Habits

Hydration is essential for fat metabolism. When the body is dehydrated, it struggles to efficiently break down fat. Japanese water helps maintain optimal hydration levels from the very start of the day.


The Popular Japanese Water Recipe

Here’s the most common version people use:

Ingredients:

  • 1–2 cups warm water (not boiling)

  • Optional: juice of ½ lemon

  • Optional: a few slices of fresh ginger

How to Use:
Drink it first thing in the morning on an empty stomach, at least 20–30 minutes before eating breakfast.

Some variations add apple cider vinegar, but this is optional and not suitable for everyone, especially those with sensitive stomachs.


Why People See Results “So Fast”

Many people report visible changes within days, especially around the waist. This is usually due to:

  • Reduced bloating

  • Less water retention

  • Improved digestion

  • Better eating habits triggered by a healthy morning routine

These changes can make the body look leaner quickly, even before true fat loss occurs. Over time, when combined with balanced meals and regular movement, actual fat loss may follow.


What Japanese Water Cannot Do

To avoid false expectations, it’s important to be clear:

  • It will not melt fat overnight

  • It cannot target fat in only one area

  • It does not replace proper nutrition or exercise

Japanese water is a supportive habit, not a miracle cure.


Who Should Be Careful?

Most people can safely drink warm water, but caution is advised if you:

  • Have acid reflux (lemon may worsen symptoms)

  • Have kidney issues requiring fluid restriction

  • Experience stomach irritation

In such cases, plain warm water without additives is the safest option.


The Real Secret Behind Japanese Water

The true power of Japanese water lies in consistency and simplicity. It encourages mindfulness, hydration, and a calm start to the day—habits strongly associated with long-term weight control and better health.

When paired with:

  • Whole, balanced meals

  • Light daily movement

  • Adequate sleep

…this simple ritual can contribute to gradual, sustainable fat loss and improved body shape over time.


Final Thoughts

So, is Japanese water the key to burning fat from your waist, back, and thighs in record time? Not exactly—but it can be a powerful first step. It prepares your body to function better, supports digestion and hydration, and helps create the conditions where fat loss becomes easier and more natural.

Sometimes, the most effective changes don’t come from extreme solutions, but from small daily habits done consistently. And Japanese water is a perfect example of that philosophy.

Cancer Dies When You Eat These 7 Foods. Time To Start Eating Them

Headlines claiming that “cancer dies when you eat certain foods” are everywhere—and while they sound hopeful, the truth is more nuanced. No single food can cure cancer. However, science clearly shows that some foods can slow cancer growth, reduce inflammation, strengthen the immune system, and lower overall cancer risk when eaten regularly as part of a healthy lifestyle.

These seven foods stand out for their powerful compounds that help the body defend itself against cancer at the cellular level. Adding them to your diet won’t replace medical treatment—but they can become part of a strong prevention and wellness strategy.


1. Cruciferous Vegetables (Broccoli, Cauliflower, Cabbage)

Cruciferous vegetables are among the most researched cancer-fighting foods in the world.

They contain sulforaphane, a compound shown to:

  • Help deactivate carcinogens

  • Trigger cancer cell death (apoptosis) in lab studies

  • Support detoxification enzymes in the liver

Broccoli sprouts are especially potent, containing up to 100 times more sulforaphane than mature broccoli.

Best way to eat: Lightly steamed or chopped raw to preserve nutrients.


2. Garlic

Garlic has been used as medicine for thousands of years—and modern science backs it up.

Its active compound, allicin, has been shown to:

  • Inhibit cancer cell growth

  • Reduce inflammation

  • Support immune system activity

Regular garlic consumption has been linked to a lower risk of stomach, colorectal, and prostate cancers.

Tip: Crush garlic and let it sit for 10 minutes before cooking to activate allicin.


3. Turmeric

Turmeric’s bright yellow pigment comes from curcumin, one of the most powerful anti-inflammatory compounds known.

Research suggests curcumin may:

  • Slow tumor growth

  • Prevent cancer cells from spreading

  • Enhance the effectiveness of some cancer treatments

Curcumin also targets chronic inflammation, a major driver of cancer development.

Boost absorption: Combine turmeric with black pepper and a healthy fat like olive oil.


4. Berries (Blueberries, Strawberries, Raspberries)

Berries are rich in anthocyanins, antioxidants that protect cells from DNA damage.

Studies show berries can:

  • Reduce oxidative stress

  • Slow the growth of cancer cells

  • Protect against cancers of the mouth, colon, and breast

They also help regulate blood sugar, which is important since high insulin levels are linked to increased cancer risk.

Best choice: Fresh or frozen berries with no added sugar.


5. Green Tea

Green tea contains EGCG (epigallocatechin gallate), a powerful antioxidant studied for its anti-cancer effects.

EGCG may:

  • Block cancer cell replication

  • Reduce tumor blood supply

  • Protect healthy cells from damage

Populations that regularly drink green tea show lower rates of certain cancers, particularly breast and prostate cancer.

How much: 2–3 cups per day for maximum benefit.


6. Fatty Fish (Salmon, Sardines, Mackerel)

Fatty fish are rich in omega-3 fatty acids, which help reduce chronic inflammation—a known cancer trigger.

Omega-3s may:

  • Slow cancer cell growth

  • Improve immune response

  • Reduce cancer-related inflammation

They are especially beneficial for colon and breast health.

Aim for: Two servings per week of wild-caught fatty fish.


7. Tomatoes

Tomatoes are the best dietary source of lycopene, an antioxidant linked to reduced cancer risk.

Lycopene has been associated with:

  • Lower prostate cancer risk

  • Protection against breast and lung cancers

  • Reduced oxidative cell damage

Interestingly, lycopene becomes more bioavailable when tomatoes are cooked.

Best forms: Tomato sauce, paste, or lightly cooked tomatoes with olive oil.


Why Food Alone Isn’t Enough—but Still Matters

While these foods contain compounds that can damage cancer cells in laboratory studies, they do not replace medical treatment. Cancer is complex, and diet works best as part of a broader prevention strategy that includes:

  • Regular exercise

  • Maintaining a healthy weight

  • Avoiding smoking and excessive alcohol

  • Getting routine screenings

What food can do is create an internal environment where cancer struggles to thrive.


Final Thoughts

Cancer doesn’t “die overnight” because of food—but what you eat every day can influence whether cancer develops, grows, or spreads. These seven foods provide powerful nutrients that support your body’s natural defenses and help protect your cells from damage.

18 Powerful Benefits of Cloves for Women And How to Use Them Effectively

Cloves are more than just a fragrant spice in your kitchen—they’re a powerhouse of health benefits, especially for women. Packed with antioxidants, essential oils, and minerals, cloves have been used for centuries in traditional medicine to promote overall wellness. From improving digestion to supporting hormonal balance, this tiny spice can have a big impact on women’s health. Here’s a detailed look at 18 benefits of cloves and how women can use them effectively.

1. Boosts Digestive Health

Cloves contain eugenol, a compound that helps stimulate digestive enzymes. This can improve digestion, reduce bloating, and relieve gas and constipation.
How to use: Add a few whole cloves to boiling water, steep for 10 minutes, and drink as a warm tea after meals.

2. Relieves Menstrual Pain

The anti-inflammatory and antispasmodic properties of cloves help reduce cramps during menstruation.
Tip: Drinking clove tea or massaging clove oil diluted with coconut oil on the lower abdomen can ease pain.

3. Balances Hormones

Cloves contain phytoestrogens that can support hormonal balance in women, particularly during menopause. This may help regulate cycles and reduce menopausal symptoms like hot flashes.

4. Promotes Oral Health

Cloves are naturally antibacterial and have been used to fight oral infections, gum disease, and bad breath.
How to use: Chew a clove or use clove oil in small amounts on a cotton swab to soothe toothaches.

5. Boosts Immunity

Rich in antioxidants, cloves strengthen the immune system, helping women fight off infections, colds, and flu.

6. Supports Skin Health

The antiseptic properties of cloves help prevent acne and skin infections, while antioxidants fight free radicals to slow aging.
Application: Make a face mask by mixing powdered cloves with honey and yogurt.

7. Enhances Hair Growth

Clove oil improves blood circulation to the scalp, promoting hair growth and preventing hair fall.
Tip: Mix a few drops of clove oil with coconut oil and massage onto the scalp weekly.

8. Regulates Blood Sugar

Cloves help improve insulin sensitivity and regulate blood sugar levels, which is beneficial for women with diabetes or prediabetes.

9. Supports Heart Health

The anti-inflammatory properties of cloves reduce the risk of heart disease by lowering bad cholesterol (LDL) and improving blood circulation.

10. Aids in Weight Management

Cloves can boost metabolism and help with fat burning when combined with a healthy diet and regular exercise.
Usage: Include cloves in teas, smoothies, or even sprinkled in curries.

11. Reduces Stress and Anxiety

The aroma of cloves has calming effects, reducing stress and anxiety, which is particularly helpful for women juggling multiple responsibilities.
Tip: Use clove essential oil in a diffuser or add to bath water.

12. Improves Bone Health

Cloves contain manganese, which is vital for bone strength and density, reducing the risk of osteoporosis in women.

13. Supports Respiratory Health

The anti-inflammatory properties help relieve cough, congestion, and asthma symptoms.
How to use: Add cloves to hot water and inhale the steam for relief.

14. Prevents Urinary Tract Infections (UTIs)

Cloves’ antibacterial effects help prevent urinary tract infections, a common concern for women.
Tip: Drink clove-infused water or tea regularly to support urinary health.

15. Enhances Libido

Cloves are considered a natural aphrodisiac and may improve sexual health and libido in women by increasing blood flow and balancing hormones.

16. Fights Infections

Cloves contain eugenol and other compounds with antiviral, antibacterial, and antifungal properties, which can help protect women from infections.

17. Aids in Detoxification

Cloves support liver function and help flush out toxins, promoting overall body detox and healthy skin.

18. Supports Eye Health

Cloves are rich in antioxidants that protect the eyes from oxidative stress, reducing the risk of cataracts and age-related vision problems.

How to Use Cloves Effectively

  1. Clove Tea: Boil 3–4 cloves in water for 10 minutes, strain, and drink.

  2. Powdered Cloves: Add to smoothies, soups, or curries for flavor and health benefits.

  3. Clove Oil: Use topically for pain relief, hair growth, or skin applications (always dilute with a carrier oil).

  4. Chewing Whole Cloves: Helps with oral health and freshens breath naturally.

Precautions

  • Avoid consuming cloves in excessive amounts as they may cause irritation or allergic reactions.

  • Pregnant or breastfeeding women should consult a doctor before using clove oil internally.

  • Always dilute clove essential oil before applying to the skin.

Cloves may be small, but their benefits for women’s health are enormous. Incorporating them into your daily routine—through tea, cooking, or oils—can support digestion, hormones, immunity, skin, hair, and much more. With these 18 powerful benefits, cloves prove that sometimes the tiniest spices can make the biggest difference.

Every washing machine can dry laundry and most people don’t know about this function

Every Washing Machine Can Dry Laundry — And Most People Don’t Know About It

For many households, doing laundry is a two-step process: first washing, then drying. We rely on separate appliances like dryers or clotheslines, assuming that washing machines are only good for cleaning clothes. But what if I told you that almost every modern washing machine has a hidden drying function, and most people never take advantage of it? Understanding this feature can save time, energy, and even extend the lifespan of your clothes.

The Evolution of Washing Machines

Washing machines have come a long way since their invention in the 19th century. Early models were purely mechanical, requiring manual effort to clean clothes. Over the decades, they evolved into fully automated machines capable of washing, spinning, and in some cases, drying clothes. Today, many washing machines are designed as washer-dryer combos, offering both washing and drying in a single appliance.

Despite this, many people overlook the drying function, often because the feature isn’t immediately visible or labeled clearly. The result? Households continue to rely on separate dryers or air-drying methods, missing out on a convenient time-saving option.

How Washing Machines Can Dry Laundry

The drying function in washing machines works in one of two ways: vented drying or condensation drying.

  1. Vented Drying: In vented systems, warm air circulates inside the drum, evaporating moisture from the clothes. The damp air is then expelled through a vent, leaving the laundry dry. While effective, this type of drying requires access to a window or exhaust vent to release the moisture.

  2. Condensation Drying: More common in modern machines, this method heats the air inside the drum to evaporate moisture. The humid air is then passed through a condenser, which converts the moisture into water and collects it in a tank or drains it automatically. Condensation dryers are ideal for apartments or homes without external venting options.

Some advanced machines even combine heat-pump technology with condensation drying, making them highly energy-efficient. These models consume significantly less electricity than traditional dryers while protecting delicate fabrics from heat damage.

Why Most People Don’t Use This Function

Several factors contribute to the underutilization of washing machine dryers:

  • Lack of Awareness: Many people simply don’t know that their washing machine can dry clothes. The function is often hidden behind a program setting labeled “dry,” “eco-dry,” or “spin + dry,” which can be confusing for first-time users.

  • Misconceptions: Some assume that washing machines can only spin water out, not fully dry clothes. While spinning removes most moisture, the drying function goes further to remove residual water, making clothes ready to wear or fold.

  • Fear of Damage: Others avoid using the drying feature because they worry about shrinking, overheating, or damaging fabrics. While caution is needed for delicate items, most modern machines have temperature and time settings tailored for different fabrics, from cotton to synthetic blends.

  • Time Concerns: Drying in a washing machine takes longer than a quick spin cycle or a tumble dryer session. However, for people without access to a separate dryer, this function is still a convenient alternative.

Benefits of Using the Washing Machine Dry Function

  1. Convenience: The most obvious benefit is saving time and effort. You can wash and dry clothes in one machine, reducing the need to transfer laundry between appliances.

  2. Space-Saving: In small homes or apartments, combining washing and drying in one machine frees up space that would otherwise be taken by a dryer.

  3. Energy Efficiency: Using a single machine to wash and dry consumes less energy than running separate appliances, particularly when using eco-friendly drying programs.

  4. Fabric Care: Unlike high-heat dryers, washing machine drying functions often use gentle heat or air circulation, which is kinder to your clothes. This reduces shrinkage, fabric wear, and color fading over time.

  5. All-Weather Drying: Rainy days or humid weather no longer hinder laundry routines. With the drying function, clothes can be dried indoors without relying on sunlight or outdoor airflow.

Tips for Using the Drying Function Effectively

  • Sort Laundry by Fabric: Just like washing, different fabrics require different drying settings. Check your washing machine manual for fabric-specific programs.

  • Don’t Overload: Overloading the drum can reduce drying efficiency. Leave enough space for air to circulate between garments.

  • Use Spin First: Run a high-speed spin cycle before drying to remove as much water as possible. This shortens drying time.

  • Clean the Lint Filter: Just as with traditional dryers, cleaning the lint filter ensures proper airflow and prevents overheating.

  • Check for Energy-Saving Modes: Some machines have eco-dry or low-heat programs that save electricity while gently drying clothes.

Conclusion

It’s surprising how many people underutilize a feature that’s already built into their machines. The washing machine’s drying function isn’t just a luxury; it’s a practical solution for modern life. By understanding and using this function, households can save time, energy, and effort, all while keeping clothes in better condition.

So next time you load your washing machine, don’t just stop at washing. Explore the drying programs

Ginger Water The Healthiest Drink to Burn Fat from Belly Neck Arms, Back and Thighs

In the quest for a healthier body and effective fat loss, people often overlook one of the simplest yet most powerful natural remedies: ginger water. Known for its unique spicy flavor and numerous medicinal properties, ginger has been used for centuries in traditional medicine for digestion, inflammation, and metabolic health. When combined with water to make a daily drink, ginger can be a game-changer for anyone looking to shed excess fat from stubborn areas like the belly, neck, arms, back, and thighs.

Why Ginger Water is So Effective

Ginger, scientifically known as Zingiber officinale, contains bioactive compounds such as gingerol, shogaol, and paradol. These compounds are responsible for many of its health benefits, including its ability to aid weight loss. Here’s how ginger water supports fat burning:

  1. Boosts Metabolism: Ginger has thermogenic properties, which means it can slightly increase your body’s temperature, promoting more calorie burning. A higher metabolic rate helps your body convert food into energy faster, preventing excess calories from being stored as fat.

  2. Suppresses Appetite: Drinking ginger water before meals can help reduce hunger and cravings. Studies suggest that ginger may influence satiety hormones, making you feel fuller for longer periods and reducing overeating.

  3. Improves Digestion: Poor digestion can contribute to weight gain and bloating. Ginger stimulates digestive enzymes, promotes smooth bowel movements, and helps break down fats more efficiently. By improving digestion, ginger ensures your body absorbs nutrients properly while preventing fat accumulation.

  4. Reduces Inflammation: Chronic inflammation in the body can make it harder to lose weight, especially in areas like the belly and thighs. Ginger’s anti-inflammatory properties help reduce this inflammation, making fat loss more achievable.

  5. Detoxifies the Body: Regular consumption of ginger water helps flush out toxins from the body. A clean internal system functions better, allowing your metabolism to operate optimally and fat cells to shrink naturally.

Targeted Fat Loss

One of the reasons ginger water is so appealing is its ability to support fat loss in multiple areas of the body:

  • Belly Fat: Ginger helps reduce visceral fat, the dangerous fat that surrounds internal organs. Its thermogenic effect and appetite-suppressing qualities are particularly effective for trimming the midsection.

  • Neck and Arms: Fat in these areas is often resistant to exercise alone. Regular ginger water consumption can support gradual fat loss by improving overall metabolism and reducing fluid retention.

  • Back Fat: Many people struggle with stubborn back fat, especially around the shoulder blades. Ginger water can aid in breaking down these fat deposits over time.

  • Thighs: By promoting better digestion and boosting metabolism, ginger water helps reduce the fat stored in the lower body, including the thighs.

How to Make Ginger Water

Making ginger water is simple, inexpensive, and quick. Here’s a basic recipe:

Ingredients:

  • 1-2 inches of fresh ginger root

  • 2 cups of water

  • Optional: a teaspoon of honey or a slice of lemon for flavor

Instructions:

  1. Wash and peel the ginger root, then slice it into thin pieces.

  2. Boil 2 cups of water in a pot.

  3. Add the ginger slices to the boiling water and let it simmer for 10–15 minutes.

  4. Strain the liquid into a cup and let it cool slightly.

  5. Optional: Add honey or lemon for taste.

  6. Drink it warm, preferably on an empty stomach in the morning.

For maximum fat-burning benefits, you can drink ginger water 2–3 times a day. Make sure to pair it with a balanced diet and regular exercise to see faster results.

Additional Tips to Enhance Results

  • Stay Hydrated: Drinking enough water throughout the day helps your body flush out toxins and supports the fat-burning process. Ginger water counts towards your daily intake.

  • Combine with Exercise: While ginger water boosts metabolism, targeted exercises like planks, squats, push-ups, and cardio will help tone areas like the belly, arms, back, and thighs.

  • Balanced Diet: Include fresh vegetables, fruits, lean protein, and whole grains. Avoid processed foods, sugar, and excessive refined carbs.

  • Consistency is Key: Fat loss doesn’t happen overnight. Drinking ginger water consistently over weeks, along with a healthy lifestyle, produces noticeable results.

Safety and Considerations

Ginger is generally safe for most people, but excessive consumption may cause heartburn, stomach upset, or mild diarrhea. Pregnant women, people on blood-thinning medications, or individuals with gallstones should consult a healthcare professional before using ginger as a fat-loss aid.

Conclusion

Ginger water is more than just a refreshing beverage—it’s a natural, effective tool for burning fat and promoting overall health. Its ability to boost metabolism, reduce inflammation, improve digestion, and suppress appetite makes it an ideal drink for those struggling with stubborn fat around the belly, neck, arms, back, and thighs. By incorporating ginger water into your daily routine, along with a balanced diet and regular exercise, you can gradually achieve a slimmer, healthier body without relying on harsh supplements or extreme diets.

Start your day with a cup of warm ginger water and experience how this simple natural remedy can transform your health, energize your body, and help you shed unwanted fat effectively.

Triple Crust Peach Cobbler

When it comes to comforting desserts, few things compare to the warm, fruity goodness of a peach cobbler. Its sweet, juicy filling paired with a tender, buttery crust has made it a favorite for generations. But imagine taking this classic to the next level — enter the Triple Crust Peach Cobbler. This elevated version combines layers of flaky pastry and rich peach filling, creating a dessert that is as visually stunning as it is delicious. If you thought cobblers couldn’t get more indulgent, this recipe will prove you wrong.

What Makes Triple Crust Peach Cobbler Special

Traditional peach cobblers usually feature a single layer of crust or biscuit topping over the peaches. The triple crust variation, however, introduces a bottom crust, a lattice or full top crust, and an extra layer in between, which adds structure and flavor. The result is a cobbler that boasts a flaky exterior with pockets of syrupy peaches in every bite. This dessert is perfect for special occasions, family gatherings, or simply a cozy weekend treat.

The triple crust technique ensures that each slice is stable enough to hold its shape when served, making it ideal for parties or potlucks. It also enhances the texture contrast — crisp edges, tender middle crust, and luscious fruit filling — which is the hallmark of a great cobbler.

Ingredients You’ll Need

To make this triple crust peach cobbler, you’ll need a mix of pantry staples and fresh ingredients:

For the crust:

  • 3 cups all-purpose flour

  • 1 teaspoon salt

  • 1 tablespoon sugar

  • 1 cup unsalted butter, chilled and cubed

  • 6–8 tablespoons ice water

For the peach filling:

  • 6–8 ripe peaches, peeled and sliced (about 6 cups)

  • ¾ cup granulated sugar

  • ¼ cup brown sugar

  • 2 tablespoons cornstarch

  • 1 teaspoon vanilla extract

  • ½ teaspoon ground cinnamon

  • ¼ teaspoon ground nutmeg

  • 1 tablespoon lemon juice

Optional topping:

  • 1 egg, beaten (for egg wash)

  • Turbinado sugar for sprinkling

Preparing the Triple Crust

Step 1: Make the dough
In a large bowl, combine flour, salt, and sugar. Cut in the chilled butter using a pastry cutter or fork until the mixture resembles coarse crumbs. Gradually add ice water, one tablespoon at a time, until the dough just comes together. Divide into three portions: one slightly larger for the bottom crust, and two smaller ones for the middle and top layers. Wrap each portion in plastic wrap and refrigerate for at least 30 minutes.

Step 2: Prepare the peaches
While the dough chills, mix sliced peaches with granulated sugar, brown sugar, cornstarch, cinnamon, nutmeg, and lemon juice in a large bowl. Toss until the peaches are evenly coated, then let them sit for 10–15 minutes. This step allows the sugars to draw out some juice, which will thicken as the cobbler bakes.

Step 3: Assemble the cobbler
Preheat your oven to 375°F (190°C). Roll out the largest portion of dough and line a greased 9×13-inch baking dish to form the bottom crust. Spoon half of the peach mixture over the crust. Roll out the second portion of dough and cover the peaches, pressing gently around the edges. Layer the remaining peaches on top, and finally roll out the last portion of dough to cover the cobbler. Seal the edges by pressing them together with a fork or your fingers. For a decorative touch, you can create a lattice top instead of a full crust. Brush the top with beaten egg and sprinkle with turbinado sugar for a golden finish.

Baking and Serving

Bake the cobbler for 45–55 minutes, or until the crust is golden brown and the peach filling is bubbly. You may need to cover the edges with foil halfway through baking to prevent over-browning. Allow the cobbler to cool for at least 15 minutes before slicing. This resting period helps the filling thicken slightly, making it easier to serve.

Triple Crust Peach Cobbler is best served warm with a scoop of vanilla ice cream or a dollop of whipped cream. The creamy cold topping contrasts perfectly with the warm, gooey peaches and buttery crust.

Tips for Perfect Triple Crust Cobbler

  1. Use ripe peaches: Sweet, juicy peaches are key for a flavorful filling. If fresh peaches are out of season, canned peaches (drained and lightly mashed) can be used.

  2. Chill your butter: Cold butter ensures a flaky crust. Avoid overworking the dough to prevent it from becoming tough.

  3. Adjust sweetness: Taste your peaches before baking. If they’re extremely sweet, reduce the added sugar slightly.

  4. Prevent soggy crust: A light dusting of cornstarch between peach layers helps absorb excess juice.

  5. Experiment with spices: Add a pinch of ginger or cardamom for a unique twist.

Why You’ll Love It

Triple Crust Peach Cobbler is more than just a dessert; it’s an experience. Each bite delivers a perfect balance of textures: crisp, buttery pastry and soft, juicy peaches spiced to perfection. It’s impressive enough to serve to guests, yet comforting enough to enjoy as a treat for yourself. Its rich flavors evoke nostalgia while the triple crust adds a sophisticated twist, making it a dessert that everyone will remember.

Whether it’s a summer barbecue, a holiday dinner, or a simple weekend indulgence, this triple crust cobbler elevates the classic peach dessert to a new level of decadence. Making it may require a bit more effort than your average cobbler, but the reward — a golden, fruit-filled masterpiece — is well worth it.

The most effective tricks for making the Christmas cactus bloom year

The Christmas cactus (Schlumbergera spp.) is a beloved holiday plant, known for its vibrant, tubular flowers that bring a splash of color to homes during the festive season. Unlike traditional desert cacti, the Christmas cactus thrives in tropical climates and prefers indirect light, humidity, and consistent care. However, one common frustration among gardeners is coaxing this beautiful plant to bloom. If your Christmas cactus has been reluctant to flower, understanding its growth cycle, environmental needs, and proper care can dramatically improve your chances of a spectacular holiday display.

Understanding the Blooming Cycle

Before trying to induce flowering, it’s important to understand how Christmas cacti bloom. Unlike most plants, Christmas cacti are triggered by changes in light and temperature. Flower buds start forming when the plant experiences long nights (approximately 12-14 hours of darkness) and cooler temperatures. This is why they naturally bloom in winter. The buds may take several weeks to develop, so patience is essential. Disruptions such as moving the plant frequently or exposing it to excessive light during nighttime hours can prevent blooms from forming.

1. Give Your Cactus the Right Light Conditions

Light plays a crucial role in the flowering of Christmas cacti. During the growing season (spring through early fall), place your cactus in bright but indirect sunlight. Too much direct sun can scorch the leaves, while too little light may result in weak growth. As the fall season approaches, start providing long nights—12-14 hours of uninterrupted darkness each day for about six weeks. A closet, darkened room, or covering the plant with a box at night can simulate this environment. Consistency is key; even brief exposure to artificial lights can disrupt bud formation.

2. Control Temperature Carefully

Temperature is another major factor in inducing blooms. Christmas cacti prefer cooler nights of around 50-55°F (10-13°C) during the bud-setting phase. Daytime temperatures should be moderate, around 65-70°F (18-21°C). Sudden temperature fluctuations or exposure to heat sources such as radiators or fireplaces can stress the plant and prevent flower development. Once buds have formed, maintain slightly warmer conditions to encourage full bloom, but avoid placing the plant in drafty areas.

3. Water Properly and Avoid Overwatering

Proper watering is crucial for both healthy growth and flowering. Christmas cacti do not like to sit in waterlogged soil, which can lead to root rot. Allow the top inch of soil to dry out between waterings. During the bud-forming period, slightly reduce watering to mimic the plant’s natural winter cycle. Once buds appear, increase watering slightly but keep the soil evenly moist. Avoid getting water directly on the buds, as this can cause them to drop prematurely.

4. Provide Balanced Fertilization

Nutrition is another factor that can influence blooming. Use a balanced, water-soluble fertilizer formulated for flowering plants, such as one with a ratio of 10-10-10 or 20-20-20. Feed the cactus every 2-4 weeks during the growing season (spring and summer). As the fall approaches, reduce fertilization to allow the plant to focus on bud development. Avoid high-nitrogen fertilizers late in the season, as they encourage leaf growth rather than flowers.

5. Repot When Necessary

Christmas cacti prefer slightly crowded roots, which can actually encourage flowering. Repotting should be done only every 2-3 years and ideally after the plant has finished blooming. When repotting, use a well-draining soil mix, typically a combination of potting soil, sand, and perlite. Avoid using heavy garden soils, as they retain too much water and can cause root rot. Overly large pots can lead to excessive vegetative growth at the expense of flowers.

6. Reduce Stress and Avoid Disturbances

Christmas cacti are sensitive to changes in their environment. Moving the plant frequently, exposing it to drafts, or touching buds can cause stress and lead to bud drop. Keep the plant in a stable location throughout the bud-setting and blooming phases. Gentle care, patience, and minimal interference are essential for a full display of flowers.

7. Prune After Blooming

After the flowers have faded, pruning the plant can encourage healthier growth and more abundant blooms in the future. Trim back sections of the plant, ideally just above a segment joint, to maintain shape and promote branching. This helps the cactus produce more flower buds the following season. Avoid heavy pruning late in the season, as it can remove potential buds.

8. Consider Humidity

Christmas cacti originate from humid tropical forests, so they thrive in environments with moderate humidity. If your home is dry, especially during winter, consider placing a humidity tray near the plant or misting it lightly. Avoid excessive moisture on leaves and buds, which can lead to fungal problems.

Conclusion

Successfully getting a Christmas cactus to bloom requires understanding its natural growth cycle, mimicking its preferred light and temperature conditions, and providing consistent, gentle care. By offering the right environment—long nights, cooler temperatures, balanced watering, and proper nutrition—you can enjoy vibrant blooms that brighten your home each holiday season. Remember, patience is key: buds take time to form, and disturbances can easily set back the process. With attention to these tricks, your Christmas cactus can become a stunning centerpiece year after year, bringing both beauty and a sense of accomplishment to your holiday traditions.

Many people wear rings without knowing this… the middle finger has a hidden meaning

Many People Wear Rings Without Knowing This… The Middle Finger Has a Hidden Meaning

Rings have been worn by humans for thousands of years, not just as decorative items, but as symbols of status, commitment, and personal expression. While most people are aware that wedding rings, engagement rings, or signet rings have specific meanings, fewer know that the choice of finger itself can carry symbolism. Among all the fingers, the middle finger holds a unique and often overlooked significance. Many people wear rings on this finger purely out of habit, style preference, or convenience, but understanding the hidden meaning can reveal surprising insights about personality, intention, and even cultural beliefs.

The Central Symbolism of the Middle Finger

The middle finger is, as the name suggests, located at the center of the hand. Its central position gives it a special role in symbolism. In palmistry and cultural interpretations, the middle finger is associated with balance, responsibility, and self-analysis. Because it sits between the ring finger (often linked to love and creativity) and the index finger (associated with power and leadership), the middle finger represents equilibrium—between emotions and logic, personal desires and social responsibilities.

Wearing a ring on the middle finger can indicate a person’s desire for self-awareness and personal responsibility. It is often chosen by individuals who value balance in life and who seek to strengthen their sense of identity. Unlike the index or ring fingers, which may communicate social messages about authority, marital status, or romantic commitment, the middle finger focuses on the self, making it a deeply personal choice.

Personality Traits of Middle-Finger Ring Wearers

Psychologists and experts in body language have suggested that the way a person adorns their hands can subtly reflect aspects of their personality. People who choose the middle finger for their rings are often seen as confident, honest, and self-reliant. The middle finger does not traditionally symbolize romance or power in the same direct way as other fingers, so wearing a ring here may suggest independence from societal expectations.

Moreover, a middle-finger ring can be a statement of individuality. It’s often the finger of choice for those who want to attract attention subtly but without overtly flaunting status or relationships. Some people even use it as a form of silent rebellion, rejecting traditional symbolism in favor of personal expression.

Cultural and Historical Perspectives

Throughout history, different cultures have attached various meanings to finger rings. In ancient Rome, for example, the left hand was considered the hand of personal power, while the right hand reflected social connections. Rings on the middle finger were sometimes worn to indicate responsibility or to invoke protection against negative energies.

In modern Western culture, the middle finger’s central position has led to associations with balance and ethical alignment. Some spiritual and metaphysical interpretations claim that wearing a ring on this finger can enhance self-confidence, focus, and clarity of thought. Additionally, certain gemstones placed on the middle finger are believed to amplify these qualities. For example, amethyst rings are said to boost calmness and insight, while onyx may encourage self-discipline.

Practical Considerations

Many people choose the middle finger simply because it is large and stable, providing a secure place for larger rings or statement pieces. Unlike the ring finger, which is smaller and primarily associated with marital symbolism, the middle finger can accommodate bold designs that would be impractical elsewhere.

Interestingly, the middle finger is also often the least constrained by societal rules when it comes to ring-wearing. There is no universal expectation about what kind of ring must go there, giving the wearer freedom to express style, beliefs, or mood. For some, it may even act as a protective talisman, placed deliberately to remind them to maintain balance in life.

Psychological Impact

Wearing a ring on the middle finger can also influence the wearer psychologically. Because it is centrally located, it serves as a constant visual reminder of personal responsibility and balance. Some psychologists suggest that having a tangible symbol on the middle finger can reinforce mindfulness and conscious decision-making. Every time the wearer notices their ring, they may be subtly reminded to stay centered, act ethically, or maintain personal integrity.

A Modern Trend

In contemporary fashion, middle-finger rings have gained popularity among both men and women as statement pieces. Celebrities, influencers, and trendsetters often showcase bold rings on this finger, combining style with symbolism. However, while aesthetics play a major role in the choice, the hidden meanings—balance, independence, and self-awareness—continue to resonate quietly beneath the surface.

Conclusion

Next time you see someone wearing a ring on the middle finger, it might not just be a fashion statement. It could be a reflection of inner balance, personal responsibility, and self-expression. For many wearers, the middle finger is a subtle yet powerful way to convey individuality and confidence. Unlike the ring finger’s romantic connotations or the index finger’s social power, the middle finger quietly speaks of self-awareness, equilibrium, and personal growth.

So, whether you wear a ring on your middle finger for style, habit, or deeper meaning, now you know that there’s more to this choice than meets the eye. It’s a hidden message about who you are—or who you aspire to be—and about the subtle ways humans use adornment to communicate personality, values, and intention.

No-Bake Peanut Butter Balls

No-Bake Peanut Butter Balls: A Simple, Irresistible Treat

When it comes to quick, delicious, and satisfying snacks, few recipes can compete with No-Bake Peanut Butter Balls. These little bites of heaven combine the rich, nutty flavor of peanut butter with a touch of sweetness and a hint of chocolate, creating a treat that’s perfect for any occasion—whether as a midday pick-me-up, a post-dinner indulgence, or a homemade gift for friends and family. The best part? They require no oven, no special equipment, and only a handful of ingredients.

Ingredients You’ll Need

To make No-Bake Peanut Butter Balls, you’ll need just a few pantry staples:

  • 1 cup creamy peanut butter – This forms the base of the balls. Creamy peanut butter works best for smooth, cohesive bites, though crunchy peanut butter can be used for added texture.

  • 1/4 cup unsalted butter – Softened butter helps bind the mixture together and adds richness.

  • 2 cups powdered sugar – This sweetens the balls and gives them a firm yet melt-in-your-mouth texture.

  • 1 teaspoon vanilla extract – Enhances the flavor and adds a warm, aromatic note.

  • 2 cups semi-sweet chocolate chips – For coating the balls in chocolate, giving them that classic candy appeal.

  • Optional toppings – Crushed peanuts, shredded coconut, or sprinkles can be added for extra flair and texture.

Step-by-Step Instructions

  1. Prepare the Peanut Butter Mixture
    In a large mixing bowl, combine the softened butter and creamy peanut butter. Using a spatula or hand mixer, beat them together until smooth and well blended. Add the vanilla extract and mix again.

  2. Incorporate the Powdered Sugar
    Gradually add the powdered sugar to the peanut butter mixture. Mix well until a thick, sticky dough forms. The consistency should be firm enough to roll into balls but soft enough to shape easily with your hands. If the mixture is too sticky, you can refrigerate it for 10-15 minutes to make it easier to handle.

  3. Shape the Peanut Butter Balls
    Using your hands or a small cookie scoop, form the mixture into 1-inch balls. Place them on a baking sheet lined with parchment paper. Try to make them uniform in size so they coat evenly in chocolate and look visually appealing.

  4. Chill the Balls
    Place the tray of peanut butter balls in the refrigerator for at least 30 minutes. Chilling helps them firm up and makes the chocolate coating process smoother.

  5. Prepare the Chocolate Coating
    In a microwave-safe bowl, melt the chocolate chips in 20-30 second intervals, stirring in between, until smooth and fully melted. You can also melt the chocolate using a double boiler on the stove. Stir until glossy and completely combined.

  6. Coat the Peanut Butter Balls
    Using a fork or toothpick, dip each chilled peanut butter ball into the melted chocolate, ensuring it is fully covered. Tap off any excess chocolate and place the coated ball back onto the parchment-lined tray. For a decorative touch, sprinkle crushed peanuts, coconut, or sprinkles on top before the chocolate sets.

  7. Final Chill
    Once all the balls are coated, return them to the refrigerator for another 30 minutes or until the chocolate is fully hardened. Store the finished peanut butter balls in an airtight container in the fridge for up to two weeks—or in the freezer for longer storage.

Tips for Perfect Peanut Butter Balls

  • Use high-quality ingredients: The flavor of these treats depends heavily on the quality of peanut butter and chocolate you use. Opt for natural peanut butter and premium chocolate for the best results.

  • Keep them bite-sized: 1-inch balls are ideal. Larger balls can be harder to coat evenly and may be too rich in a single bite.

  • Customize flavors: Mix in a pinch of cinnamon, a few chocolate chips, or even crushed pretzels into the peanut butter mixture for a unique twist.

  • Avoid overhandling the chocolate: Chocolate can seize if over-stirred. Melt it slowly and gently for a smooth, shiny coating.

Why These Treats Are a Crowd-Pleaser

No-Bake Peanut Butter Balls are universally loved for several reasons:

  1. Ease of Preparation – No need to heat up the oven or deal with complicated steps. Even beginners can make these successfully in less than an hour.

  2. Customizable – From dark chocolate to white chocolate, or from adding nuts to a sprinkle of sea salt, the recipe can be easily adapted to suit any taste.

  3. Perfect Portion Control – Small, bite-sized portions mean you can indulge without going overboard.

  4. Kid-Friendly – Children love rolling the balls and decorating them, making this a fun activity for family gatherings or holiday parties.

Serving Ideas

  • Snack packs: Individually wrap peanut butter balls in mini cupcake liners for an on-the-go snack.

  • Gift jars: Layer them in decorative jars and tie with a ribbon for a thoughtful homemade gift.

  • Party platter: Arrange them on a festive plate alongside other no-bake treats for a holiday dessert table.

Nutritional Insight

While these treats are undeniably indulgent, they also offer some nutritional value: peanut butter is a good source of protein, healthy fats, and fiber. Using dark chocolate can add antioxidants, and controlling portion size ensures that these delicious bites remain a guilt-free pleasure.

Conclusion

No-Bake Peanut Butter Balls are a testament to the fact that simplicity often yields the most delightful results. With just a few ingredients and minimal effort, you can create a snack that satisfies your sweet tooth, impresses guests, and provides a versatile treat for any occasion. Whether you’re making them for a holiday party, a quick dessert, or a thoughtful gift, these little chocolate-coated bites are sure to bring smiles to anyone who tastes them. So grab your peanut butter, melt some chocolate, and indulge in the magic of these no-bake wonders.