Lemon The Little Yellow Miracle for Cleansing, Healing & Natural Glow

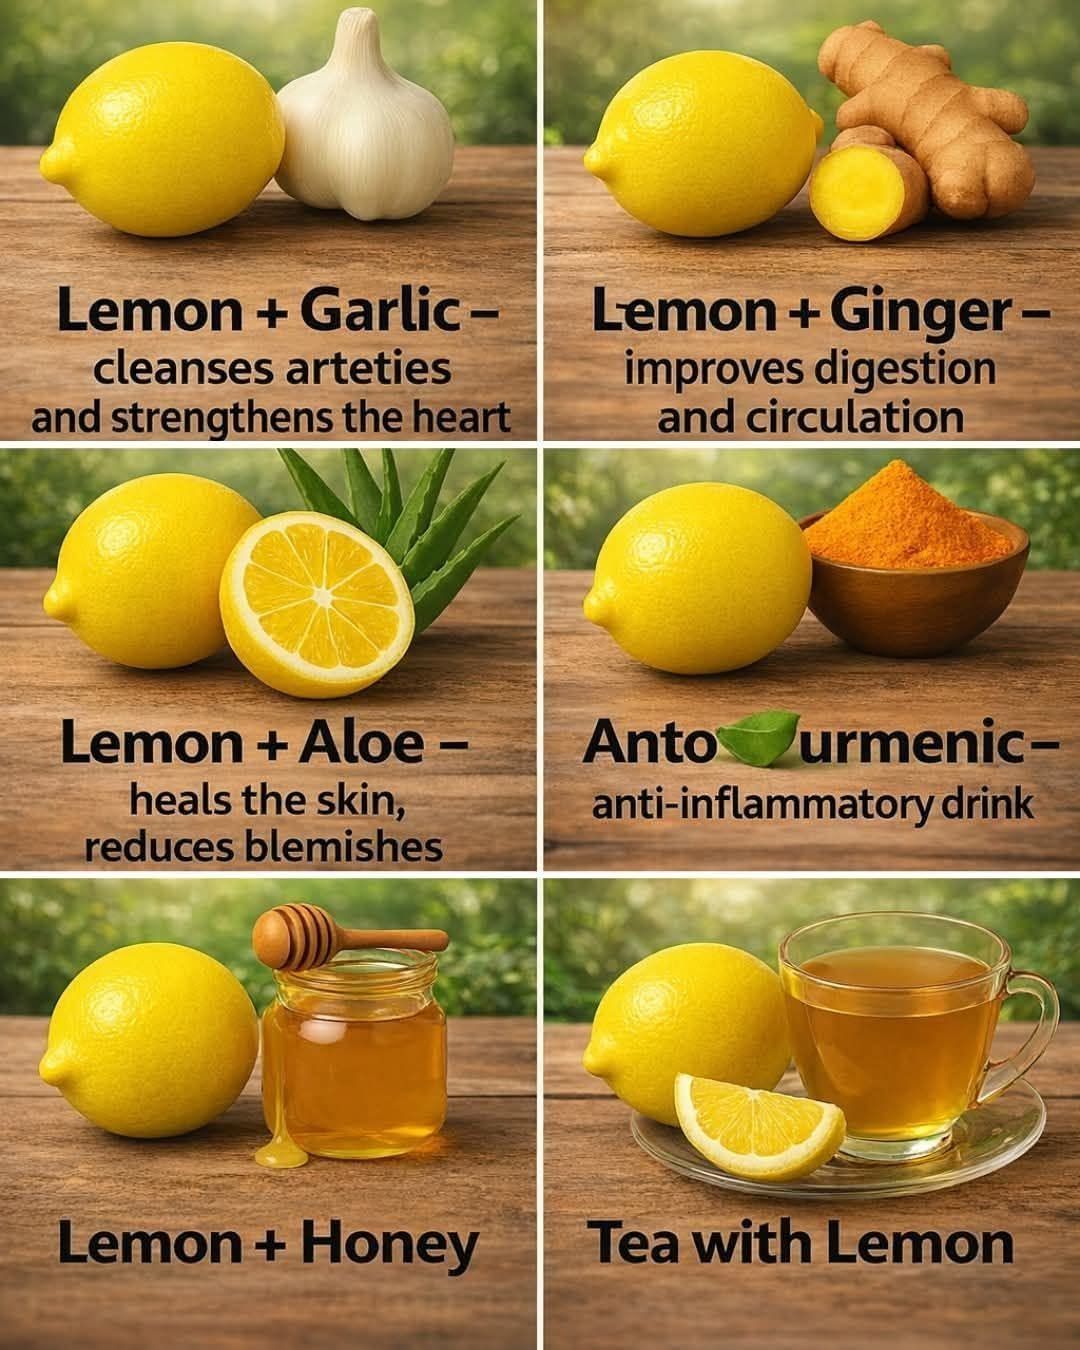
Small, bright, and bursting with flavor, the lemon has earned a timeless place in kitchens, traditional remedies, and beauty rituals around the world. This humble yellow fruit is far more than a garnish or a sour note in recipes—it has long been valued for its refreshing, cleansing, and revitalizing qualities. From supporting digestion to enhancing skin radiance, lemons continue to be celebrated as a natural wellness ally when used thoughtfully and in balance.

A Nutritional Powerhouse in a Simple Peel

Lemons are famously rich in vitamin C, a powerful antioxidant that helps protect cells from oxidative stress and supports the immune system. Just one lemon can provide a significant portion of your daily vitamin C needs, along with small amounts of potassium, folate, and vitamin B6. Lemons also contain beneficial plant compounds such as flavonoids and citric acid, which contribute to their health-supporting properties.

Unlike many fruits, lemons are low in sugar and calories, making them a popular addition to wellness routines without adding excess sweetness. Their sharp taste encourages dilution with water, which can naturally increase daily fluid intake—an often-overlooked foundation of good health.

Gentle Cleansing from the Inside Out

Lemon water has become a morning ritual for many people, and for good reason. While it is not a magical detox, warm lemon water can gently stimulate digestion and support the body’s natural cleansing processes. The citric acid in lemons may encourage the production of digestive juices, helping the stomach prepare for food.

Lemons also support liver function indirectly by promoting hydration and providing antioxidants that assist the body’s normal detox pathways. Rather than “flushing toxins,” lemons work best as part of a consistent, healthy lifestyle that includes balanced meals, adequate water, and regular movement.

For those prone to bloating or sluggish digestion, lemon-infused water or herbal teas with lemon can feel soothing and refreshing, especially when consumed slowly.

Supporting Healing and Immunity

Vitamin C is essential for immune defense, wound healing, and collagen formation. During seasonal changes or periods of fatigue, lemon-based drinks—such as warm water with lemon and honey—are often used as comforting remedies. While lemon cannot cure illness, its nutrients help support the body while it does the healing work.

Lemons also have mild antibacterial properties due to their acidity, which is why they’ve historically been used in food preservation and cleaning. In everyday life, this translates to simple benefits like fresher breath, a cleaner mouth environment, and reduced odor when used in natural home remedies.

The Secret to a Natural Glow

One of lemon’s most admired qualities is its connection to healthy, glowing skin. Vitamin C plays a vital role in collagen production, which helps maintain skin firmness and elasticity. Diets that include vitamin C–rich foods like lemons can support clearer, brighter-looking skin over time.

Lemon is also popular in DIY beauty traditions. When diluted properly, lemon juice has been used to help reduce excess oil, brighten dull skin, and clarify the complexion. However, it’s important to note that lemon juice is highly acidic and should never be applied directly to the skin without dilution. Even then, it should be used cautiously and always followed by sun protection, as lemon can increase photosensitivity.

Internally, staying hydrated with lemon water may help skin appear more radiant simply because well-hydrated skin tends to look smoother and healthier.

Lemon for Mind and Mood

The fresh scent of lemon is widely used in aromatherapy for its uplifting and energizing effect. Citrus aromas are associated with improved mood, reduced stress, and enhanced focus. Even something as simple as adding lemon zest to meals or inhaling the aroma of freshly cut lemon can create a sense of freshness and mental clarity.

Starting the day with lemon water can also become a mindful ritual—signaling a fresh start and encouraging healthier choices throughout the day.

Easy Ways to Add Lemon to Daily Life

Incorporating lemon into your routine doesn’t require drastic changes. Here are a few simple ideas:

  • Add fresh lemon juice to warm or room-temperature water in the morning

  • Use lemon zest to flavor soups, rice, salads, and baked goods

  • Squeeze lemon over steamed vegetables or grilled fish

  • Make lemon-infused water with mint or cucumber

  • Add lemon juice to homemade salad dressings instead of heavy sauces

These small habits can add brightness to meals while supporting overall wellness.

A Note of Balance and Care

Despite its many benefits, lemon should be used in moderation. Excessive consumption may irritate sensitive stomachs, worsen acid reflux, or affect tooth enamel. Drinking lemon water through a straw and rinsing the mouth afterward can help protect teeth. As with any natural remedy, listening to your body is key.

Final Thoughts

Lemon truly earns its reputation as a “little yellow miracle”—not because it promises instant cures, but because it gently supports the body’s natural functions. Its cleansing freshness, immune-supporting nutrients, and skin-enhancing qualities make it a simple yet powerful addition to daily life. When enjoyed mindfully, lemon can brighten not only your meals, but your overall sense of wellness and natural glow. 🍋

Cheesy Meatloaf with Mashed Potatoes

Few meals bring the same sense of warmth and nostalgia as cheesy meatloaf served with creamy mashed potatoes. This timeless comfort dish has graced dinner tables for generations, offering hearty flavors, simple ingredients, and soul-satisfying goodness. Whether you’re cooking for family, guests, or simply craving a cozy homemade meal, this cheesy meatloaf with mashed potatoes delivers on every level.

What sets this version apart is the gooey melted cheese tucked inside the meatloaf, creating a savory surprise in every slice. Paired with fluffy, buttery mashed potatoes, it’s the kind of meal that feels like a hug on a plate.


Why This Cheesy Meatloaf Recipe Works

Traditional meatloaf can sometimes be dry or bland, but this recipe solves both problems. The combination of ground meat, breadcrumbs, eggs, milk, and cheese keeps the loaf moist and tender. A flavorful glaze caramelizes on top while baking, adding a slightly sweet and tangy finish that perfectly balances the savory interior.

The mashed potatoes are smooth, rich, and creamy—ideal for soaking up every drop of sauce and melted cheese. Together, these two classics form a complete, satisfying meal that never goes out of style.


Ingredients for Cheesy Meatloaf

For the Meatloaf:

  • 1½ pounds ground beef (80/20 for best flavor)

  • 1 cup breadcrumbs or crushed crackers

  • 2 large eggs

  • 1 cup shredded cheese (cheddar, mozzarella, or a blend)

  • ½ cup milk

  • 1 small onion, finely chopped

  • 2 cloves garlic, minced

  • ½ cup ketchup

  • 2 tablespoons Worcestershire sauce

  • 1 teaspoon salt

  • ½ teaspoon black pepper

  • 1 teaspoon paprika

  • 1 teaspoon Italian seasoning

For the Glaze:

  • ½ cup ketchup

  • 2 tablespoons brown sugar

  • 1 tablespoon mustard


Ingredients for Mashed Potatoes

  • 2 pounds potatoes (Yukon Gold or Russet)

  • ½ cup milk or cream

  • 4 tablespoons butter

  • Salt to taste

  • Optional: garlic, sour cream, or cream cheese for extra richness


How to Make Cheesy Meatloaf

Step 1: Prepare the Meatloaf Mixture

Preheat your oven to 375°F (190°C). In a large bowl, combine ground beef, breadcrumbs, eggs, milk, onion, garlic, Worcestershire sauce, ketchup, salt, pepper, paprika, and Italian seasoning. Mix gently until just combined—overmixing can make the meatloaf dense.

Fold in half of the shredded cheese, saving the rest for the center or topping.

Step 2: Shape and Fill

Lightly grease a loaf pan or line a baking sheet with parchment paper. Press half of the meat mixture into the pan, creating a small indentation down the center. Sprinkle the remaining cheese evenly over the middle, then cover with the rest of the meat mixture, sealing the edges.

Step 3: Add the Glaze

Mix ketchup, brown sugar, and mustard in a small bowl. Spread generously over the top of the meatloaf.

Step 4: Bake

Bake uncovered for 55–65 minutes, or until the internal temperature reaches 160°F (71°C). Let the meatloaf rest for 10 minutes before slicing—this helps it hold together and keeps it juicy.


How to Make Perfect Mashed Potatoes

Step 1: Cook the Potatoes

Peel and cut potatoes into even chunks. Place them in a large pot, cover with cold salted water, and bring to a boil. Cook for 15–20 minutes until fork-tender.

Step 2: Mash and Season

Drain well and return potatoes to the hot pot. Add butter and let it melt. Mash until smooth, then gradually add warm milk or cream. Season with salt to taste.

For extra flavor, mix in roasted garlic, sour cream, or cream cheese.


Serving Suggestions

Serve thick slices of cheesy meatloaf over a bed of mashed potatoes, spooning extra glaze or pan juices on top. Add a simple green vegetable like steamed broccoli, green beans, or a fresh salad to balance the richness.

This dish is perfect for:

  • Family dinners

  • Meal prep and leftovers

  • Sunday comfort meals

  • Cold weather cravings


Storage and Leftovers

Cheesy meatloaf stores beautifully. Refrigerate leftovers in an airtight container for up to 4 days. Mashed potatoes can be reheated with a splash of milk to restore creaminess. The meatloaf also freezes well—wrap slices individually for easy future meals.


Final Thoughts

Cheesy Meatloaf with Mashed Potatoes is more than just a recipe—it’s a reminder of home-cooked comfort and simple pleasures. With its juicy, cheese-filled center and velvety mashed potatoes, this dish satisfies both the stomach and the soul. Easy to prepare and endlessly comforting, it’s a meal you’ll come back to again and again.

Spicy Cabbage and Rice Fritters

Spicy Cabbage and Rice Fritters are a wonderful example of how simple pantry ingredients can be transformed into something deeply satisfying. Crispy on the outside, tender on the inside, and packed with warm spices, these fritters are perfect as a snack, appetizer, or even a light meal. They are especially popular in home kitchens where leftover rice needs a delicious second life, and cabbage adds both texture and nutrition without overpowering the dish.

Why This Recipe Works

The beauty of cabbage and rice fritters lies in balance. Rice provides structure and softness, cabbage adds crunch and moisture, and spices bring everything together with bold flavor. When pan-fried, the mixture forms golden patties with irresistible crisp edges. These fritters are budget-friendly, vegetarian, and easy to customize depending on your spice tolerance and available ingredients.

Ingredients You’ll Need

This recipe uses everyday ingredients that are easy to find:

  • 2 cups cooked rice (white or brown, cooled)

  • 2 cups finely shredded cabbage (green or purple)

  • 1 small onion, finely chopped

  • 2 green chilies, finely chopped (adjust to taste)

  • 2 cloves garlic, minced

  • 1 teaspoon red chili flakes

  • 1 teaspoon ground cumin

  • 1 teaspoon coriander powder

  • ½ teaspoon turmeric

  • Salt to taste

  • 2 tablespoons fresh coriander or parsley, chopped

  • 2–3 tablespoons all-purpose flour or chickpea flour

  • 1 egg (optional, for binding)

  • Oil for shallow frying

Preparing the Cabbage

Cabbage contains a lot of water, which can make fritters soggy if not handled correctly. After shredding the cabbage, place it in a bowl, sprinkle lightly with salt, and let it rest for 10 minutes. Gently squeeze out excess moisture using your hands. This step ensures crispier fritters and better texture.

Making the Fritter Mixture

In a large mixing bowl, combine the cooked rice and squeezed cabbage. Add the chopped onion, green chilies, garlic, and fresh herbs. Sprinkle in the chili flakes, cumin, coriander powder, turmeric, and salt. Mix well until everything is evenly distributed.

Add the flour to help bind the mixture. If you prefer a firmer texture, add an egg, though the fritters will still hold together without it. Mix until the mixture can be shaped into patties. If it feels too wet, add a little more flour; if too dry, sprinkle in a tablespoon of water.

Shaping the Fritters

Take a small portion of the mixture and shape it into a flat patty using your palms. Avoid making them too thick, as thinner fritters cook more evenly and become crispier. Place the shaped fritters on a plate while you heat the oil.

Cooking the Fritters

Heat a shallow layer of oil in a heavy-bottomed pan over medium heat. Once the oil is hot, carefully place the fritters into the pan, leaving space between them. Cook for 3–4 minutes on each side, or until golden brown and crisp. Flip gently to avoid breaking them.

Once cooked, transfer the fritters to a plate lined with paper towels to absorb excess oil. Continue until all the mixture is used.

Serving Suggestions

Spicy Cabbage and Rice Fritters are best served hot. Pair them with mint chutney, garlic yogurt sauce, or simple tomato ketchup. They also go wonderfully with a side salad for a light lunch or can be tucked into wraps with fresh vegetables and a drizzle of sauce.

For a complete meal, serve them alongside lentil soup or a warm bowl of spiced yogurt.

Variations and Tips

  • Extra crunch: Add finely chopped carrots or spring onions.

  • Healthier option: Shallow fry with minimal oil or cook them in an air fryer.

  • Vegan version: Skip the egg and use chickpea flour for binding.

  • Cheesy twist: Add a handful of grated cheese for richness.

  • Milder flavor: Reduce chilies and chili flakes for a gentler heat.

Storage and Reheating

These fritters can be stored in the refrigerator for up to two days. Reheat them in a pan or air fryer to restore crispness. Avoid microwaving, as it can make them soft.

Final Thoughts

Spicy Cabbage and Rice Fritters are comforting, flavorful, and incredibly versatile. They are proof that humble ingredients can create something special when treated with care and imagination. Whether you make them for a family snack, a tea-time treat, or a casual gathering, these fritters are sure to be enjoyed by everyone at the table.

how to cleanse 15 kilos of waste from your colon at night

Promises to “cleanse 15 kilos of waste from your colon overnight” are everywhere online—but they are not grounded in medical reality. While the idea is tempting, especially if you feel bloated or uncomfortable, it’s important to understand how the colon truly works, why such claims are misleading, and what safe, evidence-based steps can actually improve digestive health.

The Myth of “15 Kilos of Waste”

The human colon does not store 15 kilos (33 pounds) of waste. In healthy adults, the amount of stool present at any given time is usually a few hundred grams to, at most, a couple of kilograms—and even that fluctuates based on diet and hydration. Claims of massive “toxic buildup” are a marketing tactic used to sell laxatives, teas, powders, or enemas.

Your digestive system is self-cleaning. The liver detoxifies the blood, the kidneys filter waste, and the intestines move digested material forward through natural muscular contractions called peristalsis. There is no hidden reservoir of old waste clinging to the colon walls for years.

Why Overnight “Colon Cleanses” Can Be Dangerous

Products or methods promising dramatic overnight results often rely on strong laxatives, stimulant herbs, or enemas. These can cause:

  • Severe dehydration

  • Electrolyte imbalances (dangerous for the heart)

  • Dependence on laxatives

  • Cramping, diarrhea, and intestinal irritation

  • Worsening constipation over time

Frequent or aggressive colon cleansing can actually weaken the colon’s natural function, making it harder to have normal bowel movements without assistance.

What That “Light” Feeling Really Is

When people report feeling lighter after a cleanse, it’s usually due to:

  • Loss of water, not fat or “toxins”

  • Temporary emptying of bowel contents

  • Reduced bloating from cutting processed foods

This is not detoxification—and any weight change is short-lived.


What Actually Helps Clean and Support Your Colon (Safely)

While you cannot—and should not—purge massive amounts of waste overnight, you can support healthy bowel movements and reduce bloating naturally.

1. Hydration Before Bed

Drinking enough water throughout the day softens stool and supports regular elimination. A warm glass of water in the evening can gently stimulate digestion—without shocking your system.

2. Fiber: The Colon’s Natural Cleaner

Fiber is the real hero of colon health. It adds bulk to stool and feeds beneficial gut bacteria.

Best fiber sources:

  • Oats and whole grains

  • Chia seeds and flaxseeds

  • Apples, pears, and berries

  • Lentils and beans

  • Leafy greens

Increase fiber gradually to avoid gas and cramps.

3. Magnesium (With Caution)

Magnesium-rich foods (like almonds, spinach, and bananas) help relax intestinal muscles and promote regularity. Some people use magnesium supplements at night, but excessive doses can cause diarrhea—so moderation is key.

4. Probiotics for Gut Balance

Fermented foods such as yogurt, kefir, sauerkraut, and kimchi support healthy gut bacteria, which play a major role in digestion and stool consistency.

5. Evening Movement

A short walk after dinner stimulates peristalsis and reduces bloating. Even gentle stretching before bed can support overnight digestive movement.

6. Consistent Bathroom Routine

Training your body to respond to natural urges—especially in the morning—supports colon health far better than forcing bowel movements at night.


Signs You Don’t Need a “Cleanse”

You likely don’t need any detox if:

  • You have regular bowel movements

  • You don’t experience chronic constipation

  • You feel relief after dietary adjustments

  • You don’t rely on laxatives

Your colon is doing its job.


When to See a Doctor

If you experience:

  • Persistent constipation

  • Severe bloating or abdominal pain

  • Blood in stool

  • Unexplained weight loss

These are medical issues, not detox problems, and should be evaluated by a healthcare professional.


The Bottom Line

There is no safe or real way to cleanse 15 kilos of waste from your colon overnight—because that waste doesn’t exist. The colon does not need flushing, purging, or harsh interventions. What it needs is fiber, hydration, balanced nutrition, and regular movement.

Fried Potatoes and Onion

Fried potatoes and onions are one of those simple, timeless dishes that appear in kitchens all around the world. With just a few humble ingredients, this classic recipe delivers deep flavor, satisfying texture, and an aroma that instantly feels like home. Whether served as a hearty breakfast side, a quick lunch, or a comforting dinner accompaniment, fried potatoes and onions prove that great food doesn’t need to be complicated.

At its heart, this dish is about balance. The potatoes provide a soft, fluffy interior with a golden, crispy exterior, while the onions add sweetness, depth, and a slight caramelized bite. Together, they create a harmony of flavors that is both rustic and irresistible. It’s the kind of food that reminds us of family meals, roadside diners, and simple pleasures.

Choosing the Right Potatoes

The type of potato you use can make a noticeable difference. Starchy potatoes like russets are a popular choice because they crisp up beautifully when fried. Their fluffy interior contrasts perfectly with their crunchy outer layer. Yukon Gold potatoes are another excellent option, offering a slightly buttery flavor and a creamy texture that holds up well in the pan. Waxy potatoes, such as red potatoes, can also be used, though they tend to stay firmer and less crispy.

Before cooking, potatoes should be washed thoroughly and peeled if desired. Some people prefer to leave the skins on for added texture and nutrients. Slicing is important: thin, even slices cook more uniformly and develop better browning. Uneven cuts can lead to some pieces burning while others remain undercooked.

The Role of Onions

Onions are more than just a supporting ingredient in this dish—they are essential. Yellow onions are the most common choice because they strike a perfect balance between sweetness and sharpness. As they cook, their natural sugars caramelize, adding a rich, slightly sweet flavor that complements the savory potatoes. White onions offer a milder taste, while red onions bring a hint of sweetness and color.

Slicing onions into thin strips or half-moons allows them to cook evenly and mingle with the potatoes. Timing is crucial: adding onions too early can cause them to burn before the potatoes are fully cooked, while adding them too late may leave them raw and sharp.

Cooking Technique Matters

The secret to perfect fried potatoes and onions lies in patience and heat control. A heavy skillet, such as cast iron, is ideal because it retains heat evenly and promotes browning. Oil choice also matters. Vegetable oil, sunflower oil, or a mix of oil and butter works well. Butter adds flavor, while oil prevents it from burning too quickly.

The potatoes should be added to hot oil in a single layer if possible. Overcrowding the pan causes steaming rather than frying, which prevents crispiness. Let the potatoes sit undisturbed for a few minutes before stirring. This allows a golden crust to form. Once they begin to soften and brown, the onions can be added.

Seasoning should be simple but thoughtful. Salt is essential and helps draw out moisture, enhancing browning. Black pepper adds mild heat, while paprika or chili flakes can bring warmth and color. Some cooks like to add garlic, herbs, or even a pinch of cumin for extra depth, but the classic version shines with minimal seasoning.

Flavor Variations and Additions

One of the reasons fried potatoes and onions are so beloved is their versatility. This dish easily adapts to different tastes and cuisines. Adding bell peppers creates a colorful and slightly sweet variation. Smoked paprika or dried herbs like thyme and rosemary can elevate the flavor profile. For a heartier meal, fried potatoes and onions pair wonderfully with eggs, sausages, or grilled meats.

In many cultures, this dish is customized with local spices. In South Asian kitchens, a touch of turmeric, coriander, or green chilies can transform it into a spicy, aromatic side. In European-style cooking, bacon fat or olive oil may be used for richer flavor.

Serving and Enjoying

Fried potatoes and onions are best served hot, straight from the pan. They can stand alone as a comforting dish or complement a wide variety of meals. At breakfast, they’re perfect alongside eggs and toast. At lunch or dinner, they work well with roasted chicken, fish, or even as a filling for sandwiches and wraps.

Beyond their taste, fried potatoes and onions carry a sense of nostalgia. They remind us that food doesn’t need to be fancy to be meaningful. With just a skillet, a few ingredients, and a bit of care, you can create a dish that satisfies both the stomach and the soul.

In a world full of complex recipes and exotic ingredients, fried potatoes and onions remain a humble reminder of the beauty of simplicity. Crispy, golden, and full of flavor, this classic dish continues to earn its place on tables everywhere—proof that sometimes, the simplest foods are the most memorable.

Did you know that eating bananas increases

Bananas are one of the most popular fruits worldwide, loved for their natural sweetness, convenience, and versatility. But beyond being a tasty snack, bananas are a powerhouse of nutrition that can significantly impact your health in multiple ways. Whether you eat them as a quick breakfast, a post-workout snack, or a sweet addition to desserts, bananas bring a host of benefits that many people might not fully appreciate. Let’s explore how eating bananas can improve your health, energy levels, and even mood.

1. Rich Source of Essential Nutrients

Bananas are packed with vital nutrients. They are an excellent source of potassium, a mineral crucial for heart health and proper muscle and nerve function. A single medium-sized banana contains around 422 mg of potassium, which can help regulate blood pressure and support cardiovascular health. In addition to potassium, bananas provide vitamin C, vitamin B6, magnesium, and dietary fiber. These nutrients play important roles in maintaining energy levels, boosting the immune system, and supporting overall metabolic functions.

Vitamin B6, for example, helps in the production of neurotransmitters such as serotonin and dopamine, which influence mood and cognitive function. Regular consumption of bananas can therefore have a subtle but positive effect on mental well-being, reducing feelings of stress and promoting a sense of calm.

2. Natural Energy Booster

Bananas are an excellent source of carbohydrates, primarily in the form of natural sugars such as glucose, fructose, and sucrose. These sugars are easily digestible, making bananas a quick energy booster. This is why athletes often consume bananas before or after workouts—they provide immediate fuel for muscles and help prevent fatigue. Additionally, the fiber in bananas slows down the digestion of these sugars, offering a sustained energy release rather than a sudden spike followed by a crash. This combination makes bananas an ideal snack for both children and adults who need long-lasting energy throughout the day.

3. Promotes Digestive Health

The dietary fiber in bananas, particularly soluble fiber, plays a key role in digestive health. Soluble fiber helps regulate bowel movements by absorbing water and forming a gel-like substance that aids smooth digestion. This can prevent constipation and promote regularity, keeping your digestive system healthy. Bananas also contain prebiotics, which are compounds that feed the beneficial bacteria in your gut. A balanced gut microbiome is essential for nutrient absorption, immune function, and even mental health. By supporting healthy gut bacteria, bananas indirectly enhance your overall well-being.

4. Supports Heart Health

Potassium is one of the most important minerals for heart health, and bananas are one of the richest natural sources. Adequate potassium intake helps maintain normal blood pressure levels by counteracting the effects of sodium. This reduces the risk of hypertension, which is a major factor in heart disease and stroke. Additionally, the fiber in bananas helps lower cholesterol levels, further protecting cardiovascular health. Studies have shown that individuals who regularly consume potassium-rich foods like bananas have a lower risk of heart-related complications.

5. Aids Weight Management

Bananas can be surprisingly helpful for weight management. Although they contain natural sugars, the fiber content helps promote a feeling of fullness, reducing overall calorie intake. Eating a banana as a snack between meals can curb unhealthy cravings for sweets or processed foods. Moreover, bananas have a low glycemic index, meaning they release sugar slowly into the bloodstream, avoiding rapid spikes in blood sugar levels. This makes them a smart choice for those managing weight or looking to maintain stable energy levels throughout the day.

6. Enhances Mood and Brain Function

Bananas contain tryptophan, an amino acid that the body converts into serotonin, often called the “feel-good hormone.” Serotonin plays a significant role in regulating mood, sleep, and even appetite. Regular consumption of bananas can, therefore, contribute to better emotional health and help reduce feelings of anxiety or depression. Furthermore, the vitamin B6 in bananas supports brain function by assisting in the production of neurotransmitters that regulate focus, memory, and cognitive performance. For students or professionals who need sustained mental energy, bananas can be a brain-boosting ally.

7. Natural Remedy for Hangovers and Heartburn

Bananas have been traditionally used as a natural remedy for hangovers and heartburn. The high potassium content helps replenish electrolytes lost during alcohol consumption, while the smooth, soft texture of the fruit soothes the digestive tract. Similarly, bananas can help neutralize excess stomach acid, providing relief from mild heartburn or acid reflux. Eating a banana in the morning after a night out or during a day of heartburn discomfort can be an easy, natural solution.

8. Versatility in Diet

Another reason bananas are so beneficial is their versatility. They can be eaten raw, blended into smoothies, baked into desserts, or even cooked in savory dishes. This flexibility ensures that everyone can include them in their diet in ways that fit their taste preferences and lifestyle. Additionally, bananas are naturally sweet, meaning they can replace processed sugars in many recipes, contributing to a healthier diet overall.

Conclusion

In summary, eating bananas is much more than enjoying a convenient and tasty snack. These fruits provide essential nutrients, improve digestive health, boost energy, support heart function, enhance mood, and even aid in weight management. Regular consumption of bananas is an easy, natural way to contribute to overall health and well-being. Next time you reach for a snack, remember that a simple banana might just be the most beneficial choice for both your body and mind.

Bananas truly are nature’s little energy-packed, nutrient-rich powerhouses, and including them in your daily diet can have lasting positive effects on your health. Whether you eat one every morning or blend them into a smoothie, the benefits of bananas are undeniable, proving that this humble fruit deserves its spot at the center of a healthy lifestyle.

Why do hotels always have a cloth across the bed

When you enter a hotel room, one of the first things you notice is the neatly made bed. The sheets are crisp, the pillows perfectly arranged, and often, a decorative strip of fabric stretches across the foot of the bed. This piece of cloth, commonly referred to as a bed runner, has become a standard feature in hotels worldwide. But why do hotels include it, and what purpose does it serve? While it might seem purely decorative, the reasons are a mix of practicality, hygiene, branding, and psychology.

1. Protecting the Bedding

One of the main reasons for placing a cloth across the bed is protection. Guests often place their luggage on the bed, and without a bed runner, the main sheets and duvet could become soiled. Bed runners are strategically positioned at the foot of the bed, which is usually the spot where people put their suitcases, bags, or even shoes temporarily. The runner acts as a protective barrier, preventing dirt, dust, and potential stains from reaching the pristine bedding. This simple layer saves hotels significant time and money in laundry costs, allowing housekeeping staff to focus on cleaning the runner rather than changing the entire bed.

2. Enhancing Room Aesthetics

Hotels operate in a highly competitive industry, and presentation matters. A well-designed bed can make the room feel luxurious and inviting. Bed runners add a splash of color, texture, or pattern that can complement the room’s overall design. While the sheets and comforters are usually neutral to appeal to a wide audience, the runner provides a visual accent, making the bed—and by extension, the entire room—look more stylish and finished. Interior designers often use runners to subtly reflect a hotel’s branding colors or to give a room a touch of elegance without overwhelming the space.

3. Signaling Cleanliness and Order

The presence of a bed runner also contributes to the perception of cleanliness. A neatly placed runner suggests that the hotel pays attention to detail and that the bedding underneath is fresh. It’s a visual cue that reinforces the idea that the room is well-maintained. Guests may not consciously notice this, but subconsciously, it adds to their sense of comfort and reassurance. In hospitality, such cues are important because they influence how guests perceive the quality of the establishment.

4. Psychological Impact

Interestingly, bed runners also have a subtle psychological effect on guests. The runner creates a sense of order and symmetry, which can make a room feel more organized and peaceful. This is particularly important in hospitality, where the goal is to make guests feel relaxed and at ease. A bed that looks inviting and carefully arranged can enhance the overall guest experience, contributing to positive reviews and repeat bookings.

5. Practical Use Beyond Decoration

Some hotels also use bed runners for practical purposes beyond protecting the bed. For example, in some boutique or luxury hotels, runners are placed so that guests can sit on them without disturbing the rest of the bedding. In situations where housekeeping hasn’t replaced the duvet after a guest’s short stay, the runner can cover up minor imperfections, keeping the room looking tidy. Essentially, it’s a multi-purpose tool that blends function with style.

6. Branding and Customization

Another reason for bed runners is branding. Many hotels customize runners with their logos or signature colors. This reinforces the hotel’s identity and creates a memorable visual impression. It’s part of a broader design strategy where every detail, no matter how small, contributes to the hotel’s image and guest perception. Luxury hotels, in particular, pay attention to these elements because they distinguish the brand from competitors and elevate the sense of exclusivity.

7. Flexibility in Room Themes

Hotel rooms often need to appeal to a wide range of guests, from business travelers to vacationing families. Bed runners provide a flexible design element that can be changed seasonally or updated without replacing the entire bedding. This allows hotels to refresh their rooms easily, giving a fresh look for holidays, special promotions, or seasonal themes, while keeping costs manageable.

8. Historical and Cultural Influence

The practice of using a bed runner also has historical roots. Traditionally, runners were used in luxury hotels and grand houses to protect expensive bedspreads from dirt while allowing guests to sit on the edge of the bed. Over time, this functional piece evolved into a decorative element, becoming standard in hotels around the world. While many modern hotels now use them mainly for aesthetics, the protective purpose remains relevant, especially in high-traffic rooms.

Conclusion

In summary, the cloth across a hotel bed serves multiple purposes that go far beyond mere decoration. It protects the bedding, enhances aesthetics, reinforces cleanliness, influences guest psychology, provides practical utility, supports branding, and allows flexible design updates. While many guests may view the bed runner as a small, decorative detail, it plays a significant role in hospitality management. It is a clever combination of style and functionality, demonstrating how even minor touches in hotel design can create a lasting impression.

Next time you see that colorful strip across the foot of the bed, you’ll know it’s not just for show—it’s a thoughtful element carefully chosen to protect, decorate, and elevate your hotel experience.

No bake Chocolate Eclair Cake

If you’re looking for a dessert that combines rich chocolate, creamy custard, and soft, pillowy layers—all without turning on your oven—look no further than the no-bake chocolate eclair cake. This dessert is a simplified version of the traditional French éclair, transforming it into a layered treat that’s perfect for gatherings, holidays, or even a simple family dessert. With minimal effort and maximum flavor, it’s no wonder that this no-bake delight has become a favorite in homes around the world.

What is a No-Bake Chocolate Eclair Cake?

Traditionally, eclairs are delicate pastries filled with custard or cream and topped with chocolate ganache. The no-bake chocolate eclair cake recreates those flavors using layers of store-bought graham crackers or ladyfingers, creamy vanilla custard, and a luscious chocolate topping. The magic lies in the simplicity: the crackers soak up the custard, creating a texture reminiscent of soft pastry, while the chocolate topping adds the perfect finish.

Unlike baked desserts, this cake doesn’t require complicated steps or precise oven temperatures. It’s assembled in a few easy layers and chilled until firm, making it accessible even to novice bakers or anyone short on time.

Ingredients You’ll Need

The beauty of this dessert is that the ingredients are simple and easy to find:

For the Custard Layer:

  • 1 package (3.4 oz) instant vanilla pudding mix

  • 2 cups cold milk

  • 8 oz cream cheese, softened

  • 1/2 cup granulated sugar

  • 1 teaspoon vanilla extract

  • 1 cup heavy whipping cream, whipped

For the Chocolate Topping:

  • 1 package (4 oz) semi-sweet chocolate, melted

  • 1/4 cup butter, melted

  • 1/4 cup powdered sugar (optional, for extra sweetness)

For the Layers:

  • 1–2 packages graham crackers (depending on pan size)

Optional: Whipped cream or chocolate shavings for garnish.

Step-by-Step Instructions

1. Prepare the Custard Layer:
In a large mixing bowl, combine the softened cream cheese and sugar. Beat until smooth and creamy. In another bowl, whisk together the instant vanilla pudding mix and cold milk until thickened. Slowly fold the pudding into the cream cheese mixture until fully combined. Finally, gently fold in the whipped cream for a light, airy texture. This mixture will form the indulgent, creamy base of your cake.

2. Layer the Graham Crackers:
In a 9×13-inch baking dish, lay down a single layer of graham crackers. Make sure the crackers cover the bottom completely, but don’t worry if there are small gaps—they will soften and meld together once the custard is added.

3. Add the Custard:
Spread half of your prepared custard mixture evenly over the graham crackers. Use a spatula to ensure the layer is smooth and reaches all edges.

4. Repeat Layers:
Add another layer of graham crackers on top of the custard, followed by the remaining custard mixture. Finish with a final layer of graham crackers. The layers don’t need to be perfect; the flavors and textures will merge beautifully as the cake chills.

5. Prepare the Chocolate Topping:
In a small bowl, melt the chocolate and butter together. You can do this in the microwave in 30-second intervals, stirring between each until smooth. If you like extra sweetness, mix in the powdered sugar. Pour the chocolate mixture over the top layer of graham crackers, spreading it evenly with a spatula. The chocolate will set as the cake chills, creating a glossy, decadent finish.

6. Chill the Cake:
Cover the cake with plastic wrap and refrigerate for at least 4 hours, or overnight if possible. During this time, the graham crackers will absorb the custard and soften, creating a texture similar to a baked pastry. The flavors meld together, resulting in a dessert that’s creamy, chocolatey, and irresistibly rich.

7. Serve and Garnish:
Once chilled, slice the cake into squares or rectangles. For a decorative touch, add whipped cream rosettes, chocolate shavings, or a drizzle of caramel on top. Each bite offers a perfect balance of creamy custard, soft graham crackers, and rich chocolate.

Tips for Success

  • Use full-fat ingredients for the richest flavor. Skim milk or low-fat cream cheese can affect the texture.

  • Layering matters: Ensure your graham crackers are completely covered with custard to avoid dryness.

  • Chilling is key: The cake tastes best when fully chilled, as this allows the layers to meld together and the chocolate topping to firm up.

  • Make ahead: This dessert can be made a day in advance, making it perfect for parties or family gatherings.

Variations and Add-Ons

  • Coffee flavor: Add 1–2 teaspoons of instant coffee or espresso powder to the chocolate topping for a mocha twist.

  • Fruit layer: Incorporate sliced bananas or strawberries between the custard layers for added freshness.

  • Nutty delight: Sprinkle chopped nuts, such as pecans or almonds, on top of the chocolate for crunch.

Why This Cake is a Crowd-Pleaser

No-bake chocolate eclair cake is a dessert that appeals to all ages. Its combination of chocolate and creamy custard satisfies any sweet tooth, while the soft graham crackers mimic a delicate pastry without the hassle of baking. It’s quick, easy, and forgiving, making it ideal for both experienced bakers and beginners.

The convenience of no-bake desserts is unmatched, especially during the hot summer months or when time is limited. This cake proves that you don’t need to spend hours in the kitchen to create something extraordinary.

Final Thoughts

Whether it’s a birthday celebration, a potluck, or a simple family treat, no-bake chocolate eclair cake is a dessert that promises indulgence with minimal effort. Its creamy layers, chocolatey topping, and soft texture make it irresistible, and its simplicity ensures anyone can create it successfully. Once you try this recipe, it’s bound to become a staple in your dessert rotation, delighting friends and family with every bite.

keto butter pecan pound cake

If you’ve ever dreamed of savoring a rich, buttery slice of pound cake without the carb overload, the Keto Butter Pecan Pound Cake is your answer. This luxurious dessert blends the nutty crunch of toasted pecans with the deep, indulgent flavor of real butter, creating a cake that tastes decadent while remaining low in carbs. Perfect for keto dieters, low-carb enthusiasts, or anyone who loves a sweet treat without guilt, this pound cake is a must-try.

Why Keto Pound Cake Works

Traditional pound cakes rely heavily on flour and sugar, which are high in carbs. A keto version replaces these with almond flour and a low-carb sweetener, keeping the texture soft and moist without spiking blood sugar. Butter and eggs form the backbone, providing structure and richness, while pecans add texture and flavor. The result is a cake that’s slightly denser than a conventional pound cake, but impossibly tender, buttery, and nutty—just as a classic should be.


Ingredients

To make a perfect Keto Butter Pecan Pound Cake, you’ll need the following:

  • 1 ½ cups almond flour – finely ground for a smooth texture

  • ½ cup coconut flour – adds structure and absorbs moisture

  • 1 cup unsalted butter, softened – real butter is essential for richness

  • 1 cup erythritol – or your preferred keto-friendly sweetener

  • 5 large eggs, room temperature – provides structure and moisture

  • ½ cup unsweetened almond milk – keeps the cake moist

  • 1 teaspoon vanilla extract – enhances flavor

  • ½ teaspoon almond extract – optional but adds a subtle nutty note

  • ½ teaspoon baking powder – helps the cake rise

  • ¼ teaspoon salt – balances sweetness

  • 1 cup pecans, chopped and lightly toasted – for flavor and crunch


Step-by-Step Instructions

1. Preheat and Prepare

Start by preheating your oven to 325°F (163°C). Grease a 9×5-inch loaf pan with butter or line it with parchment paper for easy removal. Toast the pecans in a dry skillet over medium heat for 5–7 minutes until fragrant, stirring frequently to prevent burning. Set aside to cool.

2. Cream the Butter and Sweetener

In a large mixing bowl, use an electric mixer to beat the softened butter with erythritol until light and fluffy, about 2–3 minutes. This step is crucial—it incorporates air, giving the pound cake a tender, airy crumb.

3. Add the Eggs

Add the eggs one at a time, beating well after each addition. Eggs provide structure and help the cake rise while keeping it moist. Mix in the vanilla and almond extracts for a burst of flavor.

4. Combine Dry Ingredients

In a separate bowl, whisk together almond flour, coconut flour, baking powder, and salt. Coconut flour absorbs a lot of moisture, so don’t skip it—it keeps the cake from being too dense. Gradually fold the dry ingredients into the butter mixture, alternating with almond milk. Begin and end with the dry ingredients, gently folding to maintain a light texture.

5. Fold in Pecans

Gently fold the toasted pecans into the batter. Save a few for topping if you want a decorative crunchy layer on top of your cake.

6. Bake

Pour the batter into your prepared loaf pan and smooth the top with a spatula. Bake for 55–65 minutes, or until the top is golden brown and a toothpick inserted into the center comes out clean. Keep in mind that almond flour cakes brown faster, so check at 50 minutes to prevent over-baking.

7. Cool and Serve

Allow the cake to cool in the pan for 15 minutes, then transfer to a wire rack to cool completely. This step is essential—keto pound cakes firm up as they cool, making them easier to slice without crumbling. Slice thick or thin, and serve as-is or with a pat of butter for extra indulgence.


Tips for Perfect Keto Pound Cake

  1. Room Temperature Ingredients: Butter and eggs at room temperature blend better and result in a smoother batter.

  2. Avoid Overmixing: Once you combine dry and wet ingredients, fold gently. Overmixing can make the cake dense.

  3. Sweetener Choice: Erythritol works well because it doesn’t affect blood sugar, but monk fruit sweetener or allulose are great alternatives.

  4. Storage: Wrap tightly in plastic wrap and store in the fridge for up to a week, or freeze slices for up to three months. Reheat slightly before serving for that just-baked taste.

  5. Add a Glaze: For extra indulgence, drizzle a sugar-free caramel or cream cheese glaze over the cooled cake.


Flavor Variations

  • Chocolate Pecan: Fold in ¼ cup unsweetened cocoa powder and ½ cup sugar-free chocolate chips.

  • Maple Pecan: Replace half the vanilla with sugar-free maple extract for a fall-inspired flavor.

  • Cinnamon Swirl: Mix 1 tablespoon cinnamon with 2 tablespoons erythritol and swirl into the batter before baking.


Final Thoughts

The Keto Butter Pecan Pound Cake proves that low-carb doesn’t mean low-flavor. Every bite is buttery, nutty, and satisfying, with a tender crumb that rivals any traditional pound cake. Perfect for afternoon tea, dessert after dinner, or a keto-friendly celebration cake, this recipe brings the indulgence you love without the carbs you don’t. With a few simple ingredients and a little care, you can enjoy a slice of pure bliss that’s guilt-free and irresistibly delicious.

Whether you’re new to keto baking or a seasoned low-carb chef, this pound cake is a versatile, fail-proof recipe to keep in your repertoire. Toasted pecans, real butter, and a touch of almond extract combine for a cake that’s rich, moist, and utterly unforgettable. Slice a piece, savor the flavor, and relish the fact that it’s low-carb, keto-approved, and absolutely delectable.

Lava Cake

Few desserts capture the essence of indulgence quite like the lava cake. Also known as molten chocolate cake, this heavenly treat combines the richness of a chocolate cake with the gooey pleasure of a molten center that oozes out like lava when you cut into it. Whether you’re a professional baker or a passionate home cook, mastering this dessert is a journey worth taking.

A Sweet History

The exact origin of lava cake is a topic of sweet debate among dessert enthusiasts. Many attribute its creation to French chef Michel Bras, who first introduced the concept of a chocolate cake with a liquid center in 1981. However, American chef Jean-Georges Vongerichten is often credited with popularizing the dessert in the 1990s, when he accidentally underbaked a chocolate cake, discovering that the center remained molten. Whatever its origin, the dessert quickly became a symbol of elegance and indulgence, frequently appearing in fine-dining restaurants around the world.

Ingredients That Make Magic

The magic of lava cake lies in its simplicity. Unlike many elaborate desserts, it requires only a handful of basic ingredients, but each one plays a crucial role in achieving the perfect texture:

  • High-quality chocolate: Use at least 60–70% cocoa for a rich, deep flavor. Semi-sweet chocolate also works well.

  • Unsalted butter: Adds creaminess and helps the cake hold its shape while keeping the center molten.

  • Eggs: Both whole eggs and egg yolks are used. The yolks add richness, while the whites help the cake rise slightly.

  • Sugar: Balances the bitterness of chocolate without overpowering it.

  • Flour: Just a small amount is needed to provide structure without making the cake dense.

  • Optional flavorings: A pinch of salt, a splash of vanilla extract, or a teaspoon of espresso powder can enhance the chocolate flavor.

The simplicity of these ingredients makes lava cake accessible to both beginners and seasoned bakers.

Step-by-Step Recipe

Creating the perfect lava cake requires attention to timing and temperature. Here’s a detailed guide:

Ingredients (Serves 4)

  • 100 g (3.5 oz) dark chocolate

  • 100 g (3.5 oz) unsalted butter

  • 2 whole eggs

  • 2 egg yolks

  • 50 g (1/4 cup) sugar

  • 25 g (2 tbsp) all-purpose flour

  • Pinch of salt

  • Butter and cocoa powder for greasing ramekins

Instructions

  1. Preheat your oven to 220°C (425°F). Grease four ramekins with butter and dust with cocoa powder to prevent sticking.

  2. Melt chocolate and butter together in a heatproof bowl over a pot of simmering water (double boiler method), stirring until smooth. Remove from heat and let it cool slightly.

  3. Whisk eggs and sugar together in a separate bowl until pale and frothy. This step ensures a light texture.

  4. Combine the chocolate mixture with the eggs, gently folding them together. Avoid overmixing to keep the cake tender.

  5. Sift in the flour and salt, folding gently until fully incorporated. The batter should be smooth and glossy.

  6. Divide the batter evenly among the prepared ramekins. Place them on a baking sheet.

  7. Bake for 10–12 minutes. The edges should be set while the centers remain soft. Baking times may vary slightly depending on your oven.

  8. Remove from oven and let the cakes rest for 1–2 minutes. Carefully invert onto plates. The molten center should flow out when you cut into the cake.

Serving Suggestions

Lava cake is a canvas for creativity. Traditionally, it is served warm with a dusting of powdered sugar. Other popular accompaniments include:

  • Vanilla ice cream: The contrast of warm cake and cold ice cream is irresistible.

  • Fresh berries: Strawberries, raspberries, or blueberries add a tart, fresh note.

  • Whipped cream: Light and fluffy, it balances the richness of chocolate.

  • Caramel or raspberry sauce: Adds an extra layer of flavor and elegance.

Tips for the Perfect Lava Cake

  1. Use quality chocolate: The flavor depends heavily on chocolate, so choose a brand you love.

  2. Don’t overbake: Timing is crucial. Overbaking will result in a fully set cake, losing the molten center.

  3. Room temperature eggs: They incorporate more easily into the chocolate mixture, giving a smoother batter.

  4. Prepare ramekins carefully: Properly greasing and dusting prevents sticking and ensures a perfect release.

  5. Serve immediately: Lava cake is best enjoyed fresh out of the oven when the center is perfectly molten.

Why Lava Cake Is Universally Loved

Lava cake appeals to multiple senses: the rich aroma of chocolate, the delicate texture of cake, and the dramatic reveal of molten chocolate flowing out. It’s versatile too—it can be served at formal dinners, romantic evenings, or casual family gatherings. Its visual appeal and decadent flavor make it a dessert that leaves a lasting impression.

Moreover, lava cake embodies the joy of indulgence without being overly complicated. With just a few ingredients and some attention to technique, anyone can create a dessert that feels gourmet yet comforting.

Conclusion

The lava cake is more than just a dessert; it’s an experience. From the first spoonful of warm, molten chocolate to the lingering sweetness on your palate, it celebrates the joy of chocolate in its purest form. By mastering the balance of rich cake and liquid center, you can transform a few simple ingredients into a show-stopping dessert that delights every chocolate lover. Whether served with ice cream, berries, or a drizzle of sauce, lava cake remains an iconic treat that never fails to impress.

So, the next time you crave a dessert that’s both elegant and indulgent, give lava cake a try. With its molten heart and decadent flavor, it promises to satisfy even the most serious chocoholics.